Overview
Each ReportWORQ Job is based on one or more source reports that are added from a ReportWORQ Report Provider. When you create a Job, you add and configure source reports to specify how they are to be processed into Job output and delivered to report consumers.
When the Job runs, data filters are applied, report data is refreshed, report outputs are generated in selected file formats, and the resulting reporting packet is distributed by one or more supported means. You can run Jobs ad-hoc or schedule them to run at specified times.
Navigation
ReportWORQ Jobs are stored in a tree structure using folders, as shown below.
.png)
This structure is useful for organizing reporting jobs and for executing multiple jobs concurrently. Jobs can be run by right-clicking the job or folder and selecting "Run". The navigation tree supports drag & drop to reorganize context menus, and common keyboard shortcuts such as Enter to open a job, Delete, Ctrl+X, Ctrl+C, and Ctrl+V (cut, copy, and paste). Double-clicking on a job will open it in the editor. Folders and jobs can be created using context menu actions or the buttons below the navigation tree. Note that multiple jobs can be open simultaneously with each job appearing on a separate tab at the top of the content pane. The navigation pane can be collapsed to provide more room for editing jobs by using the splitter bar or the left chevron button to the top right of the navigation tree.
Editing Jobs
After navigating to the Edit Jobs screen, an existing job can be edited by either double-clicking the job or selecting Open on the context menu. Jobs that are open for editing will appear in the tab view at the top of the page. The context menu on the tab provides options to Save, Discard, Rename, and Close the job, and to copy the job path to your clipboard. Any modifications to a job place the job in an edited state, which is indicated by an asterisk beside the tab name.

ReportWORQ supports concurrent users. If a job is open in the editor and another user is modifying or has saved changes to the same job, a warning triangle will indicate that the current job editor is displaying stale content. The editor can be closed and re-opened to view the latest copy, or saved to overwrite the other user's work.
If there are unsaved changes, the Save Changes button at the bottom right corner of the content pane is available. You must save changes to make them permanent. Alternatively, you can Discard Changes.
Configuring Reports
After you open a Job, you can add and configure one or more source reports.
To add source reports:
Select the Reports tab and then click the Add a Report button
 at the bottom of the content pane.
The Select a Report dialog appears.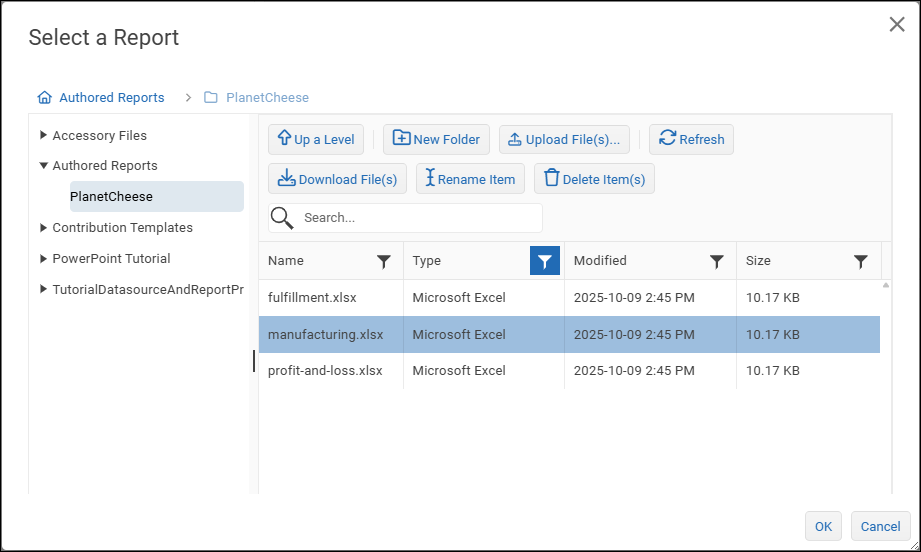
Use features of the Select a Report dialog to find and select the source report(s) you want to add, and then select OK.
The report(s) are added to the Job.
Note: For IBM Planning Analytics Report Providers, the navigation tree for selecting source reports shows the Database name as configured in Planning Analytics, rather than the Datasource name specified in ReportWORQ.
Tip: The Select a Report dialog includes special features to help you locate and select source files. In this dialog, you can:Navigate the folder structure at left or by using the Up a Level button.

Perform a text search for the report and/or filter
 the list of reports by column values.
Create a new folder.

Specify a folder name and then select OK.Upload one or more files.

Browse to select one or more files and then select Open.Download one or more files by selecting them, then selecting the Download Files button.

The files appear in your Downloads folder.Refresh the list of files.

Rename the selected file or folder.

Specify a new name for the file or folder.Delete the selected file or the selected folder and its contents.

When prompted to confirm the deletion, select OK.
Source reports are typically Microsoft Excel files (.xlsx). These reports may contain Excel formulas, proprietary ReportWORQ formulas, supported data source formulas, or data source-specific report specifications such as IBM PAfE, Anaplan, Workday Adaptive Office Connect, and Oracle SmartView.
Formulas in Excel source reports can reference data from other Excel workbooks, but only if those workbooks are in the same folder as the source report, within the Network Share Report Provider. ReportWORQ cannot reference data from other workbooks via SharePoint URLs in the source report.
If Job output is to be delivered as a PDF, you can also add PDF files (.pdf), Word documents (.docx), and PowerPoint presentations (.pptx) as source reports. The contents of these source reports are added to the Job’s PDF output. The data and other contents of non-Excel source reports cannot be modified in ReportWORQ.
After you add a report, ReportWORQ lists the worksheets contained in the report. In the following example, the report name is Tutorial_P&L, and the worksheets are P&L, Data, Regions, and Lookup.
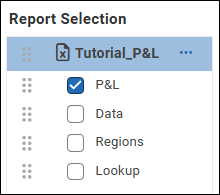
Source reports and their worksheets can be reordered to achieve the desired output. Note that worksheets within a report do not need to be ordered consecutively, rather they can be placed at any location before or after other reports. Worksheets to be excluded from the output file are unchecked. Excluded worksheets remain in the file during calculation and will be removed before distribution allowing the user to utilize excluded worksheets for data retrieval, commentary, and imagery in the distribution step. PDF reports that are added as source reports are treated as static files which can only be reordered in the reporting packet.
For each report, there is a menu of options which you can access by selecting the ellipsis beside the report name.
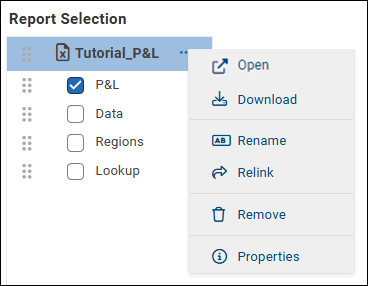
The options are as follows:
Open — Opens the source report.
Download — Downloads a copy of the source report.
Rename — Enables you to rename the report, within the context of the current job.
Relink — Enables you to select a different source file for the report.
Remove — Deletes the report form the job. The source report file remains.
Properties — Opens the Report Properties pane.
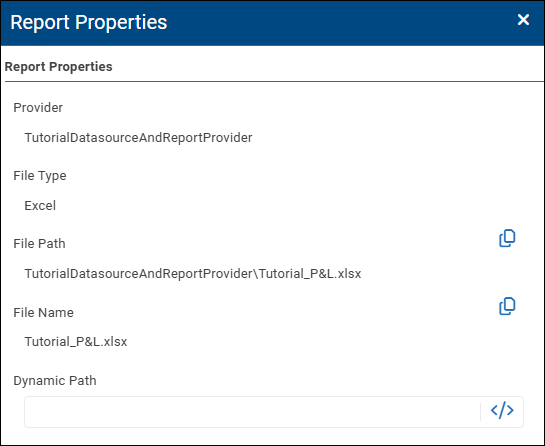
Report properties are as follows:Provider — The name of the Report Provider.
File Type — The type of report file, either Excel (.xlsx) or PDF (.pdf).
File Path — The path to the report file, including report provider, file name, and file extension.
Tip: To copy the path to your clipboard, select the Copy icon.
File Name — The name of the report file.
Tip: To copy the path to your clipboard, select the Copy icon.Dynamic Path — Enables you to select a parameter that specifies the file path.
A dynamic path can be specified for Distribution Jobs but not Contribution Campaigns.
If a source report Excel workbook or worksheets are password-protected, they will also be protected in Excel output files generated by ReportWORQ. The same password applies.
Reports are selected from one of the supported and configured source Report Providers.
Each worksheet in the Microsoft Excel file may be configured with options to alter the behavior of the creation, inclusion, and placement of the worksheet in the final output.
Sheet Name
Worksheets can be dynamically renamed with literal text including parameter values or from a calculated cell on the worksheet. This is necessary when parameters are used to replicate worksheets. Literal text can be used to name the worksheet using text combined with the parameter values for the worksheet. A cell reference may be used to rename the worksheet based on an Excel cell formula post-calculation. For example, suppose a parameter for Region is added to this worksheet and this parameter contains values for West, Central, and East. When ReportWORQ creates three copies of this worksheet this option can be used to name those worksheets by the same value as the parameter. If it is preferred to calculate the worksheet name with an Excel formula or load the sheet name from a data source, then use the Cell Reference option. In this scenario, ReportWORQ will name the worksheet based on the value of the specified Cell Range after the calculation has occurred.
PDF Parent Bookmark
A parent bookmark name for a worksheet can be based on literal text including parameter values, or from a calculated cell on this worksheet. When a report is exported to PDF, ReportWORQ will automatically create a 3-tier bookmark tree. The root node is specified in Distribution Options, the second tier, by default, is the name of the Report that the worksheet came from, and the third tier is the name of the worksheet. This option allows you to specify a custom value for the second tier. Siblings with the same parent will be grouped in the PDF bookmark tree.
Sheet Tab Color
The worksheet tab color can be set dynamically based on a calculated cell in the worksheet. The worksheet tab color can be specified based on a cell formula. The formula must return a named color (e.g., Red, Blue) or hex code beginning with a pound sign (e.g., #333333). The supported color names are listed in Microsoft documentation.
Sheet Suppression
Automation can be used to dynamically delete worksheets if they contain a supported planning report or are based on a calculated cell in the worksheet. Worksheets can be removed post-calculation based on a cell formula or automatically if the worksheet contains a provider report which does not return any data. The cell's formula must return TRUE to delete the worksheet or FALSE to retain it. Typically, this formula contains the SUMSQ of a range to determine if there is data on the worksheet. It can however be any condition. For example, the worksheet can be removed if the data does not exceed a certain threshold.
Output Order
Worksheets can be ordered manually using a specified integer value or from a cell on this worksheet. The Manual Output Order feature is an advanced feature designed to provide full control over the order of worksheets. Most ordering requirements are met using the group & collation feature in the Parameters sidebar. This option can be used to provide custom sort sequences, determined using formulas and lookups in Excel.
Exception Check
Exception check will dynamically determine whether to send reports based on calculated cell from a worksheet. If one or more Exception Cells are specified, then at least one must evaluate to a TRUE for the report to be sent. The exception check feature can be used on multiple worksheets. If at least one of the worksheets evaluates to a true, then the report is sent. If they all evaluate to a false, then the report is not sent. An example of why a user may want to do this is that they only want to send reports to managers that are over budget.