Overview
ReportWORQ provides two different paths to distribute messages, images and files to Microsoft Teams.
Direct distribution to Teams from ReportWORQ will send messages and files to both individual chats and channels. The sender in Teams will appear as the App Registration's authenticated user. If this distribution method is selected, it is suggested that a Microsoft 365 service account is created for distribution purposes.
Bot distribution to Teams from ReportWORQ will send messages and links to files exclusively to chats However, channels are not supported by the bot. The sender in Teams will appear as the ReportWORQ Teams Bot. Because of file distribution limitations for Teams Bots, ReportWORQ is required to securely store files in QueBIT's Azure cloud tenant temporarily until the recipient has retrieved the file. These files are removed after they have been retrieved or after 7 days.
Configuration
The following step must be performed before enabling ReportWORQ to integrate with Teams Direct Distribution:
Create an Azure App Registration that shares the same Tenant as the SharePoint instance.
To add Teams Direct Distribution to the list of available distributors, ReportWORQ administrators open the Administration screen, navigate to the Distributors section, select the Teams Distributor to open the configuration screen on the right side of the window, then select the Teams Direct Authentication Provider option: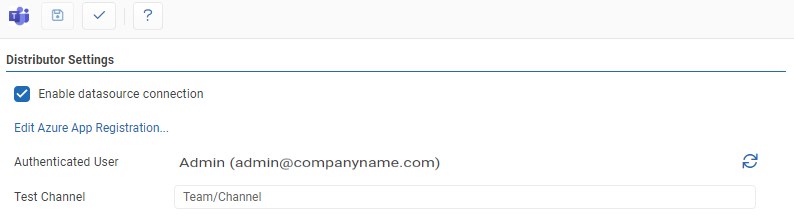
Authentication Provider: This allows you to select between Direct or Bot distribution. Select 'Teams Direct'.
Authenticated User: After App Registration configuration, this field will show the authenticated user.
Test Channel: The Team and Channel (should be formatted as 'Team/Channel') to send a test message to when the '✓' button is clicked.
Test: Clicking the '✓' button will either display a success message or show error messages with further information on missing or misconfigured settings.
Save: the 'Save' button saves changes made to the distributor settings.
The Teams Distributor can be enabled or disabled by clicking the checkbox.
You will also need to Edit the Azure App Registration:
1. Click the 'Edit Azure App Registration...' link.
2. Enter the Client ID, Tenant ID and Secret obtained from step 1.
3. For the Graph API, click the 'Authenticate...' link.
4. After authentication, confirm that the Teams Distribution item under the Graph API section shows as configured.
5. Navigate back to the Teams Distributor settings and test the connection.