
Overview #
Reportworq supports several automation options that can be used to run Reportworq Jobs from other scheduling platforms, scripting languages, and applications. Reportworq’s automation is not meant to duplicate or replace any of Reportworq’s scheduling capabilities, but rather solve additional automation problems that are not as simple as running at a preset time. For example, if a Reportworq Job needs to be run after the day’s sales have been successfully loaded to the data warehouse, that may be a task that is best automated as part of the same process that refreshes data in the data warehouse.
Reportworq administrators can open the Administration screen from the Administration button on the top right side of the page and edit Reportworq API settings.
The available Automation options are:
- Local API: Exposes a REST API endpoint used to run Reportworq Jobs and obtain Job information.
- Cloud API: Helps relay Reportworq API commands to the Reportworq server from external automation integration providers, such as Workato and Zapier.
Configuring Automation Providers #
Reportworq’s supported automation options can be enabled or disabled by selecting the checkbox on the Reportworq API screen:
Disabling an integration will shut it down.
Local API #
The Reportworq Server optionally exposes a REST API endpoint for running jobs and obtaining job information. All API commands support the POST method, and some commands support the GET method. Request and response bodies are in JSON format.
This topic covers:
- Configuring the REST API
- Calling the REST API:
- Reportworq REST API Documentation
- Ping – (GET, POST) Used to determine if the Reportworq Service is running
- List – (GET, POST) Used to list the jobs that are available for execution
- Run – (POST) Used to run a job
- Status – (POST) Used to determine the current status of a specific job execution
- Cancel – (POST) Used to determine to cancel a specific job execution

Configuring the Reportworq REST API #
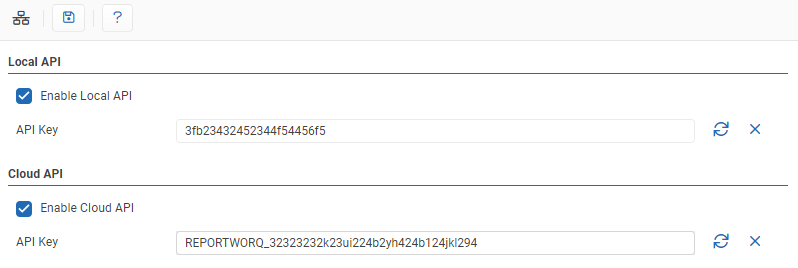
Reportworq administrators can open the Administration screen and then select the Reportworq API page from the left-hand side:

- API Key: This is a token that is unique to your Reportworq Server instance, and should only be shared with developers who build any automated processes or applications using the Reportworq API. The token is required for each call made to the Reportworq API. You may manually set this token value, for instance when upgrading from an earlier release or migrating to a new server where you need to continue using the same token in existing automation processes.
- Generate new API Key: This button will generate a new unique token, replacing the existing one.
- Save: The ‘Save’ button saves changes made to the settings.
- The Local API can be enabled or disabled by clicking the checkbox.
The Access token is required for every call to the Reportworq API, and its usage is described in more detail below.

Calling an On-Premise Reportworq REST API #
The Reportworq REST API is designed to be called from within the local network to execute any of the supported commands.
The REST Endpoint is: http://{server address}:{server port}/api/v1/{command}
e.g. https://localhost:8300/api/v1/list
Authorization is managed by providing the Reportworq Server Access Token documented above. There are two ways to provide the Access Token:
- Within an accessToken header value.
- Within an accessToken query string value.
Using the token in the query string is less secure but is helpful when using the GET version of the API methods.
Sample GET Request with Access Token in the header:
GET https://my-server.company.internal:8300/api/v1/list
Content/Type: application/json accessToken:abcdefg123
Sample GET Request with Access Token in the query string:
GET https://localhost:8300/api/v1/list?accessToken=abcdefg123Sample POST Request:
POST https://localhost:8300/api/v1/run
Content/Type: application/json accessToken:abcdefg123
{  "jobName":"Sample Job"  }
Sample Response:
Content/Type: application/json
{
  "jobs":
    [
      "Sample Job",
      "Run Sales Reports"
    ]
  }
Data Provider-Specific REST API Integrations #
Datasources supported by Reportworq have some product features that enable calling out to the Reportworq API, for example:
- IBM Planning Analytics Turbo Integrator
Please refer to data provider-specific topics for more information.
Integrating with External Services #
The Reportworq REST API is designed to be called from within a local network, but it can also be integrated with specific cloud services, such as Workato & Zapier, using a hosted API Proxy (called the Reportworq Cloud Connector). The connector, once configured with your local Reportworq Server, relays the same Reportworq REST API commands documented here to your Reportworq instance.
More detailed documentation on configuring your Reportworq Server to accept Reportworq REST API commands from external sources can be found in the Reportworq Cloud automation topic.
Reportworq REST API Commands #
The following sections document the request and response formats for all supported Reportworq API commands. Any accessToken (local network) and apiKey (external, cloud-to-cloud) authorization headers are omitted from these examples but are required as documented above for local network and external, cloud-to-cloud connections.

Ping Command
Used to determine if the Reportworq REST API is running. This method returns a status 200 with a message in the body if the service is available.
Supports: GET, POST
Request
POST http://localhost:8200/api/v1/ping
{}
Response
Content/Type: application/json
{
  "message": "Pong"
}
List Jobs Command
Used to list the jobs that are available for execution. The result will return a JSON object with a list of job names. These job names can be used with the Info and Run commands.
Supports: GET, POST
Request
POST http://localhost:8200/api/v1/list
{}
Response
Content/Type: application/json
{
  "jobs":[    "Sample Job",    "Run Budget Reports"  ]
}
NOTE: a new “includePath” query string option has been included in Reportworq 5 to optionally display the full path to each job in the list of returned job names, for example:
Request
POST http://localhost:8200/api/v1/list?includePath=true
{}
Response
Content/Type: application/json
{
  "jobs":[    "Reports/Templates/Sample Job",    "Reports/Monthly/Run Budget Reports"  ]
}
Job Run Command
Used to run a job. The request requires the name of the job to be run. The command also supports an optional JSON array of parameter overrides and an optional semi-colon delimited list of email addresses for notification. The result contains a jobId which can be used by the Status and Cancel API methods.
Supports: POST
Request
POST http://localhost:8300/api/v1/run
{
  "Name": "Goal Job",
  "Notification": "admin@rw.com",
  "HoldForDelivery": false,
  "Parameters": [
    {
      "Name": "Business Unit",
      "Value": "US;Canada",
      "Type": "list",
      "Dimension": "BusinessUnit",
      "Delimiter": ";"
    }
  ]
}
Response
Content/Type: application/json
{
   "message": "The job 'Goal Job' is running.",
   "jobId": "f943029d31564dd8b2bd59f6b25706fc"
}
Complete JSON Specification
The full JSON specification can be found below. However, only specific properties are required for each Parameter Override type. Please see the follow-up examples for more detail.
{
  "Name": "MyJob01",
  "Notification": "admin@rw.com",
  "HoldForDelivery": false,
  "Parameters": [
    {
      "Type": "list",
      //Valid Types: "list", "subset", "mdx", "mdxrepeater", "sql", "adaptive"
      "Name": "MyOverrideParameter01",
      "Value": "FY 2003 Budget;FY 2004 Budget", //Value will vary depending on Parameter Override type. (See examples below)
      "Server": "Planning Analytics Cloud", //Valid for: Subset, MDX, MDXRepeater
      "Dimension": "plan_version", //Valid for: Subset, MDXRepeater, Adaptive (Attribute), Adaptive (List)
      "Alias": "MyAlias", //Valid for: MDX, MDXRepeater
      "RepeatParameter": "MyRepeatParameter", //Valid for MDXRepeater
      "Connection": "MySQLConnectionName", //Valid for: SQL
      "BurstType": "attribute"//Valid Types: "list", "attribute"",
      "DisplayType": "details", //Valid Types: "details","consolidation","detailsAndConsolidation"
      "Delimiter": ";" //Valid for: List, Adaptive (List)
    }
  ]
}
Example: Basic Job Execution
The following example demonstrates the specification required to simply run a job without any parameter overrides.
{
  "Name": "MyJob01",
  "Notification": "admin@rw.com",
  "HoldForDelivery": false,
  "Parameters": []
}
Example: List Parameter Override
The following example demonstrates the specification required to override an existing parameter with a semi colon delimited list type parameter.
{
  "Name": "MyJob01",
  "Notification": "admin@rw.com",
  "HoldForDelivery": false,
  "Parameters": [
    {
      "Name": "MyOverrideParameter01",
      "Value": "FY 2003 Budget;FY 2004 Budget",
      "Type": "list",
      "Delimiter": ";"
    }
  ]
}
Example: Subset Parameter Override
The following example demonstrates the specification required to override an existing parameter with a named subset type parameter.
{
  "Name": "MyJob01",
  "Notification": "admin@rw.com",
  "HoldForDelivery": false,
  "Parameters": [
    {
      "Name": "MyOverrideParameter01",
      "Value": "All",
      "Type": "subset",
      "Server": "Planning Analytics Cloud",
      "Dimension": "plan_version"
    }
  ]
}
Example: MDX Parameter Override
The following example demonstrates the specification required to override an existing parameter with an MDX expression type parameter.
{
  "Name": "MyJob01",
  "Notification": "admin@rw.com",
  "HoldForDelivery": false,
  "Parameters": [
    {
      "Name": "MyOverrideParameter01",
      "Value": "{TM1FILTERBYLEVEL( {TM1SUBSETALL( [plan_version] )}, 0)}",
      "Type": "mdx",
      "Server": "Planning Analytics Cloud",
      "Alias": "MyAlias"
    }
  ]
}
Example: MDX Repeater Parameter Override
The following example demonstrates the specification required to override an existing parameter with an MDX repeater type parameter. This requires both the override and repeat parameter to exist.
{
  "Name": "MyJob01",
  "Notification": "admin@rw.com",
  "HoldForDelivery": false,
  "Parameters": [
    {
      "Name": "MyOverrideParameter01",
      "Type": "mdxrepeater",
      "Value": "{ DRILLDOWNMEMBER ( {[plan_business_unit].[%ELEMENT%]}, {[plan_business_unit].[%ELEMENT%]} )}",
      "Server": "Planning Analytics Cloud",
      "Dimension": "plan_version",
      "Alias": "BusinessUnit",
      "RepeatParameter": "Business Unit"
    }
  ]
}
Example: SQL Parameter Override
The following example demonstrates the specification required to override an existing parameter with a SQL expression type parameter.
{
  "Name": "MyJob01",
  "Notification": "admin@rw.com",
  "HoldForDelivery": false,
  "Parameters": [
    {
      "Name": "MyOverrideParameter01",
      "Value": "Select Name from MyTable Where Year = 1969",
      "Type": "sql",
      "Connection": "My ODBC Connection",
    }
  ]
}
Example: Adaptive (List Burst Type) Parameter Override
The following example demonstrates the specification required to override an existing parameter with a Workday Adaptive type parameter which uses the List Burst Type.
{
  "Name": "MyJob01",
  "Notification": "admin@rw.com",
  "HoldForDelivery": false,
  "Parameters": [
    {
      "Name": "MyOverrideParameter01",
      "Value": "Level1;Level2",
      "Type": "adaptive",
      "Dimension": "Levels",
      "BurstType": "list",
      "DisplayType": "details",
      "Delimiter": ";"
    }
  ]
}
Example: Adaptive (Attribute Burst Type) Parameter Override
The following example demonstrates the specification required to override an existing parameter with a Workday Adaptive type parameter which uses the Attribute Burst Type.
{
  "Name": "MyJob01",
  "Notification": "admin@rw.com",
  "HoldForDelivery": false,
  "Parameters": [
    {
      "Name": "MyOverrideParameter01",
      "Value": "AutomationAttributes:Attribute01",
      "Type": "adaptive",
      "Dimension": "Levels",
      "BurstType": "attribute",
      "DisplayType": "DetailsAndConsolidation"
    }
  ]
}
Example: Using multiple parameter override types in the same request
The following example demonstrates the specification required to override multiple existing parameters with the same ‘run’ API call.
{
  "Name": "MyJob01",
  "Notification": "admin@rw.com",
  "HoldForDelivery": false,
  "Parameters": [
    {
      "Name": "MyOverrideParameter01",
      "Value": "FY 2003 Budget;FY 2004 Budget",
      "Type": "list",
      "Delimiter": ";"
    },
    {
      "Name": "MyOverrideParameter02",
      "Value": "All",
      "Type": "subset",
      "Server": "Planning Analytics Cloud",
      "Dimension": "plan_version"
    }
  ]
}
Example: Overriding job file format options or distribution options
Supported output types: excel/pdf/powerpoint/csv
Supported distribution types: file/email/sharepoint/sheets(google)/slack/teams
Delimiter: ‘;’
If ConvertPowerPointToPdf parameter is true, PowerPoint output is converted to PDF. If false, PowerPoint output is not converted to PDF. Parameter is optional. If not present, PowerPoint output is exported as configured in the job.
The following example demonstrates the specification required to override file format or distribution options with the same ‘run’ API call.
{
  "Name": "MyJob01",
  "Notification": "admin@rw.com",
  "HoldForDelivery": false,
  "Parameters": [
    {
      ...
    }
  ],
  "AllowedOutputFileTypes": ["excel", "pdf", "powerpoint"],
  "AllowedDestinationTypes": ["file", "sharepoint"],
  "ConvertPowerPointToPdf": ["true"]
}
Job Run Status Command
Used to determine the current status of a specific job execution. The request body provides the jobId to obtain status for. The response provides state and progress information which can be used to track the job execution.
Supports: POST
Request
POST http://localhost:8200/api/v1/status
{
   "jobId": "f943029d31564dd8b2bd59f6b25706fc"
}
Response
Content/Type: application/json
{
   "jobId": "f943029d31564dd8b2bd59f6b25706fc",
   "name": "Goal Job",
   "status": "Success",
   "start": "3/19/2021 2:00:11 PM",
   "elapsed": "00:00:15",
   "progress": 100,
   "logReport": "The job 'Goal Job' succeeded.\r\nElapsed Time 0.00:00\r\nStep: Goal Reporting Packet\r\nStatus: Success\r\nFormulas Processed: 40 - 40 Success, 0 Errors\r\n\r\n\r\n"
}
Job Run Cancel Command
Used to cancel a specific job execution. The request body requires the jobId being canceled.
Supports: POST
Request
POST http://localhost:8200/api/v1/cancel
{
  "jobId": "f943029d31564dd8b2bd59f6b25706fc"
}
Response
Content/Type: application/json
{  "message": "Success"
}
Cloud API #
The Reportworq Server is normally configured to run inside a corporate network, behind firewalls and other security measures designed to prevent attempts by unauthorized users to access applications within the network. It may be helpful, in some cases, to allow specific 3rd parties or other external services outside the corporate network to connect to and integrate with applications like Reportworq and its API to support the automation such as executing Reportworq Jobs from Workato.
The Reportworq Cloud Connector is designed to solve this external, or cloud-to-cloud, automation problem. When enabled, the Reportworq Server registers with an Azure-hosted API Proxy service (the Reportworq Cloud Connector). A unique Reportworq Cloud connector API token “secret” is generated and used to establish the trusted connection between external requests and the Reportworq REST API. This approach’s advantage is simple: no dedicated VPN tunnels or complex firewall rules are required to maintain the solution, but Reportworq is still secured behind a secret API token and is never directly exposed to the internet.
This topic covers:
- Configuring Reportworq Cloud Automation
- Calling the Reportworq API via the Cloud Connector
- Cloud Connector Maintenance Windows
- Sample Cloud Connector Solutions
- Workato Integration
Configuring the Reportworq Cloud Connector #
Prerequisites
To support the external/cloud-to-cloud communication required by the Reportworq Cloud Connector, the Reportworq Server must be installed on a server with internet access. The Reportworq Server must also be able to send outbound traffic via port 443 (HTTPS :), which may require opening that outbound port in the firewall.
Please Note
Although the Reportworq Server needs to communicate with the Cloud Connector over the internet, the Reportworq Server itself does not need to be accessible from the internet. The connection between the Cloud Connector and the Reportworq Server is established by the Reportworq Server using a socket. The open socket enables the Cloud Connector to relay API commands to Reportworq.
Configuration
Reportworq administrators can open the Administration screen and then select the Reportworq API page from the left-hand side:
- Cloud API: This is a token that is unique to your Reportworq Server instance, and should only be shared with developers who build any automated processes or applications using the Reportworq Cloud Connector & Reportworq API. The token is required for every call made to the Reportworq Cloud Connector. You may manually set this token value, for instance when upgrading from an earlier release or migrating to a new server where you need to continue using the same token in existing automation processes.
- Generate new API Key: This button will generate a new unique token, replacing the existing one.
- Save: The ‘Save’ button saves changes made to the settings.
- The Cloud API can be enabled or disabled by clicking the checkbox.
The Cloud API key is required for every call made to the Reportworq API through the Reportworq Cloud Connector, and its usage is described in more detail below.
Changing API Access Tokens
Changing the “Reportworq Cloud API Access” token will impact existing automation processes that use the Reportworq REST API via the Cloud Connector, since only one token can be active at a time, per Reportworq Server instance.
Calling the Reportworq REST API via the Cloud Connector #
Authorization is performed by providing the Reportworq Cloud Connector Token in the header of the request or the request query string. Making Reportworq REST API calls via the Reportworq Cloud Connector is identical to making those same calls from the local network, except that the URL endpoint used is different. These differences are documented in more detail, along with all REST API commands, in the Reportworq API topic.
Cloud Connector Maintenance Windows #
Scheduled maintenance for the Production Cloud Connector, which is hosted in Microsoft Azure, may take place during the following maintenance windows listed below. During these maintenance periods, the Cloud Connector may be unavailable or in the process of restarting. Cloud Connector updates are first tested in a development environment and then pushed to production with an expected downtime of fewer than 5 minutes. It is recommended that any automated schedules avoid these time windows, where possible, to avoid interruptions:
- Weekdays: 9 PM to 10 PM EST
- Weekends: 9 AM to 12 PM EST
Sample Reportworq Cloud Connector Solutions #
External Reportworq REST API Integration using the Reportworq Cloud Connector can enable automation solutions like the following:
- Automated processes using Workato Integration with Reportworq.
Workato Integration #
Workato is a platform for process automation designed around intuitive, pre-built integrations. Within the Workato platform, a user can configure individual recipes that automate a single process. Workato users have access to a variety of pre-defined apps that can be used, for example, to make API calls, send emails, or post to a slack channel. There is a Workato custom connector for Reportworq that can be used to automate Reportworq Rest API calls, which is described in more detail below.
Workato Prerequisites
To use the Workato Integration you must first enable and configure both the Reportworq Cloud Connector and the Reportworq API.
Building a Workato Recipe with Reportworq
To begin, you will need to install the Reportworq connector in Workato by navigating to the Community Library page located at the top of the screen, and clicking on the Custom connectors tab. On this page, use the search bar to find Reportworq and then install the app.
To make use of the app you must set up a connection to Reportworq in Workato. This can be done by creating a new connection within a project folder, or a connection can also be configured within a recipe. To set up a connection within a project folder, click on the desired folder and navigate to the drop-down menu next to the “Create Recipe” button. Click on the “Create Connection” option which will direct you to the setup screen. To create the connection you must enter your Reportworq Cloud API Token created for the Reportworq Rest API cloud connection.
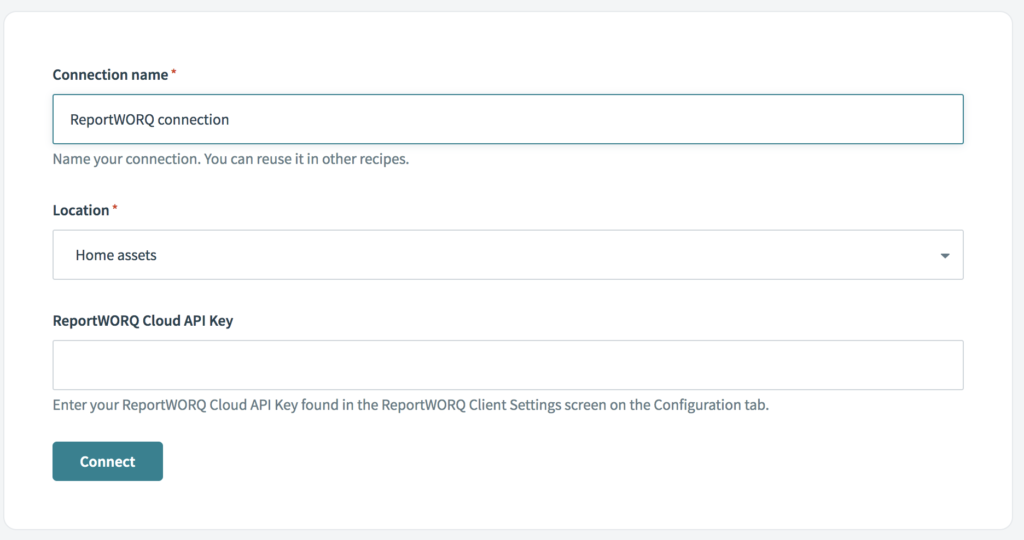
Once the connection is established, the Reportworq app can be used in your Workato recipes.
Reportworq Connector Supported Actions
The Reportworq custom connector defines six actions that can be used in recipes, which mirror commands available in the Reportworq REST API.
Cancel job
Cancels a specific job execution. This action takes in a jobId input which can be obtained from the output of running a job.
List jobs
Lists the jobs that are available for execution. This action returns a list of job names that can be used as inputs for further actions within the recipe.
Check server status
Tests if the Reportworq Server is running. This action will return True if the server is up. Workato will test the Reportworq connection before running a recipe that makes use of the app. If the server is down, Workato will not allow the recipe to run.
Run asynchronous job
Runs a Reportworq job. The action can take in a variety of inputs (described in more detail under “Run synchronous job”) and will then run the job in Reportworq. The action returns the created jobId which can be used as inputs for further actions (cancel job, get job status).
Run synchronous job
Automates running a job until completion. The action takes in the inputs to run a job, and also an additional timeout input. The action will run the job and continuously check the status until the job is complete or the timeout input limit has been reached. The action returns the final status output which can be used as inputs for further actions within the recipe.
Run job inputs
- Job name: the name of the job you are trying to run
- Parameters: a semicolon-delimited list of additional inputs (Ex: Business Unit=Canada; channel=Slack channel)
- Notification list: a semicolon-delimited list of emails to which the job report will be sent
- Timeout: an integer representing the time (in seconds) before the action will stop checking the status of a job
Get job status
Displays the current status of a specific job execution. The action takes in a jobId input and returns a status object. The components of the status object can be used as inputs for further actions within the recipe.
Sample Workato Recipe that runs a Reportworq Job
In this example we will create a recipe that runs a synchronous job in Reportworq and sends a status email:
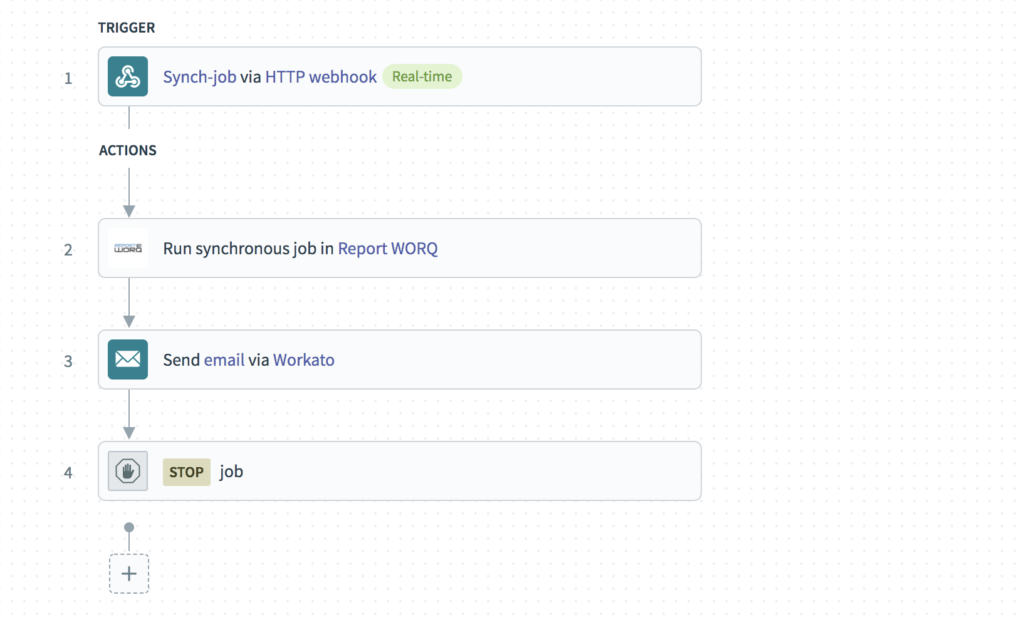
Workato recipes can be triggered in many ways, but in this example, we will use a Webhook trigger.
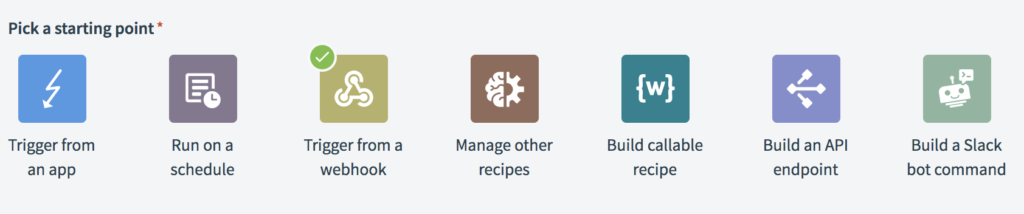
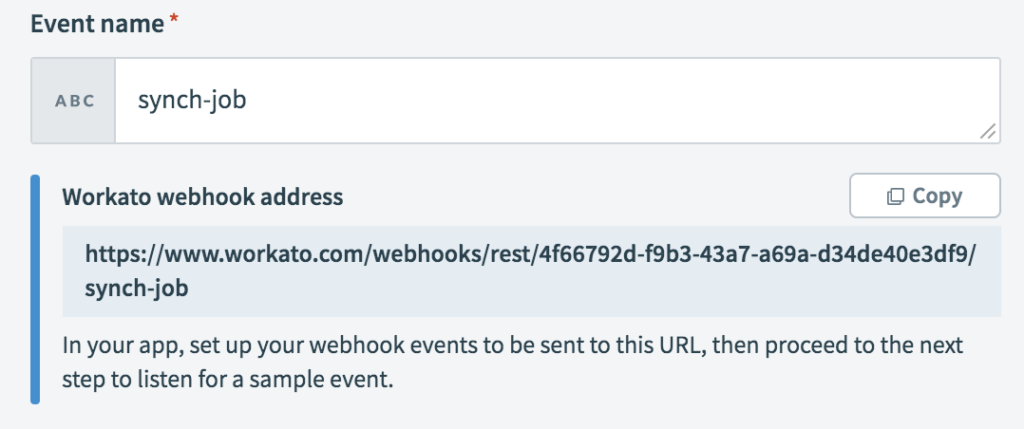
A Webhook is a link – when it is accessed it will trigger a recipe to begin the following actions. The Webhook link can also take in additional parameters that can be used within the recipe. After configuring the Webhook you will be provided with a Workato-generated link:
We can add additional payload schemas that support user input within the Webhook, which are passed along to the recipe. An example of a Webhook with user-inputted parameters can be seen below:
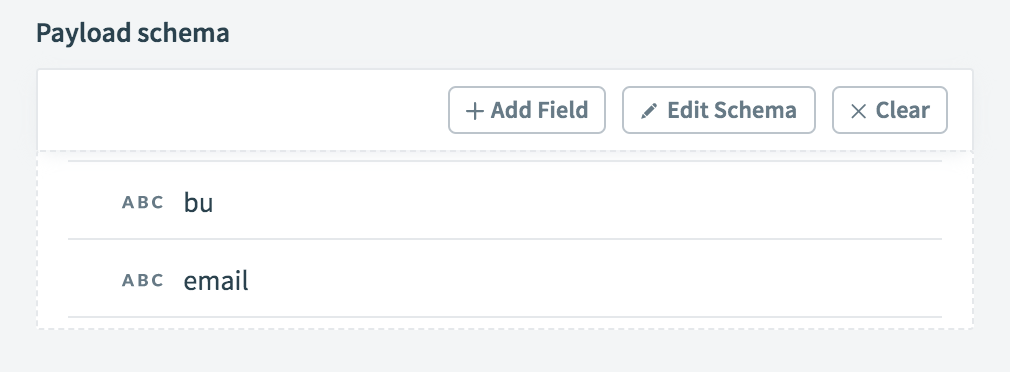

The schemas are passed in as parameters. The bu input will set the “business unit” for the job execution and the email will specify to who the report should be sent.
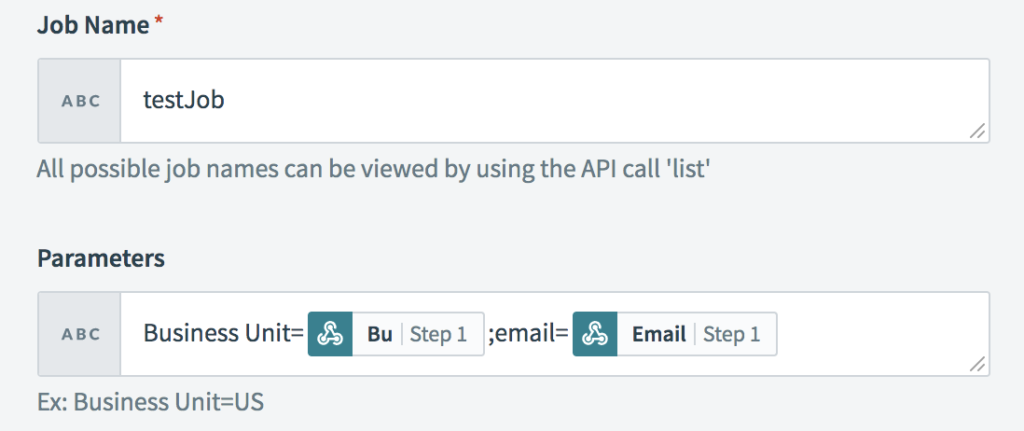
The next step is to configure the “Run synchronous job” action. This can be done by entering the job name and passing the webhook query schemas into the parameter field:
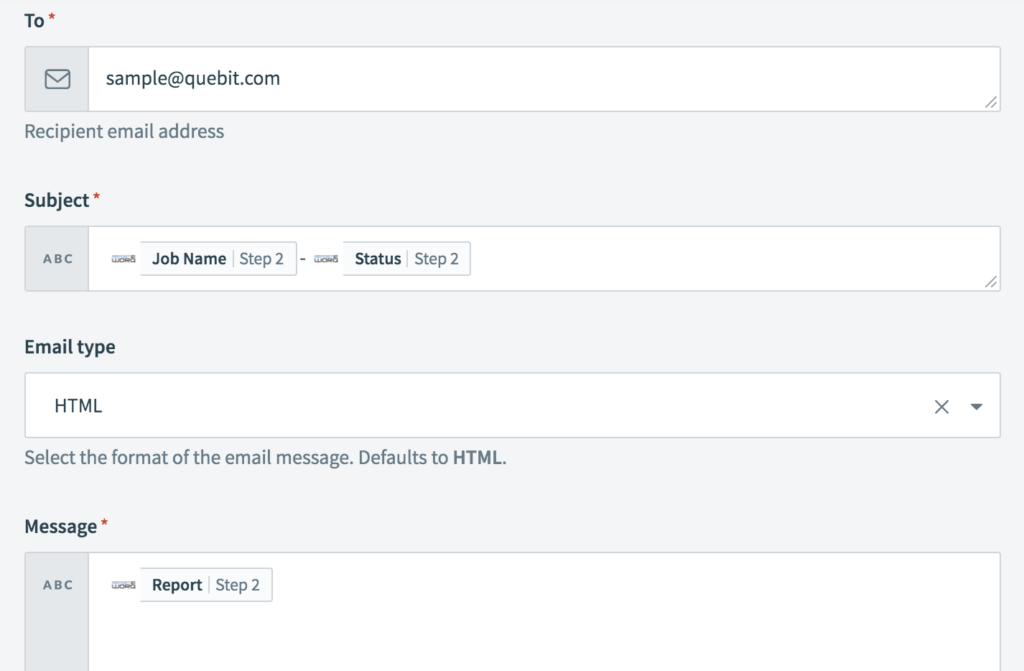
The last step of the recipe is to send an email when the action has been completed. This email will not contain the report created by running the job, but it will contain the job status at the end of the run action. Within the email we will use Workato “datapills” (outputs from previous actions in the recipe) to create a message that updates a user on the status of the job:
This recipe is now ready to run.