
Lab 2: First-run setup and licensing#
What you are doing. Taking the installed-but-empty server from Lab 1 and making it a working Reportworq instance: choosing where it stores its data, loading the Timberline Harvest Co. content this course builds on, applying your license, and signing in as the administrator.
What this shows you. That a Reportworq install is really two decisions: where the Repository lives, and what license this instance holds. Everything else the wizard does is bookkeeping around them. It also introduces the Repository, the thing every later lab reads from and writes to.
How long. About 15 minutes, most of it the restart.
What you need. The server from Lab 1, with the Reportworq 6 Bootstrap Service running, and your Reportworq 6 license key.
Before you start#
The wizard is already waiting for you. It is what loads at https://localhost:8600 on a server whose Repository is empty, in place of the sign-in screen.
Two things are worth knowing before you start clicking, because they decide which of the two routes below you take.
The Repository is a folder, and it is the whole system. Workspaces, jobs, reports, schedules, settings, audit history and run history all live in it. Reportworq does not use a database you have to provision; the Repository is a directory on disk, and backing Reportworq up means backing that directory up. Where you put it is the one decision in this lab that is genuinely hard to change later, which is why the wizard asks first.
You are going to install the demo content, not build from an empty repository. Labs 3 to 11 build on the Timberline Harvest Co. workbooks and reports, so this lab takes the Set up the Timberline demo system route, which extracts the whole demo store for you in one click. Part C covers what the Create a new repository route does instead, because that is the route you will take on a real production install, and it has two steps the demo route does not.
Part A: Open the wizard#
1. Browse to the server#
On the server, go to https://localhost:8600. The wizard opens on its Welcome step. Select Get Started.
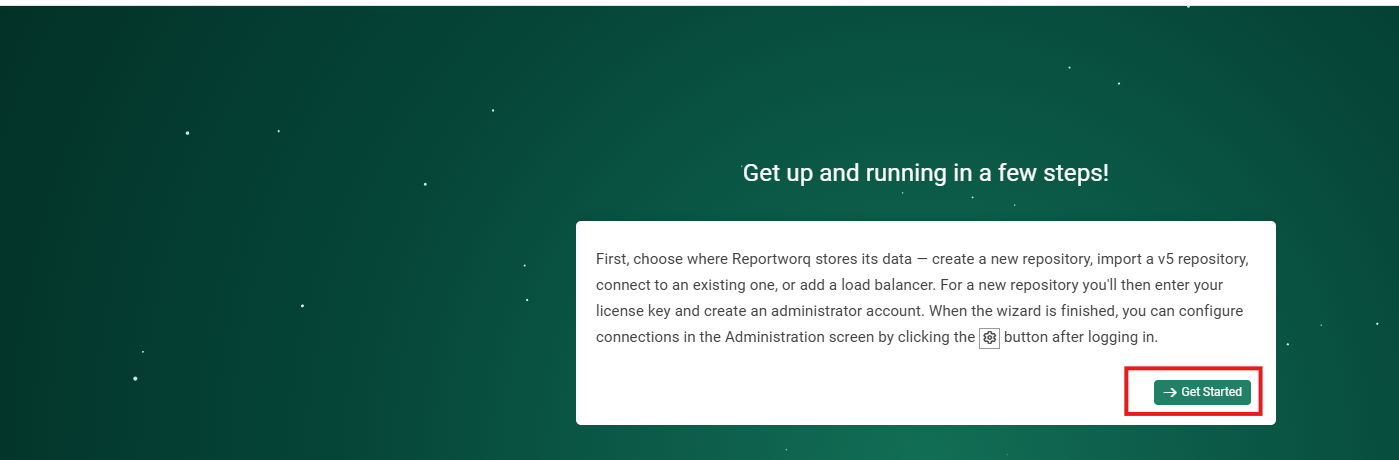
If you get the sign-in screen instead of this, the Repository is not empty, which means somebody has already run the wizard on this server. See Notes and limits at the end for how to reopen it.
2. Choose where Reportworq stores its data#
The next step is the one that matters. It offers five routes:
| Option | What it does |
|---|---|
| Create a new repository | Starts fresh at an empty path. The normal choice for a real install. |
| Add a load balancer to an existing web app | Runs this install as an extra execution node sharing another instance's Repository. |
| Connect to an existing repository | Points this install at a folder that already holds Reportworq v6 data. |
| Import a Reportworq v5 repository | Builds a new v6 Repository from a copy of a v5 one, leaving the v5 original untouched. |
| Set up the Timberline demo system | Extracts the ready-made Timberline Harvest Co. demo store into a new Repository. |
Select Set up the Timberline demo system, leave Repository path blank so it takes the default shown, and select Set up Timberline.
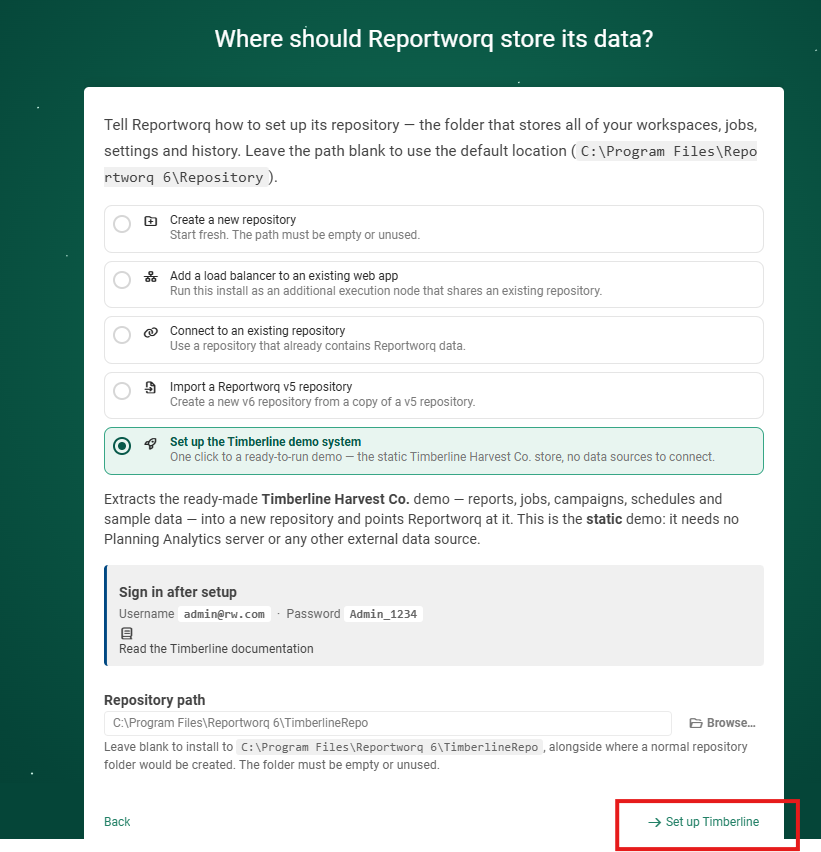
That default path is deliberate. The demo goes to C:\Program Files\Reportworq 6\TimberlineRepo, alongside where a normal Repository folder would go rather than in it, so the demo is obviously the demo and a real Repository can sit next to it later. The path you give must be empty or not exist; the wizard refuses a folder that already holds a repository.
Note what the option says about itself: this is the static Timberline store. It carries reports, jobs, campaigns, schedules and sample data, and it needs no external data source to run. That is what makes it usable as a course.
Part B: Set up the Timberline demo system#
3. Restart to load it#
Extraction takes a few seconds, and then Reportworq tells you it needs to restart to bind the new Repository. Select Restart Now.
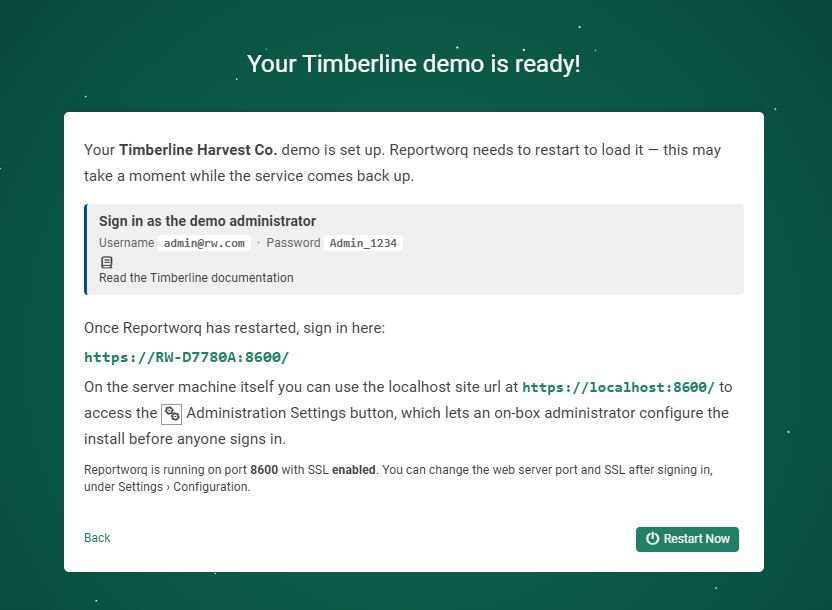
Write down what this screen is telling you before you leave it:
- The demo administrator is
admin@rw.com, passwordAdmin_1234. That is public on purpose. Timberline is a fictitious company on a demo store, so the wizard prints the credential on screen rather than making you hunt for it. It is not a credential that means anything outside the demo. - Two URLs, and they are not interchangeable. The machine URL (
https://<your-server>:8600/) is what everyone else uses; the localhost URL works only on the server itself. - The port and SSL line is live, not boilerplate. It reports the binding this install actually has. On a fresh Windows install that reads port 8600 with SSL enabled, because Reportworq generated and trusted a self-signed certificate at first boot (see Lab 1). On Linux or in a container it will read 8080 and SSL disabled.
The restart can take a minute while the service comes back up. If the page seems to hang, refresh it.
This is the end of the wizard on the Timberline route. The demo store brings its own accounts, so when Reportworq comes back it has no reason to ask you who the administrator should be. It goes straight to the sign-in screen. Skip to Part D.
Part C: What a new repository does instead#
If you had chosen Create a new repository in step 2, Reportworq would also have restarted to bind it, and then the wizard would have resumed, not restarted, at two more steps that the demo route has no need for. This is the route a real install takes, so it is worth seeing even though this course does not take it.
The License step#
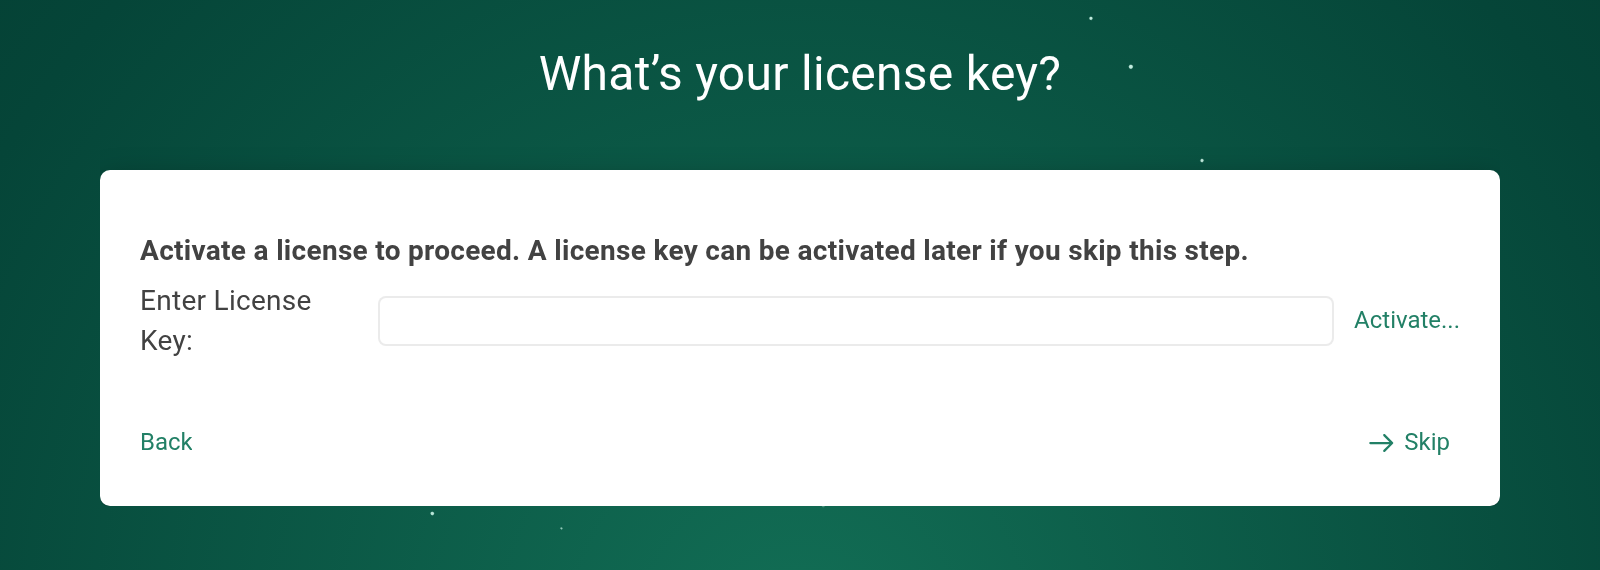
This is where a license key is entered during setup. Paste the key in and select Activate. The instance contacts the licensing service, applies your entitlements, and the warning above the box is replaced by a line confirming what you hold: the subscription's user count and its end date, or the days left if it is a trial. The bottom-right button changes from Skip to Next.
Three things about this step catch people out:
- Skipping is allowed, and the consequence is not obvious. The copy says a key can be activated later, and that is true, but an unlicensed Reportworq is unavailable to everyone until a key is applied. Skipping does not get you a limited instance; it gets you a locked one. Part D shows exactly what that looks like.
- Type the key and the button changes. With a key in the box the button reads Activate & Continue, so a typed key is never thrown away by a stray Skip.
- No outbound access? Use Manual Activation rather than retrying. Activation needs to reach the licensing service, and the manual path exists for servers that cannot.
The administrator step#
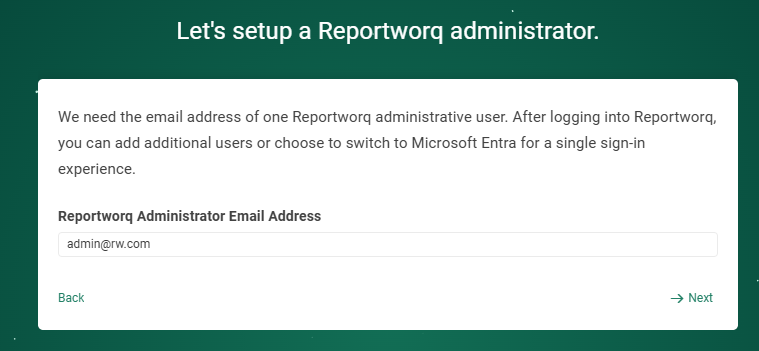
Enter the email address of the person who will administer this instance and select Next. One account is all the wizard wants; you add the rest, or switch the instance to Microsoft Entra single sign-on, after you are in.
Congratulations, you're all set#
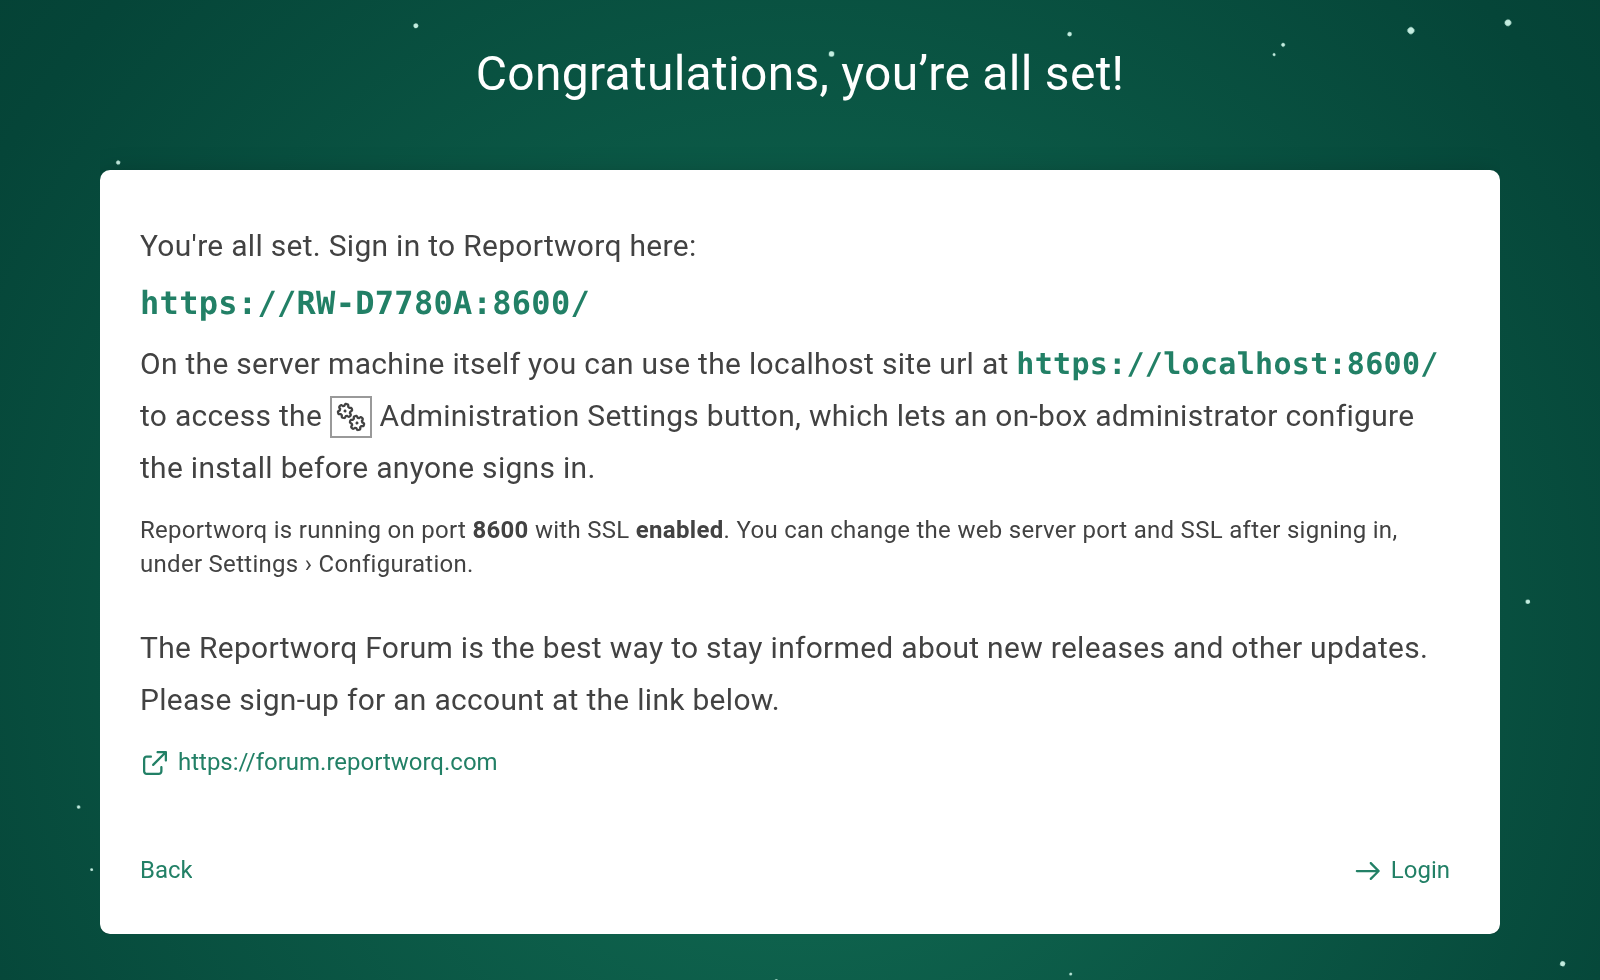
The wizard is done. It repeats the two URLs and the port/SSL line from step 3, and selecting Login closes the wizard for good and reloads into the normal application.
Two things happened quietly when you did that, and both matter on a real install:
- A workspace named
Defaultwas created, so you land somewhere usable rather than in an empty shell. - The instance was opened wide. The built-in All Users group was granted the System Administrator entitlement and membership of that workspace, so every account that signs in is an administrator. That is a bootstrap posture, not a recommendation. If more than one person will use this environment, tighten it before you add accounts, see Accounts, groups, and entitlements.
On this route the account you named has no password yet, so the first sign-in asks you to set one.
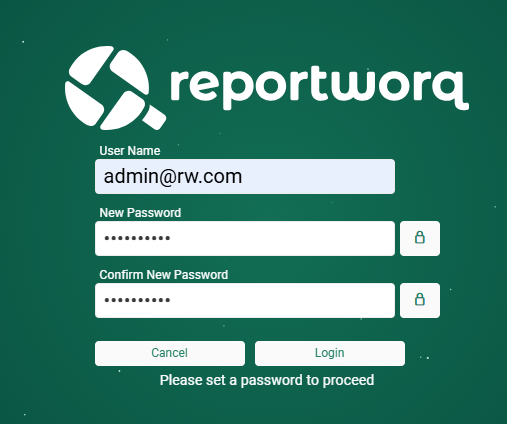
Part D: Sign in, and license the instance#
Back on the Timberline route. Reportworq has restarted and is showing the normal sign-in screen.
4. Sign in as the demo administrator#
Enter admin@rw.com and Admin_1234 and select Login. The demo administrator already has a password, so there is nothing to set.
5. Apply your license key#
You do not land in the application. You land here:
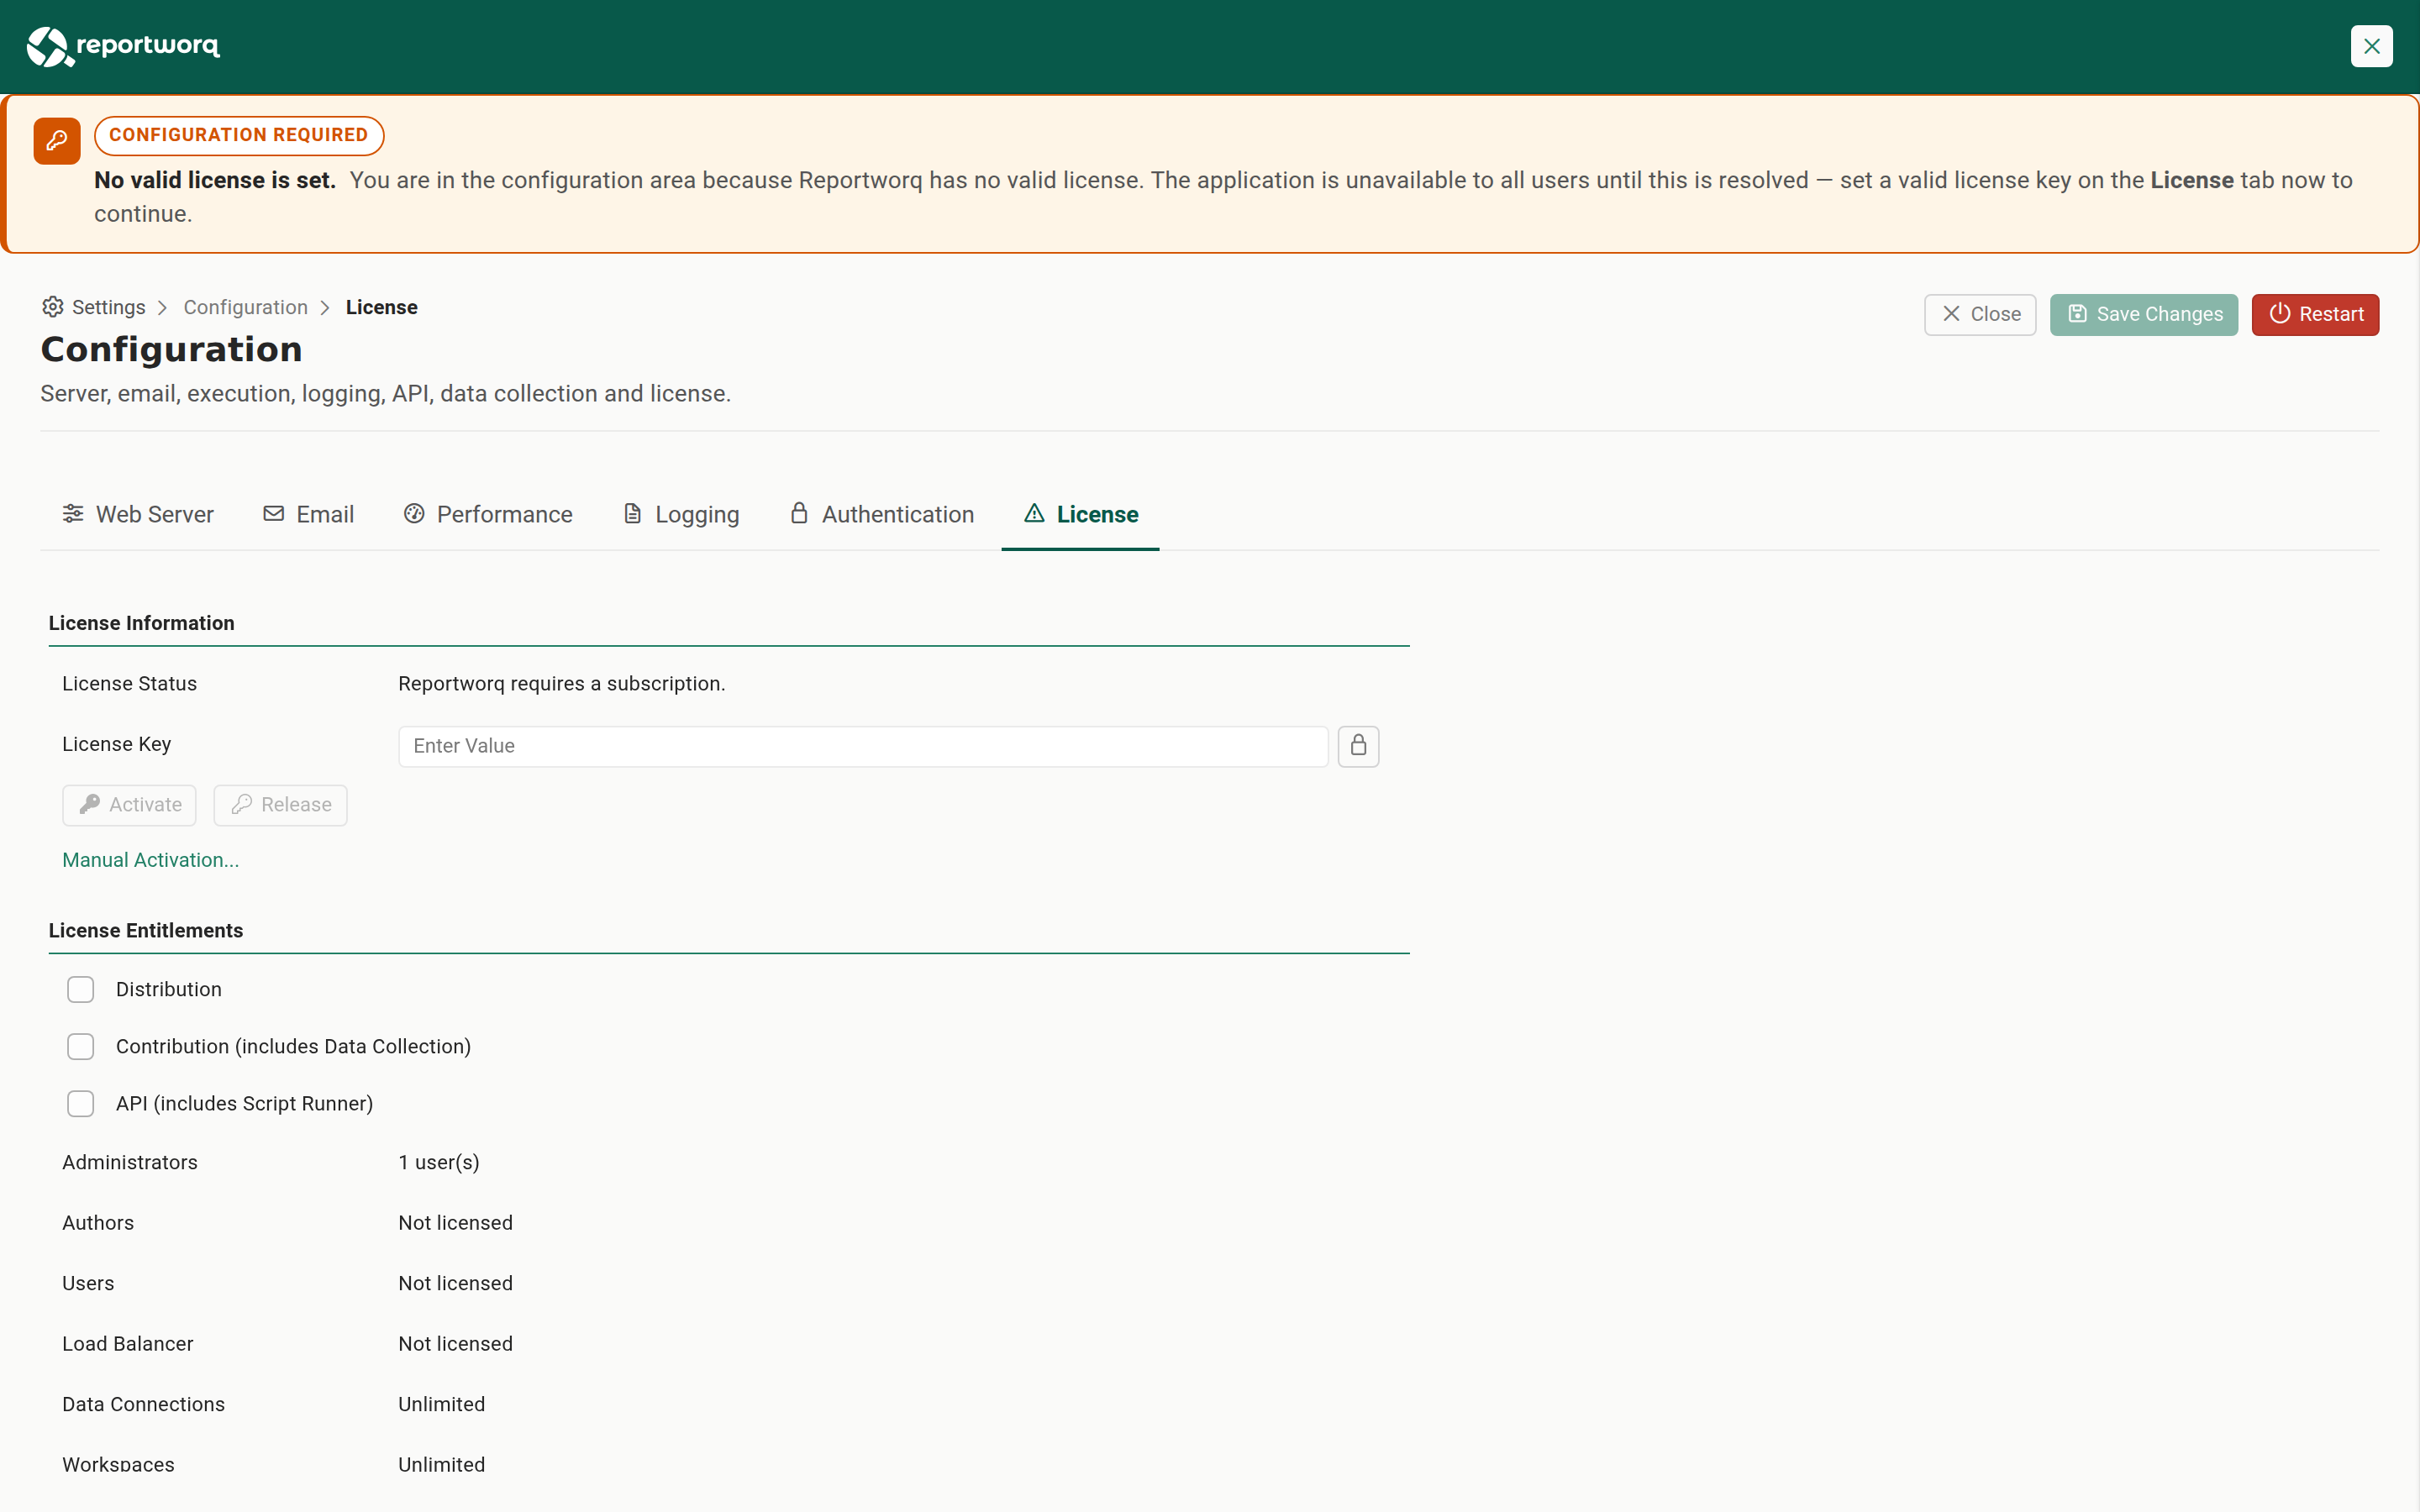
The Timberline demo ships unlicensed, deliberately. An activated subscription is never packaged into the demo, and the build refuses to produce a demo package that contains one, so the first thing the demo asks you for is your own key. This is the answer to "where does the license key go?" on this route: not in the wizard, but here, on the first sign-in.
Paste your key into License Key, select Activate, and then Restart when it asks. On the way back up the entitlement list fills in: Distribution, Contribution, API, and the account counts your subscription carries.
This is the same screen you will use for the rest of the instance's life: Settings ▸ Configuration ▸ License is where you check what you hold, release a seat before decommissioning a server, or activate a server with no outbound access via Manual Activation.
6. Accept the license agreement#
Reportworq asks you to accept the End User License Agreement. Tick I have read and accept the End User License Agreement and select Accept & Continue.
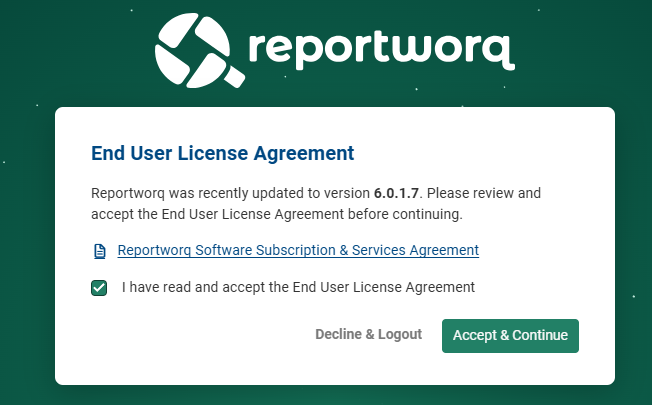
Acceptance is recorded in the Repository against the version that was accepted and the account that accepted it, so you see it again after an upgrade rather than on every sign-in. That also means you may not see it here at all: if the demo store you just installed already carries an acceptance for the exact version you are running, Reportworq signs you straight through to step 7.
7. Land in the Workspace#
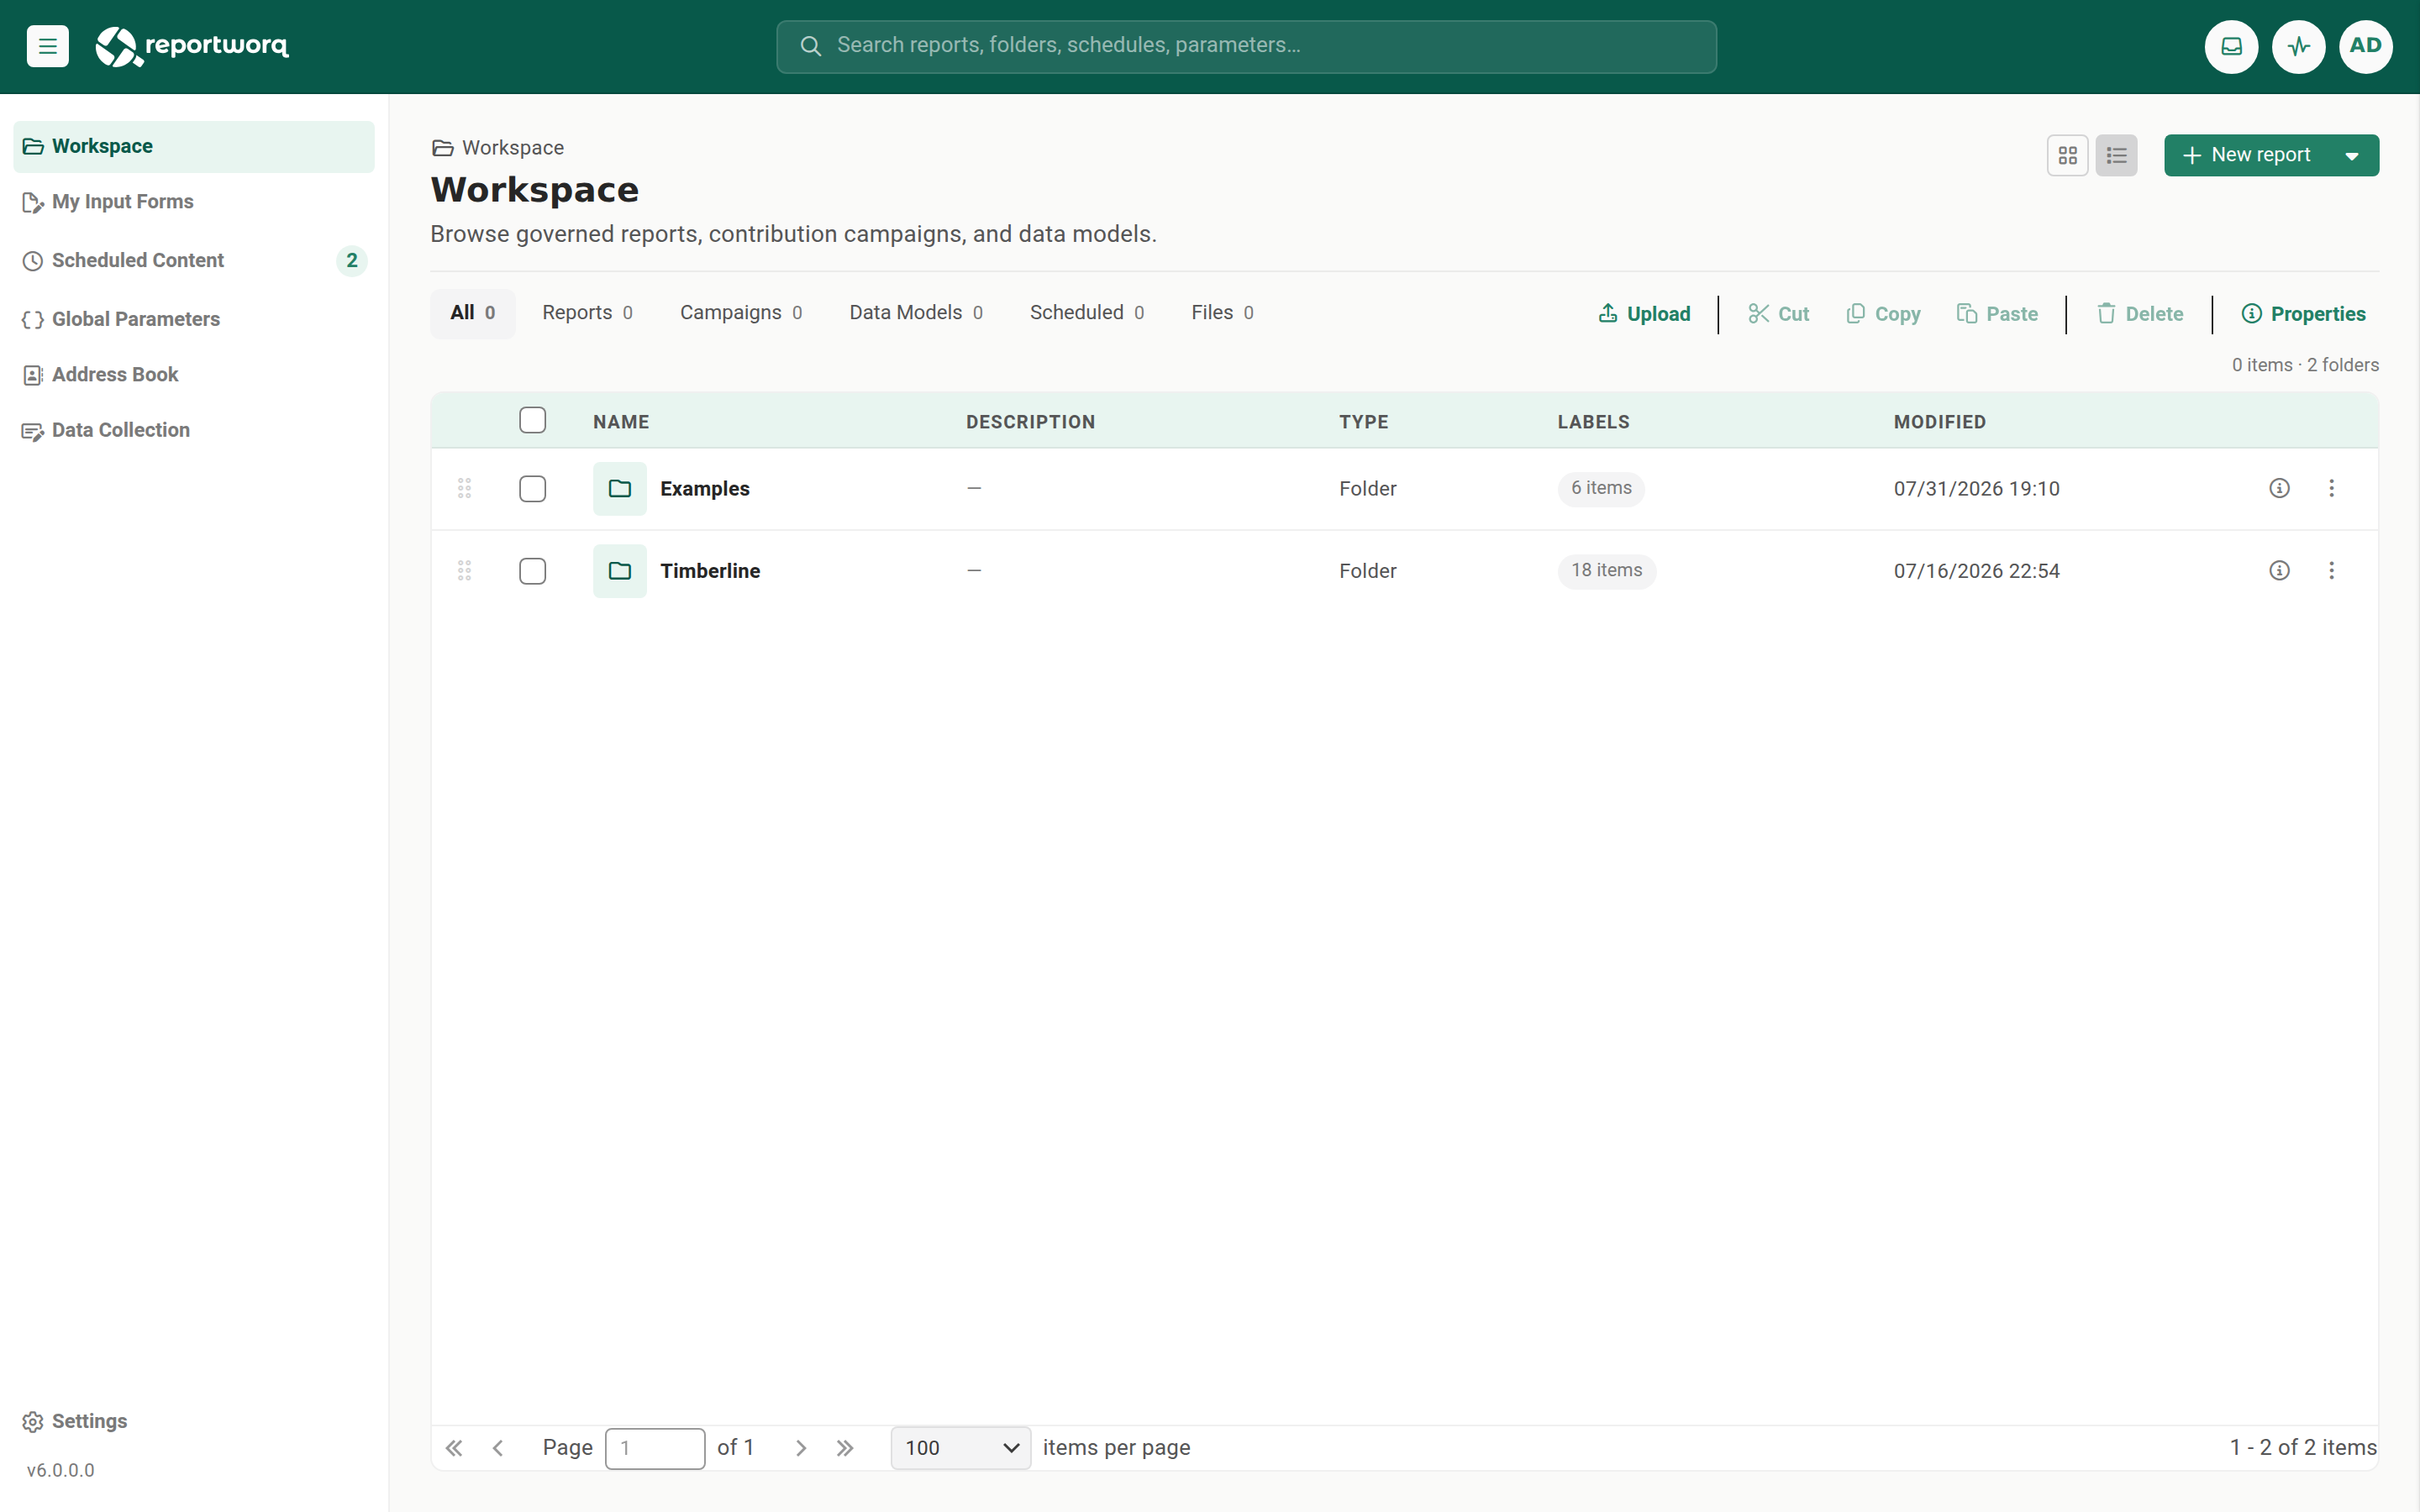
Reportworq is installed, licensed, and carrying the demo content. The two folders are the material for the rest of this course:
- Timberline is Timberline Harvest Co.'s own content, under a Financial Reports folder: the Financial Statements pack, the Board Packet with Division Slides, the Divisional Packet, the Sales Rep Scorecard and a contribution campaign. Labs 4 to 9 build the first three, one at a time; the scorecard and the campaign are there as further examples.
- Examples is a small set of chart reports and the workbooks behind them, for looking up how one feature is wired without opening a whole pack.
The left rail is the whole application: Workspace to browse and build, My Input Forms for contribution forms waiting on your input, Scheduled Content for what runs on its own, Global Parameters, the Address Book of distribution recipients, and Data Collection. Lab 3 walks all six.
Why the order is what it is#
The wizard asks for the Repository before the license, and it is worth understanding why, because the sequence is not arbitrary.
The license is stored in the Repository. So there is nothing to store a license in until the Repository exists and the service has restarted to bind it. That is also why both routes restart in the middle: the bind is a process-level thing, not a setting. On the new-repository route the wizard remembers where it was and resumes at the License step; on the Timberline route the extracted store already has accounts, so the wizard has nothing left to ask and stands down.
It also explains the one thing that surprises people about the demo route: you get an instance that is fully populated and completely unusable until you license it. The content came from the package; the license can only come from you.
Try this#
Two checks, both of which prove something the later labs depend on.
- Find the Repository on disk. Open
C:\Program Files\Reportworq 6\TimberlineRepoin Explorer. Everything you just signed in to is in there, and inv6\datayou will find the folders behind the screens you have seen, includinglicense-artifacts, where the key you activated now lives. This is what "back up Reportworq" means. - Find the jobs you are going to build. In the Workspace, open Timberline, then Financial Reports. The Financial Statements pack, the Board Packet with Division Slides, the Divisional Packet and the Sales Rep Scorecard are all sitting there, finished. Labs 4 to 9 build the first three of them from nothing, so treat this folder as the answer key: open one now if you want to see where you are heading.
Notes and limits#
The wizard runs once, on an empty Repository. A server that already has a configured Repository, or any accounts, will not show it again by itself. To change the Repository path, connect or import a repository, or convert the install into a load-balancer node afterwards, go to Settings ▸ Configuration ▸ Web Server and select Reconfigure, at the right of the Web Server section heading.

The Configuration screen on its Web Server tab, with the Reconfigure control outlined at the right of the Web Server section headingTap or click the image to view it full screen The demo option only appears if the demo shipped with your install. It is packaged alongside the binaries; a build without it shows four repository options rather than five.
The static demo is deliberately data-source-free. It needs no external data source at all, which is what makes it safe to hand to anyone, and it is why this course never asks you to connect one. Every number you will see comes out of the workbooks themselves.
Do not uninstall without releasing the license first, or the seat stays consumed. Release is on the same License screen you used in step 5, next to Activate.
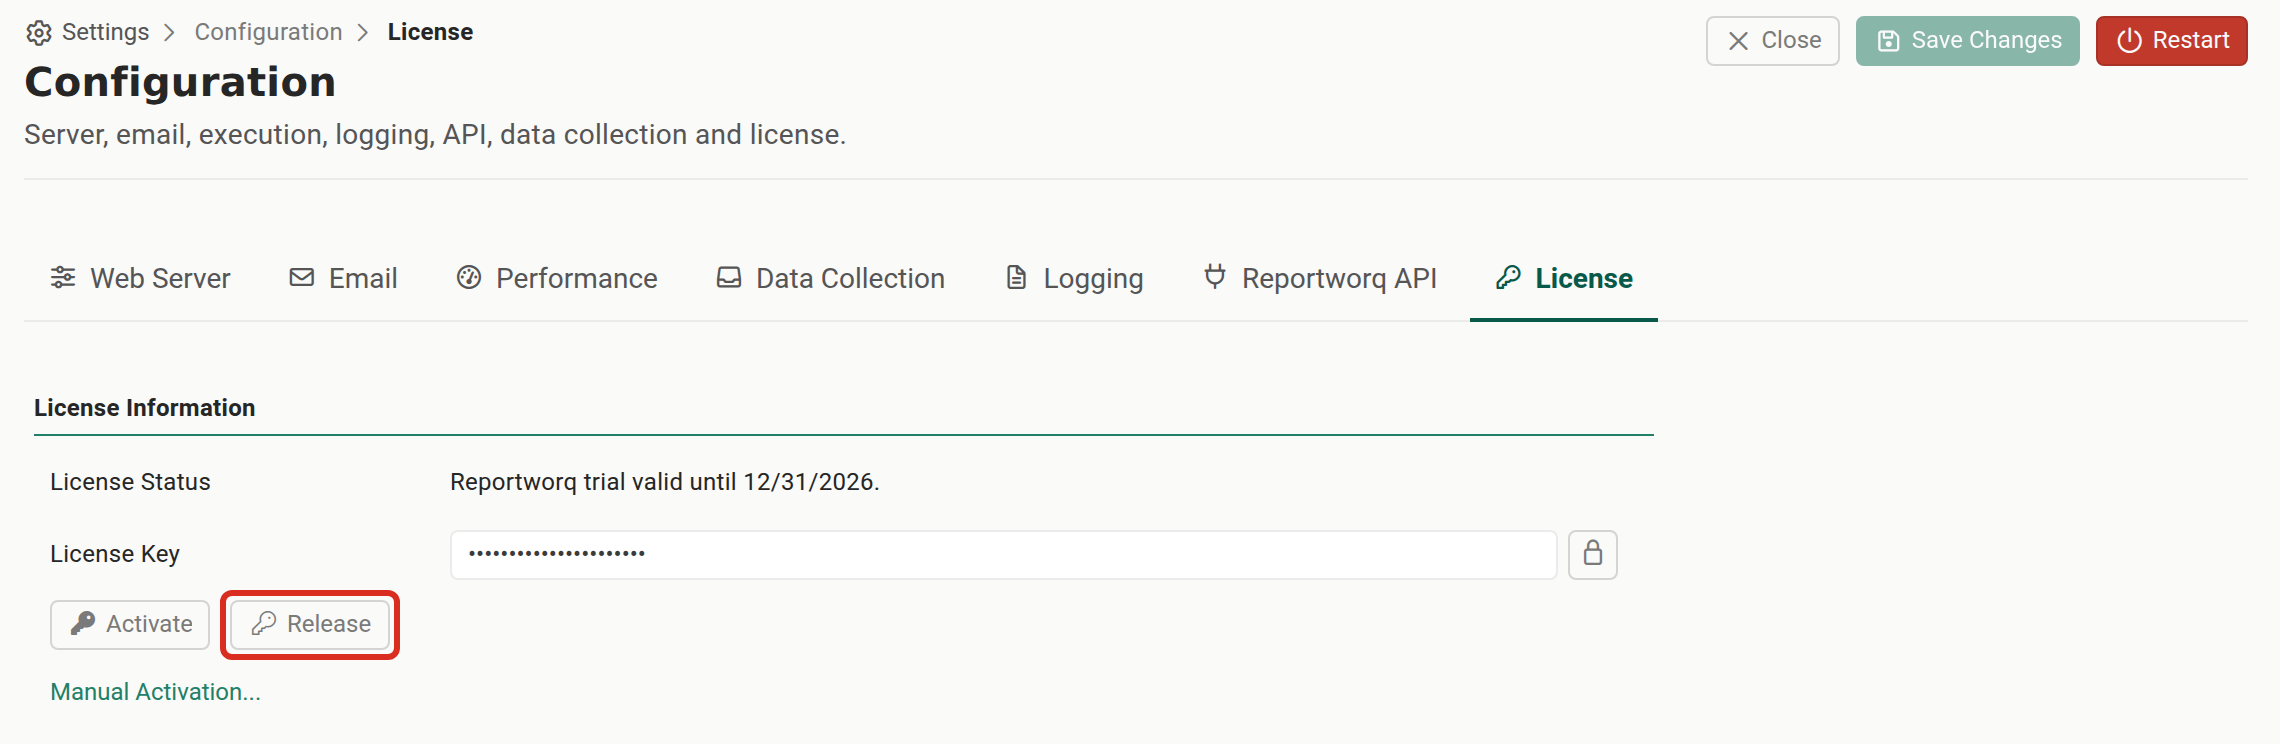
The Configuration screen on its License tab, with the Release button outlined beside ActivateTap or click the image to view it full screen Different defaults off Windows. On Linux or in a container the wizard is the same, but the web server defaults to port 8080 with SSL disabled, and an immutable deployment (Docker, Azure App Service) takes its Repository from the environment, so the repository step is skipped entirely and the wizard opens on the License step.
Going deeper. For every repository option in full, including the v5 import path and the load-balancer node, see First-run setup. For the license model, entitlements and the manual activation path, see Licensing and entitlements. For what is inside the demo store, see What is Timberline.
Next#
Lab 3: Find your way around Reportworq. The instance is running, licensed, and full of finished content. Before you build any of it yourself, Lab 3 walks the screen: the left rail, the top bar and the workspace, so the later labs can name a control once and expect you to find it.
Feedback on this page
Comments, questions, requests, or something missing or unclear? Email us - the page you are on is filled in for you.
Email feedback on this pageOr write to support@reportworq.com directly.