
Overview#
Reportworq Distribution Jobs can be scheduled for repeated execution. This article explains how to schedule Job execution from within Reportworq. Alternatively, you can configure an external scheduler to run Jobs using the Reportworq API.
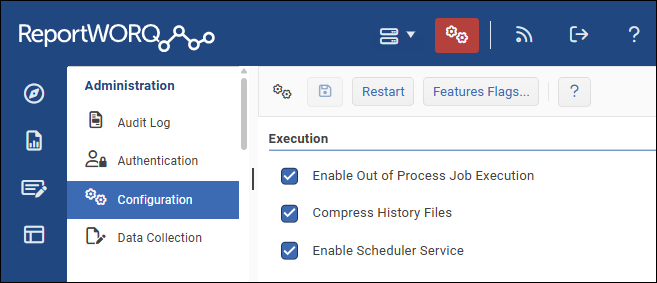
Scheduled Jobs run only if the Scheduler Service is enabled at the scheduled run time. The Enable Scheduler Service setting is available in the Execution area of the Administration > Configuration interface, as shown below:
A schedule can run a single Job or multiple Jobs, and you can create as many schedules as needed. You can also create a whitelist of dates that completely overrides the configured run dates, or a blacklist of dates to make Reportworq skip execution of scheduled Jobs on certain days. You can disable these date filters (whitelist and blacklist) to revert to the configured run dates.
The Scheduler provides a basic user interface for setting a recurring schedule. Reportworq also supports an advanced mode, based on Cron syntax, which allows for more customized schedules. Visit Crontab Guru for more details about Cron and examples of Cron syntax. For more information about advanced scheduling options, visit the Reportworq Forum.
If a Job contains parameter values, you can configure the schedule to override those values with ones you provide. For example, if a Job is configured to run for a specific Business Unit, you could configure one schedule to run and send reports for Business Unit A daily, and another to run and send reports for Business Unit B weekly.
Accessing and Managing the List of Schedules#
The list of schedules contains information about all schedules and provides access to tools for creating, editing, running, and deleting them.
To access and manage the list of schedules:
- On the Reportworq sidebar, select the Schedules icon.
 The list of schedules appears.
  Note: All scheduler time references are based on the Server Time clock, which is displayed above the list of schedules. The list of schedules includes the following columns and settings:
 Add Schedule button -- Opens the schedule editor, which enables you to create a new schedule. For more information, see Creating Schedules.
 Refresh button -- Updates the list of schedules.
- Enabled column -- If the check box is selected, the schedule is active and its Jobs will run as scheduled. Tip: To enable or disable a schedule, select its edit button
 and then select or clear the Enabled check box.
 - Schedule Name column -- The name of the schedule.
- Schedule column -- The definition of when the scheduled Jobs will run.
- Last Actual Job Run column -- Date stamp from the most recent time the scheduled Jobs ran.x`
- Last Scheduled Job Run column -- Date stamp from the most recent time the Jobs were supposed to run. They may or may not have run successfully at that time.
- Next Scheduled Job Run column -- The time that the scheduled Jobs will next run. This applies only to enabled schedules.
- Description column -- A list of the scheduled Jobs. Tip: To view the list, select the description link.
- Edit button -- Opens the schedule editor.
 Run button -- Runs the scheduled Jobs immediately. Tip: The run button is available only for enabled schedules.
 Delete button -- Deletes the schedule immediately. IMPORTANT: Reportworq does not prompt you to confirm the deletion. As soon as you select the button, the schedule is deleted.
- If you want to sort the list, decide which column to sort by and then select its header. An arrow appears beside the header to indicate whether the list is sorted in ascending order
 or descending order
  . Select the header repeatedly to cycle through the sort options: ascending order , descending order , or none (no arrow).
 - If you want to filter the list:
- Decide which column you want to filter on and then select its filter icon.

- Specify the filter criteria and then select Filter.
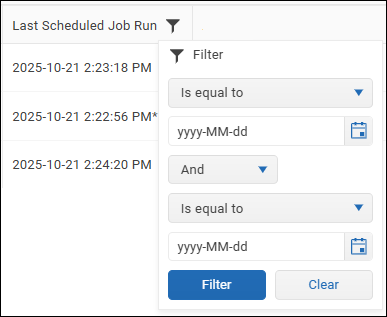 The filter is applied, and a blue background appears around the filter icon in the list of schedules.
  Tip: Filter criteria options vary by column. The preceding figure shows criteria options for filtering on the Last Scheduled Job Run column.
- If you want to clear a filter:
- Select the filter icon.
- Select Clear.
Creating Schedules#
You can configure each schedule to run one or more Jobs together at specified times or intervals.
To create a schedule:
- Above the list of schedules, select the Add Schedule button. The schedule editor appears.
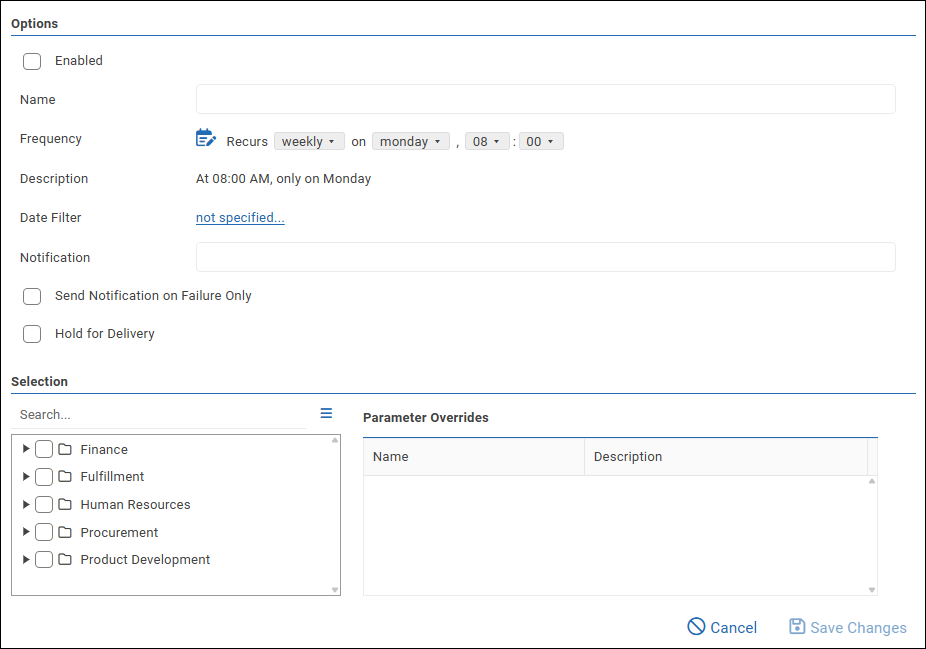
- In the Options area, provide a Name for the schedule.
- Do one of the following to specify how often the scheduled Jobs run:
- Select settings from the Frequency dropdown lists.
- Select the edit icon
 to switch to the advanced scheduler, which uses crontab schedule expressions. For more information about advanced scheduling options, visit the Reportworq Forum.
- If you want to override the schedule to exclude specific dates (blacklist) or to run only on a specific set of dates (whitelist), create a Date Filter:
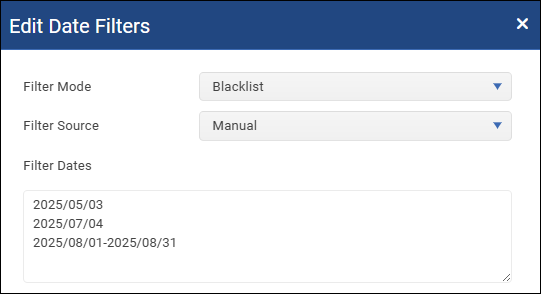
- Select the link beside Date Filter. The Edit Date Filters pane appears:
- Select a Filter Mode:
- Blacklist -- Jobs in this schedule will not run on the dates specified in the filter. They will run on all other scheduled dates.
- Whitelist -- Jobs in this schedule will run only on the dates specified in the filter. Dates specified in the Frequency dropdown lists or in a crontab schedule expression are ignored.
- Do one of the following to specify filter dates:
- To manually specify dates for the filter, set Filter Source to Manual and then type the dates in the Filter Dates box. Each date or date range must appear on a separate line. The format for a single date is yyyy/MM/dd. The format for a date range is yyyy/MM/dd-yyyy/MM/dd.
- If you want Reportworq to retrieve the filter dates from a text file (.txt), set Filter Source to File, and then specify the file path including filename. The advantage of using a text file is that you can edit the file outside of Reportworq anytime to modify the filter dates. Changes made in the text file may take up to one hour to apply in Reportworq. The text file must contain one or more dates and/or date ranges. Each date or range of dates must appear on a separate line. The format for a single date is yyyy/MM/dd. The format for a date range is yyyy/MM/dd-yyyy/MM/dd.
- Optionally, you can provide a Notification email address for receiving status notifications about the schedule:
- Notifications are available only if the Email Distributor has been configured.
- By default, a notification is sent when the scheduled jobs are complete or when a job fails. If you prefer to be notified only if a job fails, also select Send Notification on Failure Only.
- If you want to test whether the schedule will run successfully but you don't want to distribute Job output yet, select Hold for Delivery and clear Send Notifications on Failure Only. For more information, see the test procedure immediately below this set of steps.
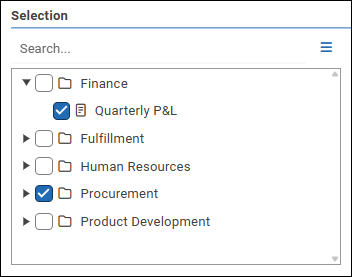
- In the Selection area, select one or more Jobs to run on this schedule. Tip: If you select a folder, all Jobs in the folder are selected.
- Optionally, you can override the values of parameters that are used in the scheduled Job(s):
- In the Parameter Overrides area, select the pencil icon beside the parameter you want to override. The Edit Parameter pane appears. The example below shows values for a parameter named Region.
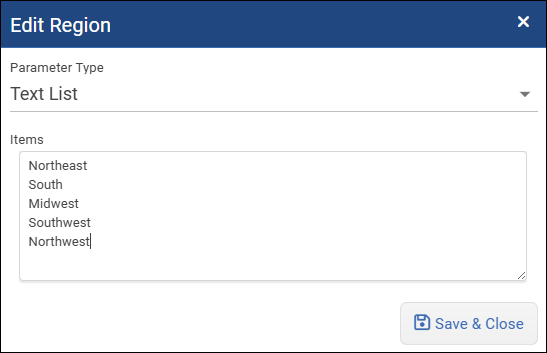
- Specify the Parameter Type and the data or source of data for the parameter values. For more information, see Configuring Parameters.
- Select Save & Close.
- At the top of the options area, select Enabled.
- Select Save Changes.
Testing Schedules#
You can test schedules without sending Job outputs to their destinations.
To Test a Schedule:
- In the list of schedules, select the schedule you want to test. The schedule editor appears.
- In the Options area, select Hold for Delivery and clear Send Notifications on Failure Only.
- Select Save Changes.
- In the list of schedules, select the play button beside the schedule you are testing.
 The schedule runs immediately. After the Jobs are finished, Reportworq sends a notification email that lists the scheduled Jobs and indicates the success or failure status of each.
 - Review the email notification to confirm desired behavior.
- When you are ready to let the schedule run unimpeded, clear Hold for Delivery, select Send Notifications on Failure Only if desired, and Save Changes.
Feedback on this page
Comments, questions, requests, or something missing or unclear? Email us - the page you are on is filled in for you.
Email feedback on this pageOr write to support@reportworq.com directly.