
Overview#
Reportworq Contribution enables customers to efficiently gather planning data from multiple people. Contribution Campaigns automate the process of requesting, receiving, and collating planning data.
Contribution starts with one or more planning report spreadsheets, which might normally be distributed using Reportworq. The reports are turned into Contribution templates by using a special Reportworq Excel add-in to add one or more input formulas defining input ranges that require data input from Contributors. In Reportworq, the Contribution Campaign Manager creates an input form based on one or more of these template reports and assigns it to Contributors and Approvers. Requests for data input are sent to Contributors as email notifications. Each input form can be bursted to dynamically configure it to be specific to the Contributors' area of responsibility. Contributors and Approvers access their input forms on a Reportworq web page. After Contributors complete and submit their input forms, Approvers review and approve them. Alternatively, an Approver can reject an input form, requiring the Contributors for that form to make changes and resubmit. The Campaign Manager monitors the progress of each input form and the Campaign overall.
Collected data can be exported to an Excel file, an IBM Planning Analytics instance, or to a SQL server.
Contribution is a licensed feature of Reportworq. Contribution features are available only if your organization has a valid Contribution license.
The main topics in this article are as follows:
Note: Reportworq Contribution represents the next generation of Reportworq Data Collection functionality. Contribution's web-based form creation and edit/review/approval processes make the collection of planning data easier for Administrators, Contributors, and Approvers. Reportworq Data Collection remains functional for customers who are licensed to use it.
Navigation#
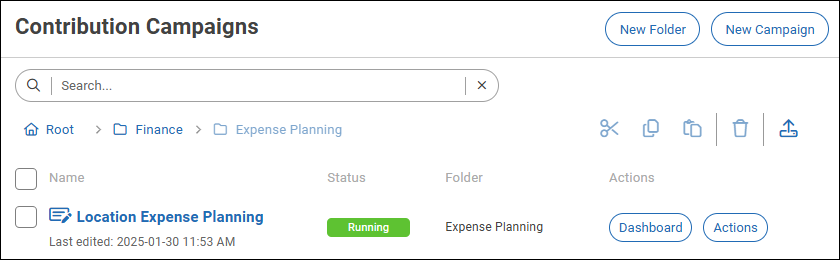
Campaigns are stored within nested folders on the Contribution Campaigns page. In the following example, the Location Expense Planning Campaign is within the Finance > Expense Planning folder.
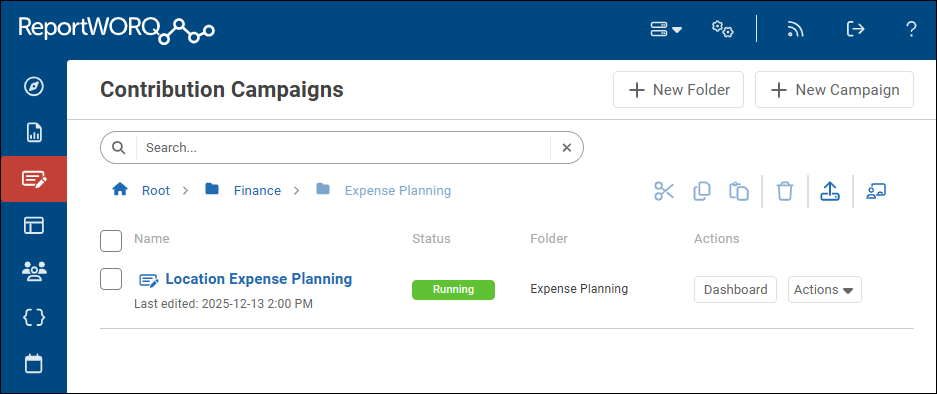
The upper area of the Contribution Campaigns page includes the following buttons and icons:
- New Folder -- Creates a new folder and prompts you to name it.
- New Campaign -- Creates a new Campaign and prompts you to name it.
 Cut -- Copies the selected Campaign(s) and/or folders to the clipboard so you can paste them
  into a different folder. The original Campaign(s) and/or folder(s) are deleted when you paste them elsewhere.
 Copy -- Copies the selected Campaign(s) and/or folders to the clipboard so you can paste them into a different folder. The original Campaign(s) and/or folder(s) remain intact.
- Paste -- Pastes the copied Campaign(s) and/or folders into the current folder.
 Delete -- Permanently deletes the selected Campaign(s) and/or folders.
 Import -- Imports a previously-exported Campaign (.zip file) into the Root folder.
 View Process Manager -- Opens the Process Manager page, which contains information about all. For more information, see Process Manager.
Each Campaign entry has an Actions list, which includes the following:
- View Dashboard -- Opens the Dashboard page, where you can manage the Campaign. Alternatively, you can open the Dashboard page by selecting the Dashboard button.
- Modify Campaign -- Opens the edit page, where you can modify the Campaign. Alternatively, you can open the edit page by selecting the Campaign name.
- Rename -- Changes the name of the Campaign.
- Cut -- Copies the Campaign to the clipboard so you can paste it into a different folder. The original Campaign is deleted when you paste it elsewhere.
- Copy -- Copies the Campaign to the clipboard so you can paste it into a different folder. The original copy remains intact.
- Duplicate -- Creates a copy of the Campaign in the current folder.
- Delete -- Permanently deletes the Campaign.
- Archive Campaign Data -- Archives all Campaign forms, activity, and collected data so that the campaign can be restarted.
- Export Campaign -- Saves the entire Campaign, including gathered data, to the Downloads folder as a .zip file.
- Send to Support -- Sends support files to the Reportworq support system and notifies Reportworq staff.
The interface for a Campaign consists of an edit page and a Dashboard page:
- Campaign edit page -- Contains settings for configuring Campaign properties. To open a Campaign for editing, select the Campaign name.
- Dashboard page -- Contains settings for managing the Campaign. To open the Dashboard for a Campaign, select its Dashboard button.
To navigate between Campaign interface pages:
- To switch from the edit page to the Dashboard, select the Dashboard button.
- To switch from the Dashboard to the edit page, select the Modify Campaign button.
- To return to the Contribution Campaigns page, select the Home button.

Process Manager#
The Process Manager page displays Contribution-related performance information for all Reportworq servers. This information may help you make decisions about the number of Load Balancer servers required to handle Contribution processing. If a Contribution participant attempts to access a form when all servers are experiencing over 90% memory usage, the request is denied and the participant receives a message advising them to try again later.
To access the Process Manager page:
- From the Contribution Campaigns page, select the View Process Manager icon. To close the Process Manager page, select the Dashboard button.
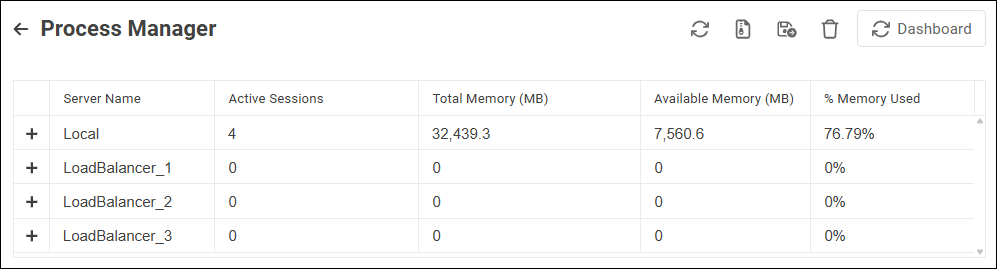
Icons and buttons along the top of the page are as follows:
 Refresh -- Updates the page.
 Download All Session Logs -- Downloads all session logs and saves them as a .zip file in the local Downloads folder.
 Send All Session Logs to Support -- Sends all session logs to the Reportworq support system and notifies Reportworq staff.
 Clear Session Logs -- Deletes all entries on the page.
- Dashboard -- Returns to the main Contribution Campaigns page.
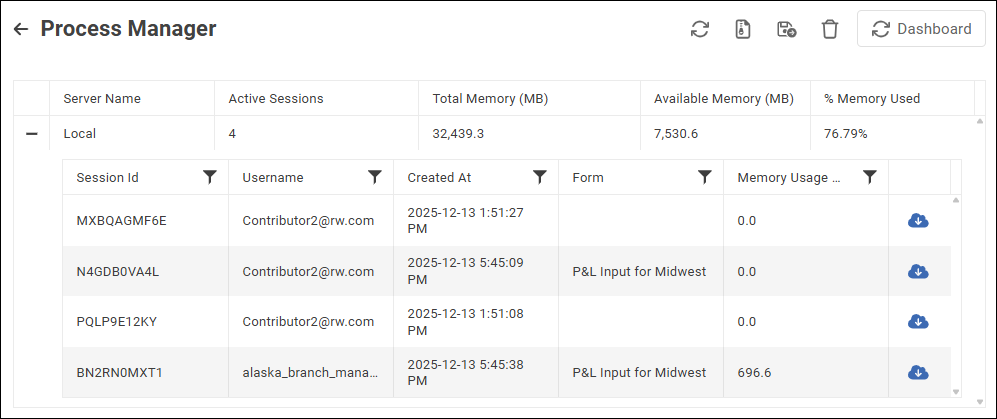
You can expand a server entry to view details about individual Contributor sessions. To download the information for a given session as a .zip file in your Downloads folder, select its View Details icon.
Configuring a Campaign#
This section explains how to configure a Contribution Campaign using the edit page, which has five tabs:
- Create Forms - Add template reports, add parameters, define bursting, and select options.
- Assign Forms - Generate input forms and then assign Contributors and Approvers to the forms.
- Notifications - Edit the contents of notifications and configure related options.
- Exports - Define one or more methods of exporting collected data.
- Options - Set additional options, such as whether data approval is required.
Before Creating a New Campaign#
Before a new Campaign can be created, a Reportworq Administrator must set up the following in Reportworq:
- Contribution templates -- These are reports that contain formulas to identify data input ranges. The templates are created in Excel, using a special Reportworq add-in. Contribution templates must be added to Reportworq as Report Providers.
- Licensing -- All potential Contribution participants (Contributors and Approvers) must be registered in Reportworq Authentication and must be assigned a Contribution End User license. The number of Contribution users may be limited, depending on your organization's Reportworq license agreement.
- Workspaces -- Each Contribution Campaign is confined to the Reportworq Workspace in which it was created. Participants for a Campaign must have access to its Workspace.
- Groups -- Contribution participants can be assigned roles (Contributor or Approver) as individuals or as part of a Reportworq group. If you plan to use groups to assign participant roles, create and configure groups as required.
Create Forms Tab#
The Create Forms tab is on the edit page. To navigate from the Dashboard to the edit page, select Modify Campaign.
To access the Create Forms tab for a specific Campaign if starting from the Contribution Campaigns page, navigate to the folder that contains the Campaign, and then select the name of the Campaign. The edit page opens and displays the Create Forms tab.

The Create Forms tab has five subtabs:
- Reports
- Parameters
- Bursting
- Options
- Test
Reports Subtab
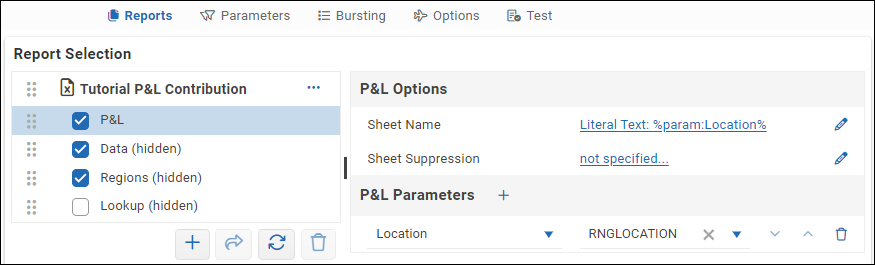
In the Report Selection area, add one or more Contribution templates, and then select all worksheets that require input from Contributors. You can also set Report configuration options such as Sheet Suppression and Sheet Naming.
Parameters Subtab
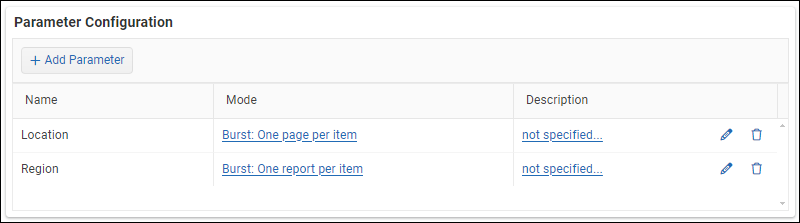
In the Parameter Configuration area, you can define and configure parameters. You can then dynamically create multiple worksheets based on a Parameter definition, and allow parameters to be used in burst sets.
Bursting Subtab
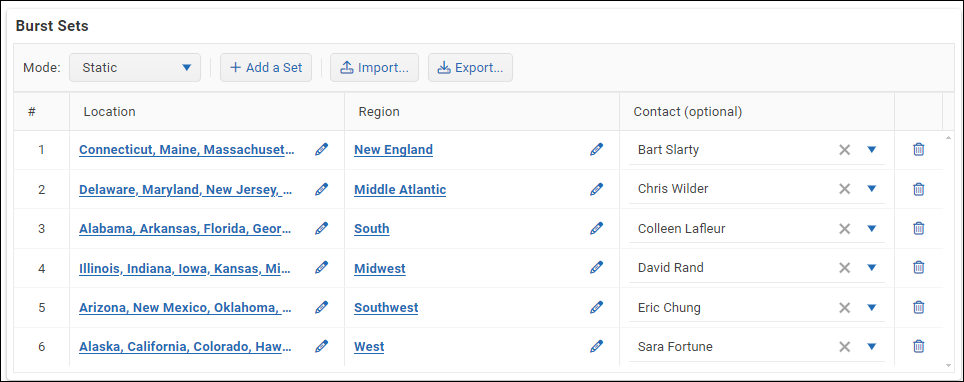
Create Burst sets to define worksheets and assign Contacts (optional).
Contacts act as default Contributors if no other Contributors are assigned. Alternatively, you can assign Contributors on the Assign Forms tab or by configuring contact mapping.
Tip: When you finish creating burst sets, you can Export them for future Import.
Options Subtab
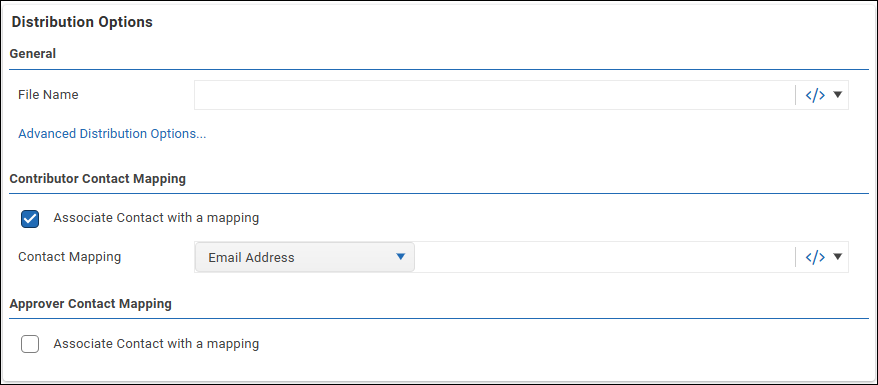
In the General area, specify how input forms are to be named. You must include a variable so each bursted form name (File Name) is unique. In the example below, the File Name for the input form has the Region parameter variable, text, and the Contact Name Address Book variable. To insert a variable value, select the variable type from the dropdown list to the right of the File Name box, select the variable pill in the File Name box, and then select appropriate options.
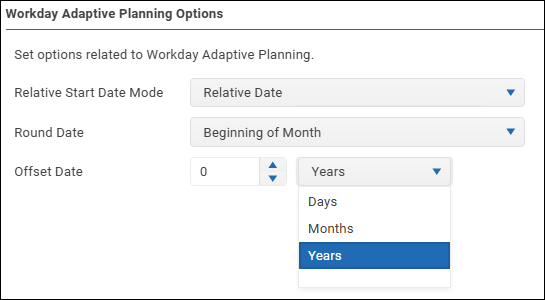
If you are using a Workday Adaptive Planning Datasource, select Advanced Distribution Options and then set the Relative Start Date, which is used in Workday Adaptive OfficeConnect report specifications:
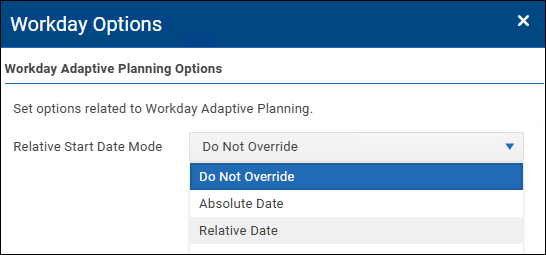
To configure the relative start date:
- To use the default relative start date with no adjustments, select Do Not Override.
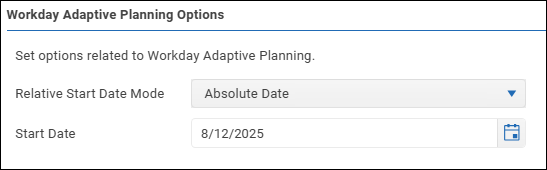
- To set a specific start date, select Absolute Date and then specify the Start Date.
- To set a relative start date, select Relative Date and then do the following:
- Select a Round Date, which is the basis of the relative date. The options are Today, Beginning of Week, Beginning of Month, or End of Month.
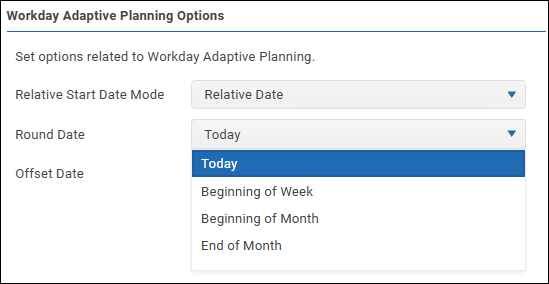
- Select a numeric Offset Date value and time units. The options are Days, Months, or Years.
If you want to assign forms to Contributors and Approvers via contact mapping, configure the settings in the Contributor Contact Mapping area and/or the Approver Contact Mapping area. Additional configuration is required. For more information and detailed steps, see Contact Mapping.
Test Subtab
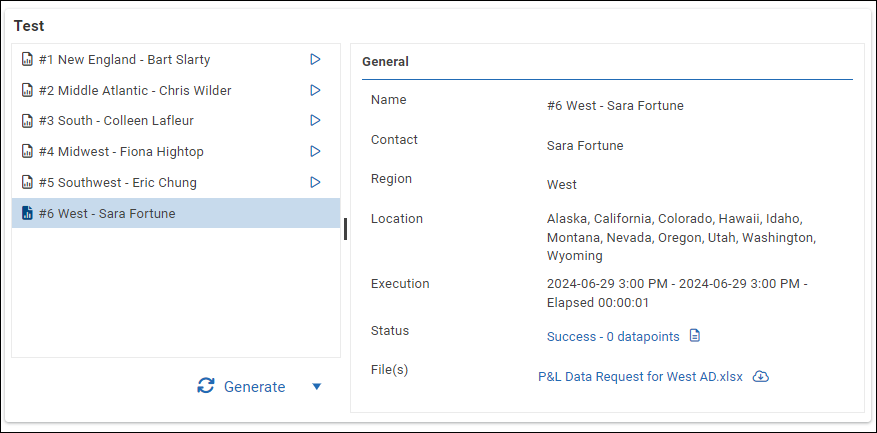
You can test input forms by generating previews and inspecting them:
- Select Save Changes.
- Select Generate Preview. A list of input forms appears.
- Select the Run icon
 beside one or more input forms. If there are no issues, the status changes from Pending to Success. After a moment, one or more Excel file names appear. If there are any issues, a Warning link appears. Select the link to diagnose any issues. You can download and review Excel files that are generated for this input form. These Excel files are the basis of the Contributor/Approver user interface, but contain more information than participants ever see. Contributors see only the print areas of these Excel spreadsheets.
The following example shows the successful results of testing the West input form.
Assign Forms Tab#
On the Assign Forms tab, you generate input forms and then assign one or more Contributors to each form. If the Campaign requires submitted data to be approved, you also assign one or more Approvers to each form. Contributors and Approvers can be assigned as individual contacts and/or Reportworq groups.
As an alternative to generating input forms in Reportworq, you can Upload Forms that you created by other means. When you upload an input form that has an identical Report Name as an existing form, the uploaded form replaces the existing form.
Note: The Upload Forms button is not intended for uploading Contribution input data.
The following figure shows the Assign Forms tab for a Campaign named Expense Planning, before any input forms have been generated.
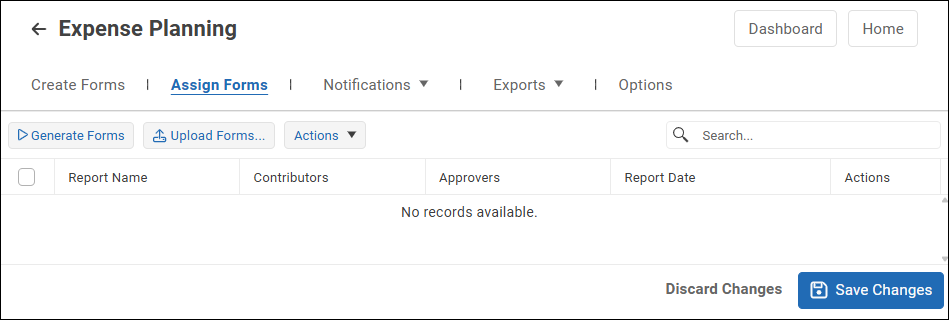
To generate and assign forms:
- Select Save Changes.
- Select Generate Forms. The Generate Contribution Forms dialog appears.
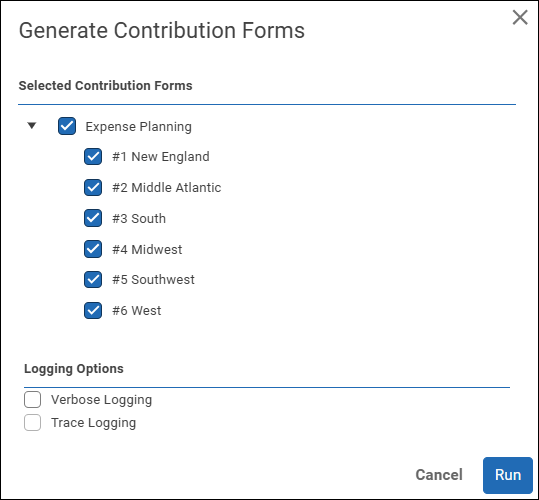
- Select the forms you want to generate, and then select Run.
- When the Job Completed message appears, select Close. The generated forms appear on the list.
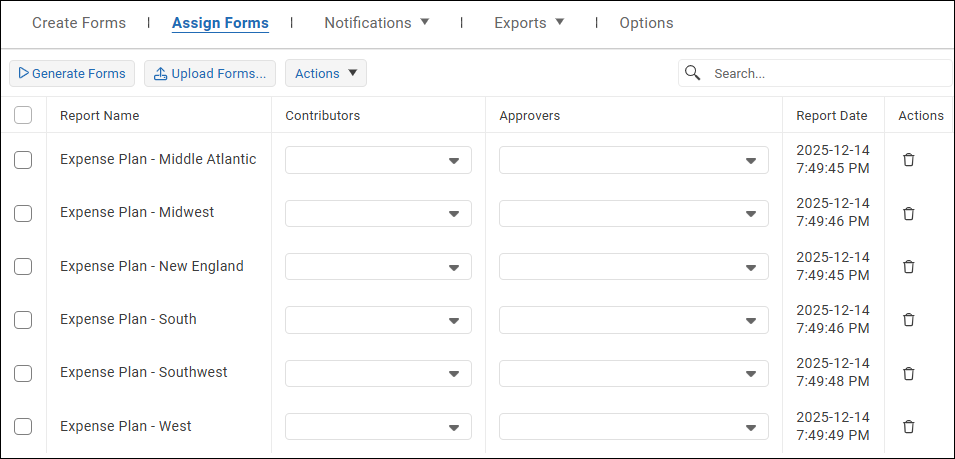
- If you previously exported form assignments and want to import them:
- From the Actions list, select Import Assignments.
- Navigate to the form assignments file (Forms Mapping.xlsx by default), select it, and select Open.
- For each input form on the list:
- In the Contributors column, expand the dropdown list and select one or more Contacts and/or Contact Groups. The selected contacts and members of the selected contact groups are assigned as Contributors for the form.
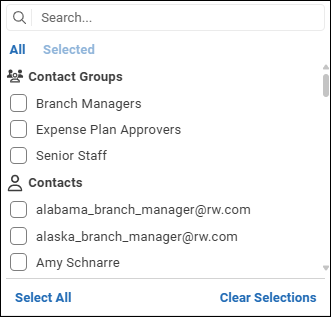
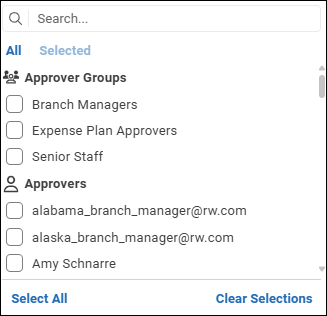
- If the Approvers column is present, expand the dropdown list and select one or more Approvers and/or Approver Groups. The selected approvers and members of the selected approver groups are assigned as Approvers for the form. Tip: The Approvers column is present only if the Campaign requires submitted forms to be approved. Each submitted form requires only one approval, regardless of how many Approvers are assigned to it. The Campaign-wide requirement for approval is controlled by a setting on the Options tab.
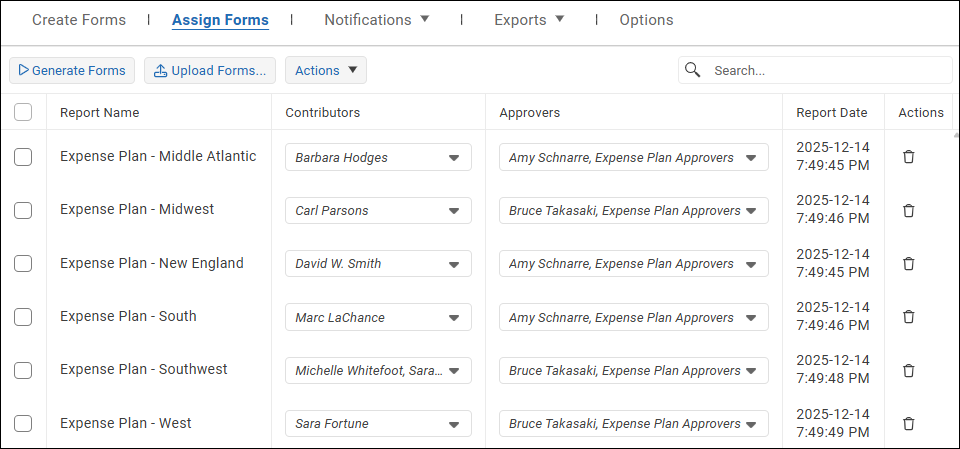
- Review the assignments and make changes if required. The following figure shows Contributor and Approver assignments for six input forms.
- If you want to save input form assignments so you can edit them in Excel and later reimport them, select Actions, and then select Export Assignments. The assignments are saved in an Excel file (.xlsx) named Forms Mapping in the Downloads folder.
Notifications Tab#
There are six default notifications that Reportworq sends to participants via email when certain criteria are met:
- Approver Invitation - sends invitations to all Approvers in the Campaign, at the scheduled start time or when executed from the Campaign Dashboard.
- Approver Reminder - sends reminders to all Approvers who have pending input forms that require approval, at scheduled intervals or when executed from the Campaign Dashboard.
- Approver Workflow - sends notifications to Approvers when an input form has been submitted for approval or recalled.
- Contributor Invitation - sends invitations to all Contributors in the Campaign, at the scheduled start time or when executed from the Campaign Dashboard.
- Contributor Reminder - sends reminders to all Contributors who have pending input forms that require submission, either at scheduled intervals or when executed from the Campaign Dashboard.
- Contributor Workflow - sends a notification to Contributors when an input form has been approved, rejected, or recalled by an Approver.
You can select a notification to view and edit its contents and settings.
To insert a variable in the Subject field:
- Position the cursor where you want to insert the variable.
- Expand the associated variables list and then select the variable type.
 A red variable pill appears.
- Select the variable pill and then configure the variable's properties as required.
To insert a variable in a message body:
- Position the cursor where you want to insert the variable.
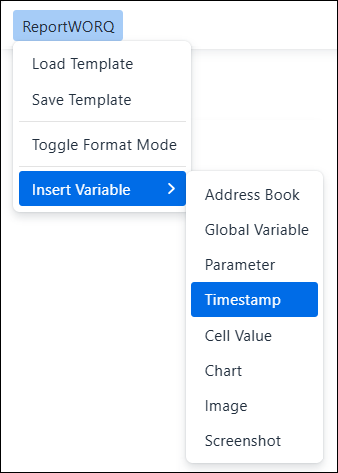
- From the Reportworq menu, select Insert Variable and then select the type of variable you want to insert. In the following figure, Timestamp is selected.
 A red variable pill appears.
 - Select the variable pill and then configure the variable's properties as required. Tip: If you want to apply HTML formatting to variables, first select Toggle Format Mode from the Reportworq menu. Variable pills switch to plain text codes that can more easily be selected and formatted. To avoid breaking a variable, do not edit the code between the square brackets, for example, [[code]]. Apply any formatting to the entire pill text. To return to the WYSIWYG view, toggle the format mode again.
When you finish editing, Save Changes.
The following is an example of an Approver Workflow notification.
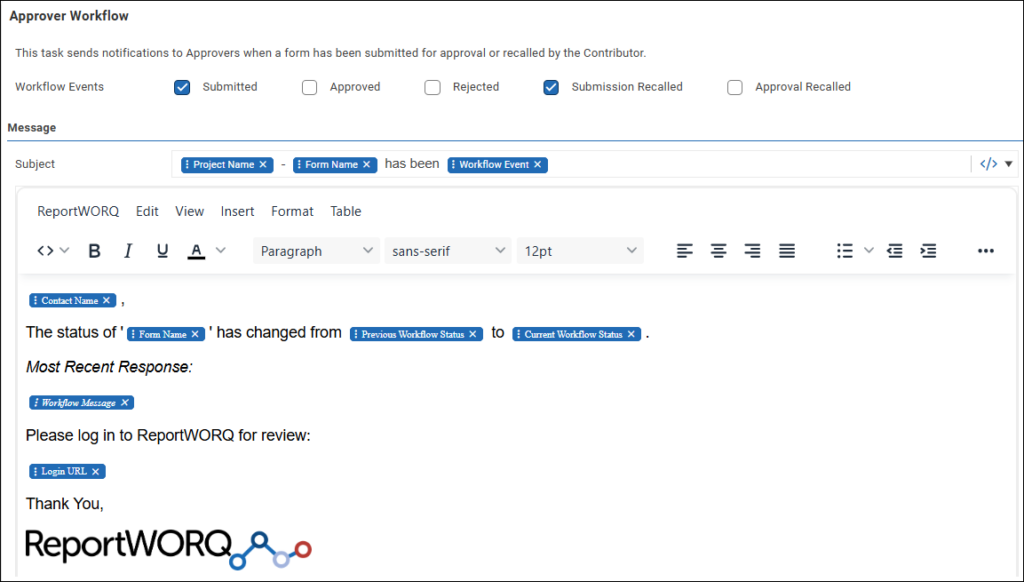
Notification Templates
Notification templates enable Campaign Managers to save and reuse the contents of notifications. A template contains the message body from a notification. You can save new templates or modify existing ones, including default templates. When any template is created or modified, it is available to all Campaign Managers. Change to default templates apply to all new Campaigns regardless of who creates them.
The six default templates are designed to be used for the six default notifications. If you edit and save these default templates, new campaigns will include the modified versions as defaults. If you want to revert one of default notifications to its original version, delete it. Instead of being deleted, it will revert to its original contents.
To create or modify a template:
- Edit an existing template and select Save Changes.
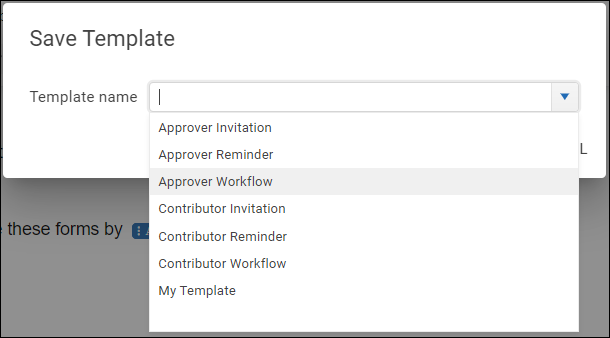
- From the menu at the top of the message editor, select Templates > Save Template, and then do one of the following:
- If you want to create a template, specify a unique Template name.
- If you want to modify a template, select it from the list.
To Load, Rename, or Delete a Template:
- Select any template from the Notifications list. The message editor appears.
- From the menu at the top of the message editor, select Templates > Load Template. The Select a Template pane appears. You can select each template to see a preview.
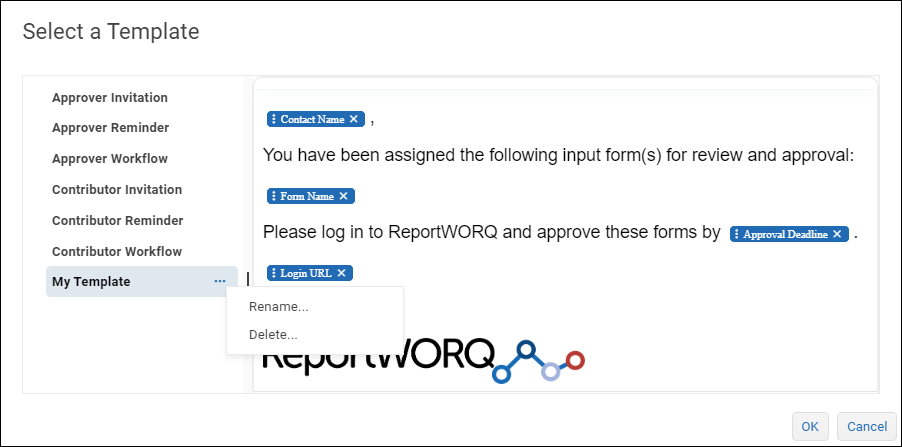
- If you want to load a template, select it and then select OK. Tip: You can edit the loaded message to customize it for your Campaign before you select Save Changes.
- If you want to rename a template, select the three-dot menu beside the template name and then select Rename. Type a unique name and then select OK.
- If you want to delete a template or reset a default template to its original contents, select the three-dot menu beside the template name and then select Delete. Confirm the deletion.
Exports Tab#
Export definitions (exports) control how and when Contribution data is exported. Data can be exported to a Planning Analytics Cube, a Database Table, or an Excel file (.xlsx or .csv). You can create any number of exports.
An export can be run or downloaded on demand from the Exports tab, or run on demand from the Campaign Dashboard. You can also define trigger conditions that run the Export when they are met.
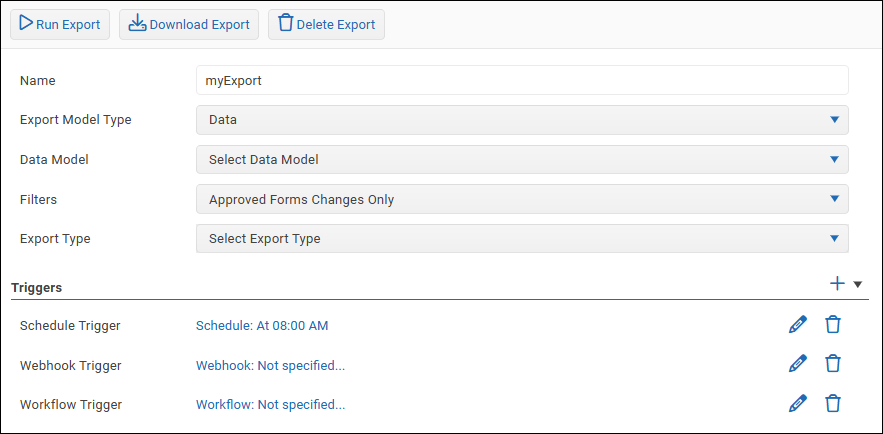
To create an export:
- On the Exports tab, select New Export. The New Export dialog appears.
- Provide a name for the export, and then select OK.
- Define the properties of the export as follows:
- Select an Export Model Type:
- Data -- Exports input form data.
- Commentary -- Exports comments submitted by Contributors and Approvers.
- Workflow -- Exports information about workflow activity for each input form.
- Select the Data Model for the Campaign. Note: This does not apply for Commentary or Workflow exports.
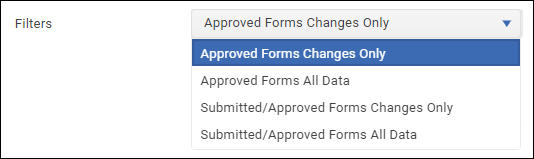
- If you are creating a Data export, select a Filter to specify what data is to be exported. You can export data from approved forms only, or also include data from submitted forms that have not yet been approved. You can also choose whether to export all data from the input form, or only data that has changed. Unsubmitted work in progress is never exported.
- Select an Export Type to define how the exported data is to be delivered. You can export data to a Planning Analytics Cube, a Database Table, or a File (Excel .xlsx or .csv).
- If you want to create a trigger, in the Trigger area select a trigger type and then configure the trigger conditions. When the trigger conditions are met, the export runs. You can create any number of triggers.
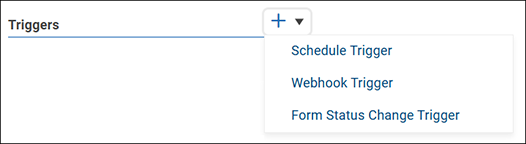 Trigger types are as follows:
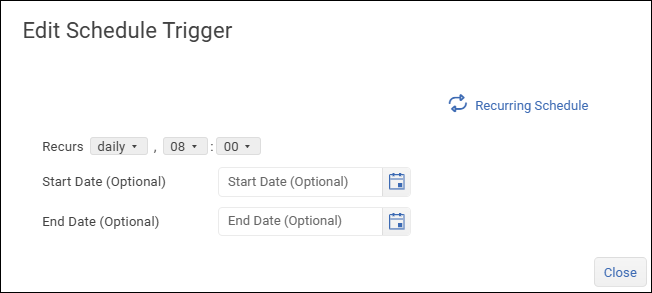
- Schedule Trigger -- runs the export at the scheduled time.
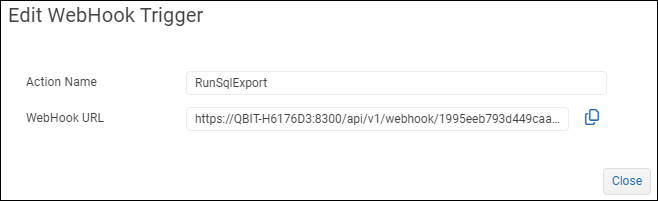
- Webhook Trigger -- runs the export when a specified Action Name is received via a specified Webhook URL.
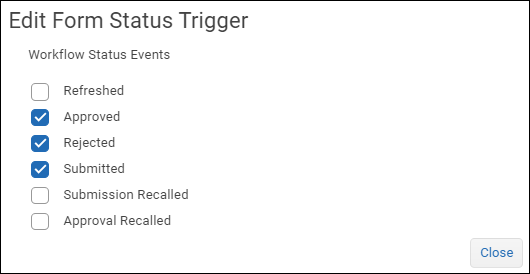
- Form Status Change Trigger - runs the export when a specified status change occurs.
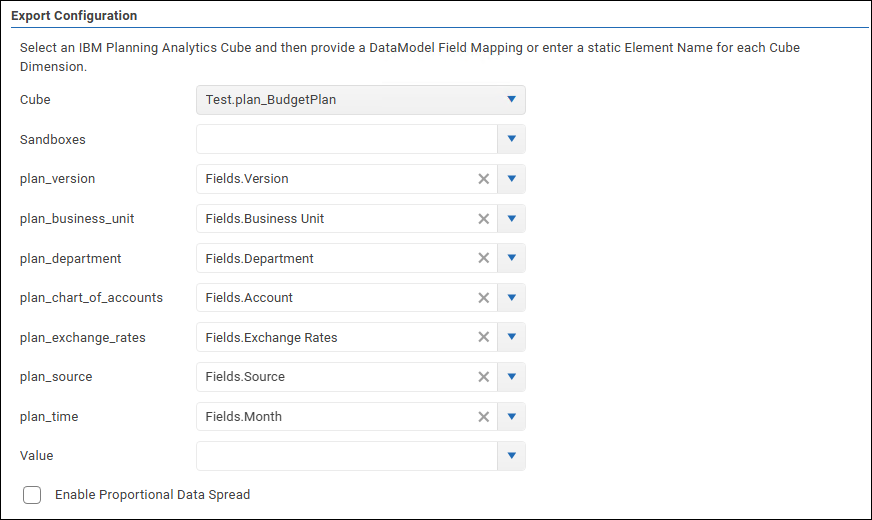
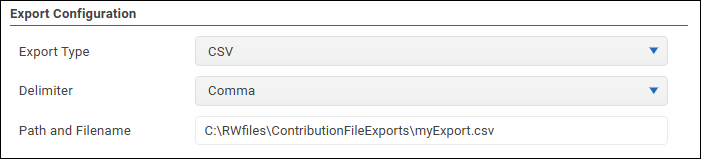
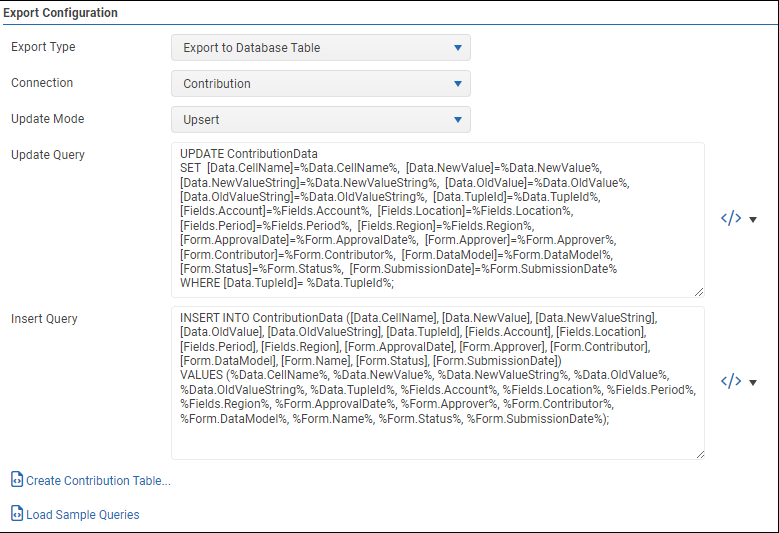
- Define the Export Configuration, which is the information required to export data via the Export Type you selected in Step 3d. The following are examples of Export Configurations for the three Export Types (Planning Analytics Cube, File, and Database Table):
- Planning Analytics Cube
- File -- exports data to an Excel file (.xlsx or.csv). If you select CSV as the format, you must select a data Delimiter (Comma or Tab).
- Database Table
To run or download an export from the Exports tab:
- Do one of the following:
- To run the export as defined, select Run Export. Data is exported to its designated location, as defined in Export Type settings.
- To run the export and download the exported data locally, select Download Export. Data is exported to the Downloads folder on your computer.
Options Tab#
The Options tab contains settings related to the overall Campaign, and are grouped into four sections:
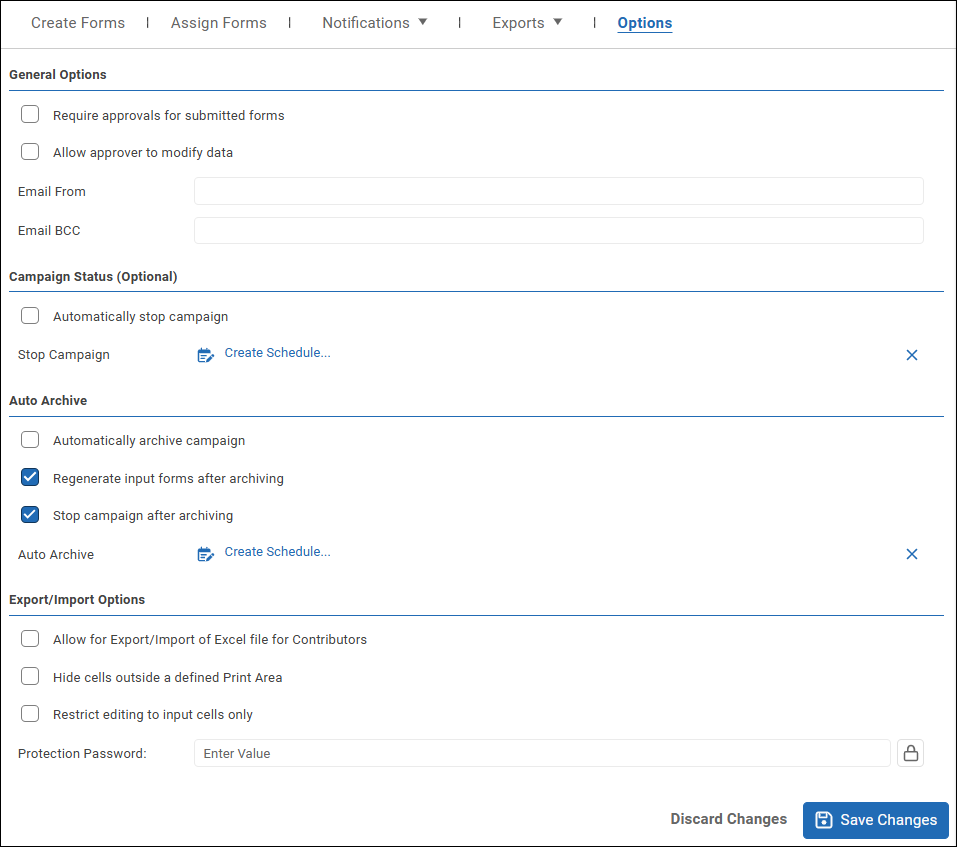
General Options#
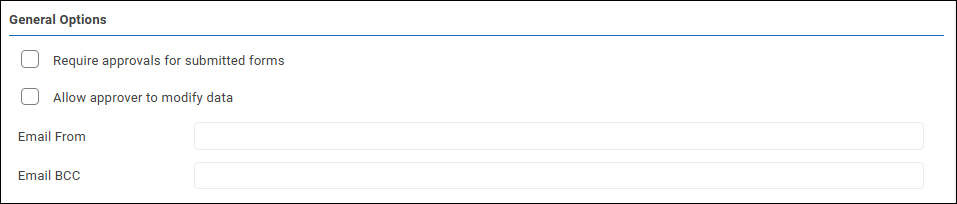
General options are as follows:
- Require approvals for submitted forms -- Controls whether submitted input forms require approval before being considered final. If selected, one or more Approvers must be assigned to each form. Filter options for individual Exports can be configured to exclude unapproved data.
- Allow approver to modify data -- Controls whether Approvers for an input form can edit input data, overriding data submitted by Contributors.
- Email From -- An optional email address that acts as the sender for Campaign emails to participants. This email address overrides the Default From Email Address configured for the Email Distributor. Participants can reply to Campaign emails.
- Email BCC -- An optional email address to which all Campaign emails are blind carbon copied (BCC).
Campaign Status (optional)#

Campaign Status options are as follows:
- Automatically stop campaign -- If selected, the campaign automatically stops as scheduled in the Stop Campaign setting.
- Stop Campaign -- Specify the time and date when you want the Campaign to automatically stop. Applies only if the Automatically stop campaign check box is selected. Select the scheduler icon (
 or
or  ) to switch between the basic scheduler and the advanced scheduler:
- Basic scheduler -- Define the schedule by selecting values from the dropdown lists as required.

- Advanced scheduler -- Define the schedule using a crontab schedule expression. For additional guidance, select Examples. A green check mark indicates that the expression is valid.

- Basic scheduler -- Define the schedule by selecting values from the dropdown lists as required.
Auto Archive#
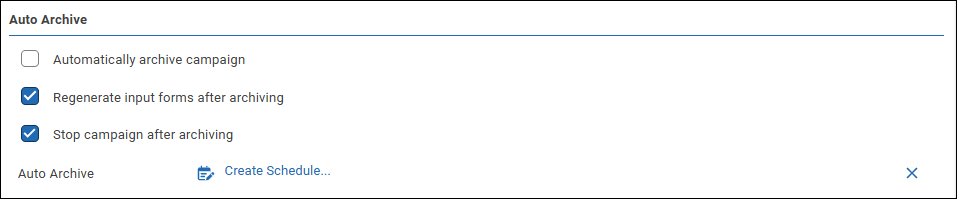
Auto Archive options are as follows:
- Automatically archive campaign -- If selected, the Campaign is automatically archived as scheduled in the Auto Archive setting.
- Regenerate input forms after archiving -- If selected, all input forms are automatically regenerated after the Campaign is archived. The regenerated forms do not contain any data provided by Campaign participants and are set to Not Started status on the Dashboard.
- Stop campaign after archiving -- If selected, the Campaign stops automatically after it is archived.
- Auto Archive -- Specify the time and date when you want the Campaign to be archived. Applies only if the Automatically archive campaign check box is selected. Select the scheduler icon ( or ) to switch between the basic scheduler and the advanced scheduler:
- Basic scheduler -- Define the schedule by selecting values from the dropdown lists as required.
- Advanced scheduler -- Define the schedule using a crontab schedule expression. For additional guidance, select Examples. A green check mark indicates that the expression is valid.
- Basic scheduler -- Define the schedule by selecting values from the dropdown lists as required.
Export/Import Options#
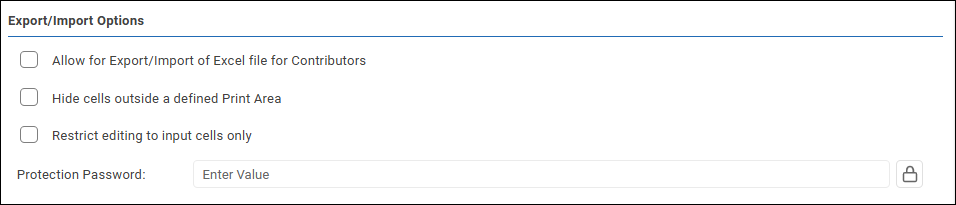
Export/Import options are as follows:
- Allow for Export/Import of Excel file for Contributors - When selected, Contributors can export input forms as Excel files, edit them, and reimport them back into Reportworq Contribution.
- Hide cells outside a defined Print Area - When selected, exported forms include cells that are within the Print Area only. The Print Area was defined in Excel when the Contribution template was created.
- Restrict editing to input cells only - When selected, only cells that are within the input range are editable. When not selected, all cells are editable, but all changes outside the input range are discarded.
- Protection password (and lock/unlock visibility) - If set, the sheets and workbooks are password-protected when they open in Excel. Only input cells are editable. Tip: The lock icon hides/shows the password. Note: Any user with access to the password can change the file's password protection state on the Review ribbon in Excel.
Managing a Campaign#
This section explains how to manage a Contribution Campaign from the Dashboard.
To access the Dashboard for a specific Campaign if starting from the Contribution Campaigns page, navigate to the folder that contains the Campaign, and then select the Dashboard button across from the Campaign name.
The Dashboard displays a list of generated input forms. In the following example, the Campaign is running and participants have engaged with it.
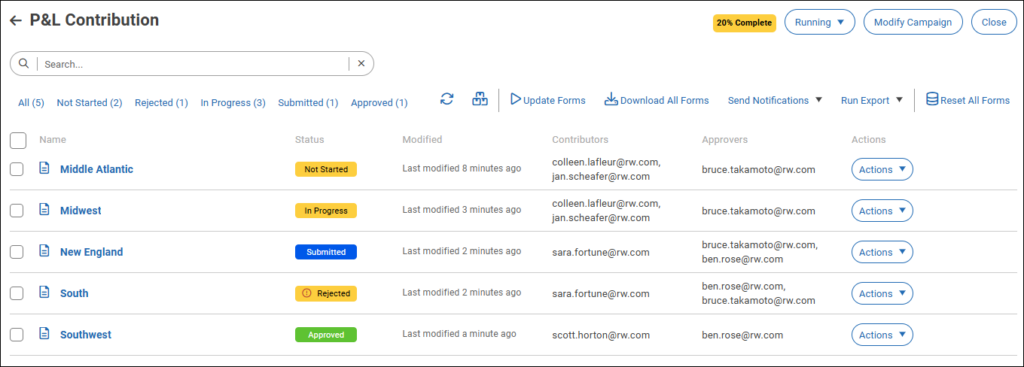
The Dashboard features the following information columns:
- Name -- The name of the input form.
- Status -- Can be one of the following:
- Not Started -- No data has been saved. If a Contributor has opened the input form, they have not yet submitted it and have not selected Close to save their modified data.
- In Progress -- One or more Contributors have modified data and closed the input form, but they have not submitted it. They can open the form again to edit and submit it.
- Submitted -- One or more Contributors have reviewed the input form and edited data. The most recent Contributor has submitted the form.
- Rejected -- An Approver has reviewed and rejected the submitted input form. A Contributor must adjust the input data and resubmit.
- Approved -- An Approver has reviewed and approved the submitted input form.
A lock icon beside the Status indicates that someone is currently reviewing or editing the input form.
- Modified - Indicates how recently the Status of the input form changed, or how recently the form was Unlocked or Reset.
- Contributors - The names of people assigned to complete and submit the input form.
- Approvers - The names or people who can approve the completed input form after a Contributor submits it. This column is present only if the Campaign is set to require approvals. Only one approval is required for a given form, regardless of how many Approvers have been assigned to it.
Run, Pause, or Stop the Campaign#
You can Run, Pause, or Stop the Campaign:
- Run Campaign - Input forms become available for editing by Contributors and for review by Approvers. Running the Campaign does not trigger Reportworq to issue invitation notifications.
- Pause Campaign - Input forms are not available to Contributors or Approvers.
- Stop Campaign - Input forms are not available to Contributors or Approvers.
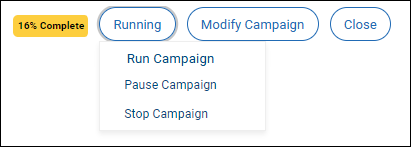
Note: Automations such as schedules, webhooks, and workflow events for notifications or exports do not run when a campaign is paused or stopped.
Search and Filter#
You can use the Search box to filter the list. You can also filter the list to display only input forms that have a specific status. The number beside each predefined filter name indicates how many forms have that status.

Actions#
The buttons in the Actions column provide access to the following options:
- Unlock Form - Releases the input form so it can be reopened.
- Reset Form - Deletes all edited data and comments and changes the input form status to Not Started.
- Download Form - Downloads a copy of the form. Downloaded forms are intended for review purposes only, not for data entry.
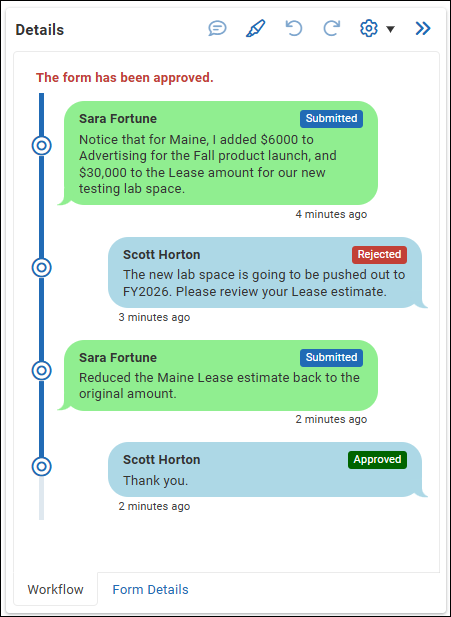
- View Progress - Opens a view of the input form and the Details pane. You can review current and historical data, and comments made by Contributors and Approvers. The Workflow tab displays an event record consisting of status changes and associated comments. Select a node on the workflow timeline to view the input form data as it was when the corresponding event occurred.
The Form Details tab displays a list of data changes, validation issues, and general comments from Contributors and Approvers. It includes entries for all worksheets of the input form. When you select an item in the list, the corresponding data cell on the input form becomes active (green box).
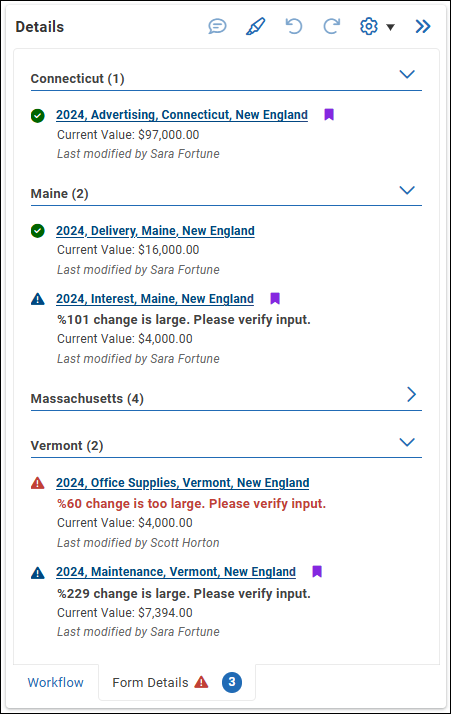
You can expand  or collapse
  the list for each worksheet.
To refresh the list, select a different tab and then select the Form Details tab.
To the left side of each each list item is one of the following icons:
 The data value is valid.
 Validation warning - The data value should be reviewed for accuracy, but it does not block form submission or approval.
 Validation error - The data value is not valid. It must satisfy validation requirements before the form can be submitted or approved.
If the list item is followed by a comment icon  , the cell has one or more associated comments. Select the icon to open the cell's comment box.
The Form Details tab itself shows the number of changes  , and indicates the presence of validation warnings or validation errors . If there are both warnings and errors, only the validation error icon is shown.
Update Forms#
You can regenerate all input forms to ensure they are current.
Update Forms regenerates the input forms to show refreshed and recalculated data if the input form has been configured to load data from a supported datasource. The user's modifications to the form are retained.
Download All Forms#
Download All Forms downloads copies of all forms if none or all forms are selected. If one or some of the forms are selected the Download Selected Form(s) button appears instead. The forms are saved to the local Downloads folder as Excel .xlsx files. If multiple forms are downloaded, they are packaged in a .zip file. Downloaded forms are intended for review purposes only, not for data entry.
Send Notifications#
You can send notifications to invite Contributors and Approvers to participate in the Campaign, or to remind them of outstanding tasks to be completed. You can also send custom messages. Notifications work only when the Campaign is running.
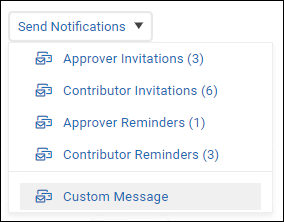
Notifications are as follows:
- Approver Invitation - sends invitations to all Approvers in the Campaign.
- Approver Reminder - sends reminders to all Approvers who have pending input forms that require approval.
- Contributor Invitation - sends invitations to all Contributors in the Campaign.
- Contributor Reminder - sends reminders to all Contributors who have pending input forms that require submission.
- Custom Message - opens an editor where you can create a custom message and send it to your choice of recipient groups. You can also include input forms that are relevant to recipients, delivered as attached Excel files. To insert a variable value, drag a variable pill to where you want to insert the variable, select the pill, and then select appropriate options. When the message is ready, select Send & Close.
Run Exports#
To export data, select an export definition from the Run Export list. You can export data anytime the Campaign is running.
Clear Data#
To delete saved data and reset the selected input forms to Not Started status, select Clear Data.
Tip: If no input forms are selected, Clear Data applies to all forms.
End the Campaign#
The following optional tasks are typically performed at the end of a Campaign:
- On the Dashboard page, check the Status of all forms to determine whether the Campaign has gathered all the data you need. You can Send Notifications to prompt participants to finish their work.
- Stop the Campaign.
- Export the data (Run Export).
- Download All Forms if you might want to view the data recorded on the input forms later and/or keep an archive of the forms. The forms are downloaded as a .zip file in the Downloads folder.
- Send a Custom Message (Send Notifications > Custom Message) to All Contributors and All Approvers to let the participants know the campaign is over. If you select the Attach Input Forms option, participants will receive a copy of the forms they submitted or approved.
- Export the Campaign if you want to save the entire Campaign, including gathered data, to the Downloads folder as a .zip file. On the Contribution Campaigns page, from the Actions list, select Export Campaign.
Workflow for Contributors and Approvers#
A Reportworq Contribution Campaign can solicit and collect planning data from multiple Contributors. For example, a Campaign might gather budgeting data from each regional manager for each state within their region. Contributors provide data on web-based input forms, and then an Approver reviews and approves the data. Depending on Campaign settings, data approval may not be required, in which case the data is considered approved as soon as any Contributor submits it.
Each input form can be assigned to any number Contributors and Approvers. You may be a Contributor for some input forms and an Approver for others.
Whether you are a Contributor, Approver, or both, your Reportworq activity begins when you receive an invitation to participate. The invitation includes a link that prompts you to log in and then opens Reportworq in a web browser. In the following example, Reportworq displays a list of input forms that require the participant's attention.
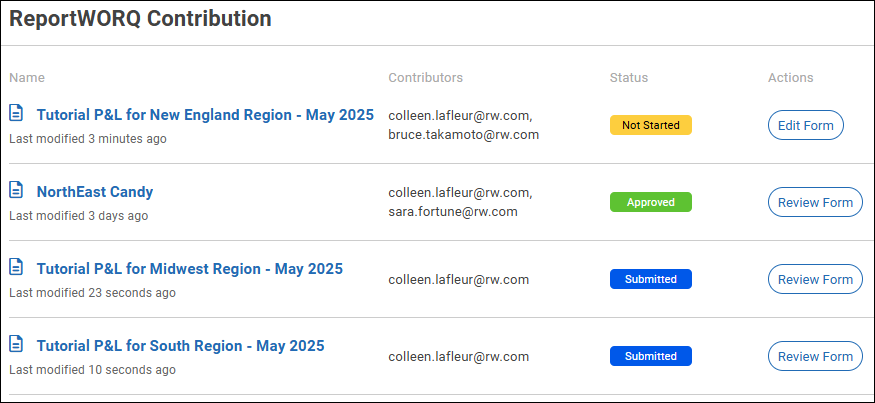
For input forms that have an Edit Form button, you are a Contributor.
For input forms that have a Review Form button, you are an Approver.
Note: You may have access to multiple workspaces. If the workspace icon is visible in the top toolbar, select it to view a list of workspaces.
To open an input form, select its name or its button (Edit Form or Review Form).
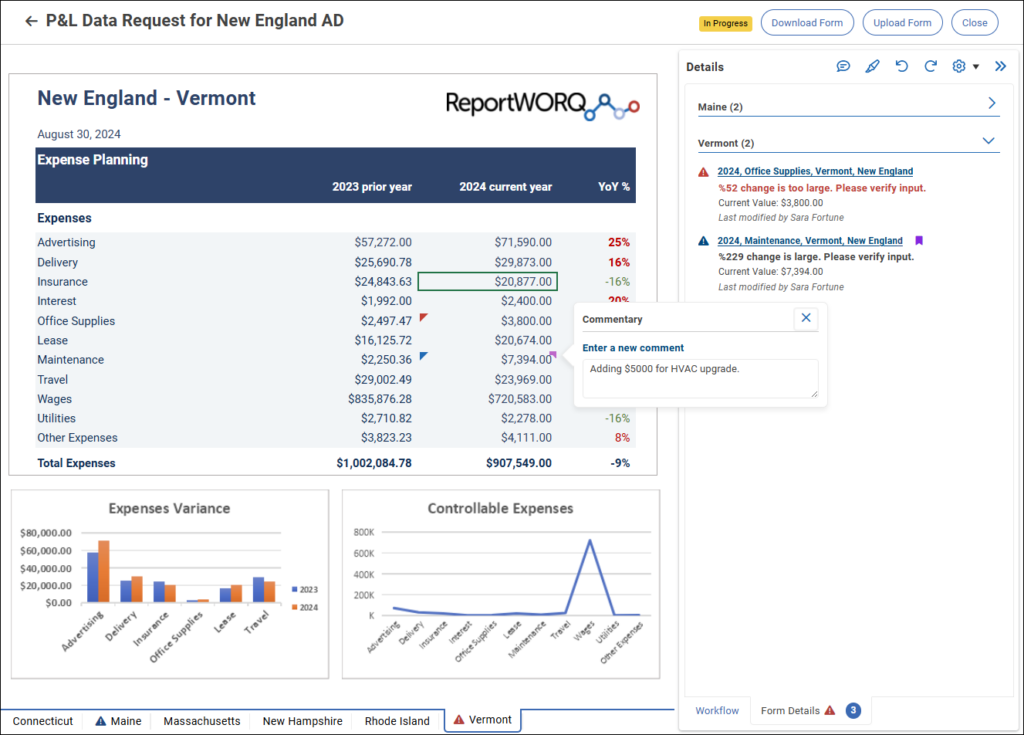
The input form looks almost identical for Contributors and Approvers. The example above includes multiple worksheets, each containing data for one state. This worksheet layout features a table of values and two charts. As the data is edited, the charts and calculated values are updated in real time.
The design of input forms is based on a Microsoft Excel spreadsheet, so they include features similar to those found in Excel. For example:
- If the form is too large for the display area, horizontal or vertical scroll bars are present. Some rows and/or columns may stay in place when you scroll, while others may move or even become hidden.
- You can cut, copy, and paste cells using standard Windows shortcuts (CTRL+X, CTRL+C, CTRL+V).
- You can select a single cell or a range of cells to cut, copy, or paste. You can paste them elsewhere on the input form, including on other worksheets, or into a different application such as an Excel spreadsheet. Selecting non-adjacent cells is not supported; the selection must be a contiguous rectangular block of cells. When you paste a range of cells into an input form, the top left cell of the range is pasted into the active cell, and the range extends downward and/or to the right. If any destination cells are not editable, they are skipped.
- You can use the following Excel keyboard shortcuts when selecting a range of cells:
- SHIFT+click selects a cell range that extends from the active cell to the cell over which you clicked.
- SHIFT+arrow (up, down, left, right) expands or condenses the cell range in the direction of the arrow.
- CTRL+SHIFT+arrow (up, down, left, right) redefines the cell range so it extends from the active cell to the final non-empty cell, in the direction of the arrow.
- You can copy cells from an Excel spreadsheet and paste them into input forms. You can also paste values copied from a text editor, such as Windows Notepad.
Symbols on worksheet tabs indicate whether they contain data validation warnings and/or errors . If the worksheet contains both warnings and errors, only the errors icon is shown.
If you are a Contributor, your job is to review the input form and edit data in the input cells of each worksheet as required. You can also review and add general comments and cell-level comments. You can Close the form at any time to save your data changes as a work in progress, but comments are not saved. When you are finished editing data and adding comments, Submit the form.
If you are an Approver, your job is to review data and comments on each worksheet of the submitted input form. You can add general comments and, depending on Campaign settings, you may be able to edit data and add cell-level comments. When you are finished reviewing/editing the data and adding comments, you must either Reject or Approve the form.
If you Reject the input form, a Contributor must review it, make changes if needed, and resubmit.
The following figure shows input cells.
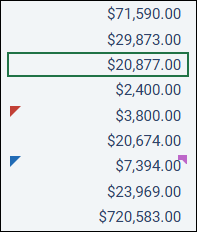
Symbols that may appear within input cells are as follows:
- The green box indicates the active cell. If you select a change on the Form Details tab, the green box moves to the corresponding input cell.
- A red triangle
 or a blue triangle
  in the top left corner of a cell indicates that there is a data validation issue. Hover over the triangle to view the validation message. Values in cells with red triangles must be corrected before the input form can be submitted. Values in cells with blue triangles should be reviewed for accuracy, but the validation issue does not block form submission.
 - A comment icon
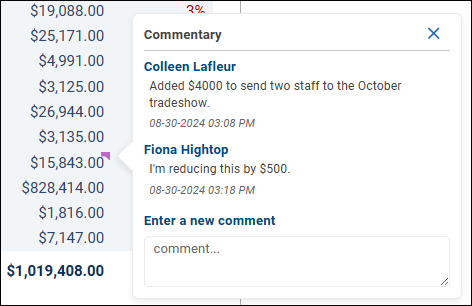
 in the top right corner of a cell indicates there are comments added by Contributors and/or Approvers. Select the icon to view the commentary. Depending on your role and the Campaign settings, you may be able to type a comment in response. The figure below shows commentary for an input cell.
Details Pane#
The Details pane provides information and tools to assist Contributors and Approvers. The following icons appear along the top of the Details pane:

 Add Cell Comment -- Opens the Commentary dialog for the selected cell. You can view previous comments and/or type a new one. Alternatively, you can select a cell's comment icon to open its Commentary dialog.
 Highlight Input Cells -- Turns green highlighting of input cells on and off. Highlighting may help you identify data you need to review and/or edit.
Undo and Redo:
 Undo -- Reverses the most recent action.
 Redo -- Performs the most recent action that was undone. This is the reverse of undo.
Because Reportworq maintains a list of actions as you perform them, you can undo or redo multiple actions by selecting undo or redo repeatedly. If you close an input form and reopen it, the list is still active and you can undo or redo earlier actions. If you submit, approve, or reject an input form, the list of actions is cleared.
 Settings -- The dropdown list includes the following settings:
- Reset Form -- Reverts all input cells to baseline data values. The initial baseline values are set when the input form is generated. Reportworq updates the baseline values each time the form is opened after passing between the Contributor(s) and the Approver(s), as follows:
- Whenever a Contributor submits a form and then an Approver opens it for Review.
- Whenever an Approver rejects a form and then a Contributor opens it for Edit.
- Hide/Show System Messages -- You can hide or show system messages that appear on the Workflow tab.
- Ungroup/Group System Messages -- If system messages are shown on the Workflow tab, you can group/ungroup them.
 Show/Hide Details -- Extends and retracts the Details tab.
The Details pane has two tabs - Workflow and Form Details.
Workflow Tab#
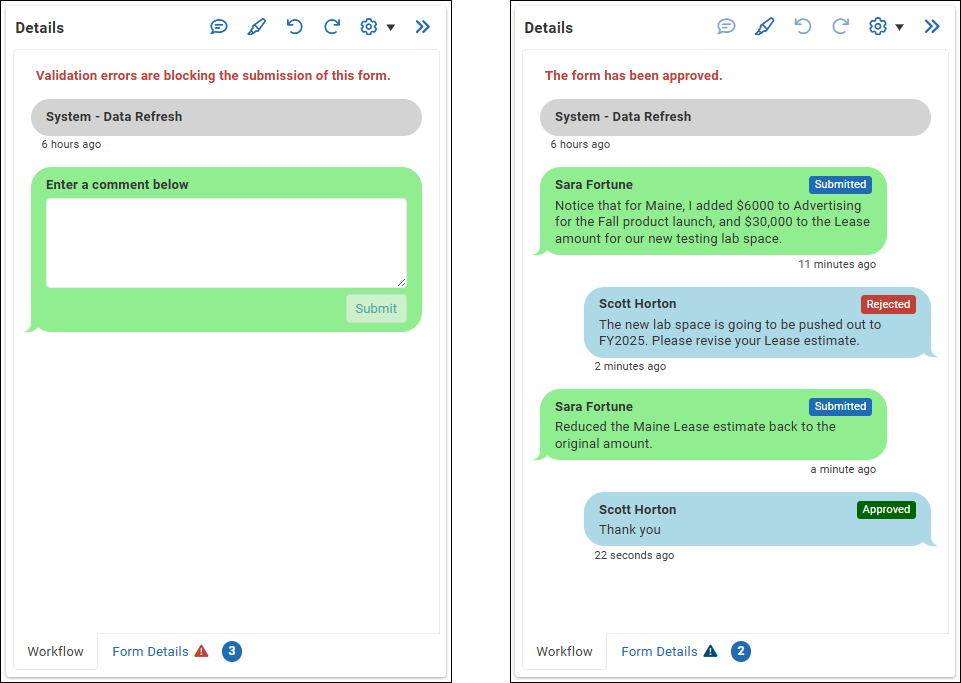
The Workflow tab displays an event record consisting of status changes and associated comments from Contributors and Approvers. Comments from your current session are saved only if you select Submit, Approve, or Reject. They are not saved if you select Close.
Below the event record are one or more action buttons. When you finish reviewing and/or editing the input form, select the appropriate button:
- Submit - When a Contributor is finished editing, they Submit their changes. The input form then becomes available to Approvers. If the Submit button is unavailable, one or more validation errors are blocking submission. A Contributor must fix the errors before they can submit the form.
- Recall Form - There are two scenarios in which this button may apply:
- If the form has been submitted but a Contributor wants to reopen the form to review it and possibly make changes, they can recall the form, edit data and comments as needed, and then submit it again. Contributors cannot recall approved forms.
- If an Approver reviews an input form after it has been approved, they can recall the form. The Approver can then edit the previous Approver's general comment on the Workflow tab. Depending on Campaign settings, the Approver may also be able to modify data values and add cell-level comments. Note: Any changes made by the previous Approver are considered to have been made by the current Approver. After the Approver is finished making changes, they can Approve the form or Reject it. If they reject the form, a Contributor must edit and resubmit it for review and approval. When you Recall a form, the form view closes and the list of input forms appears. To open the form, select Edit Form or Review Form.
- Reject - An Approver can Reject the submitted input form, in which case a Contributor must edit and resubmit it for review and approval.
- Approve - An Approver who has finished reviewing the submitted input form can Approve it.
Below are examples of the Workflow tab when validation errors are blocking submission (left) and showing the event record after the input form has been approved (right).
Form Details Tab#
The Form Details tab displays a list of data changes, validation issues, and general comments from Contributors and Approvers. It includes entries for all worksheets of the input form. When you select an item in the list, the corresponding data cell on the input form becomes active (green box).
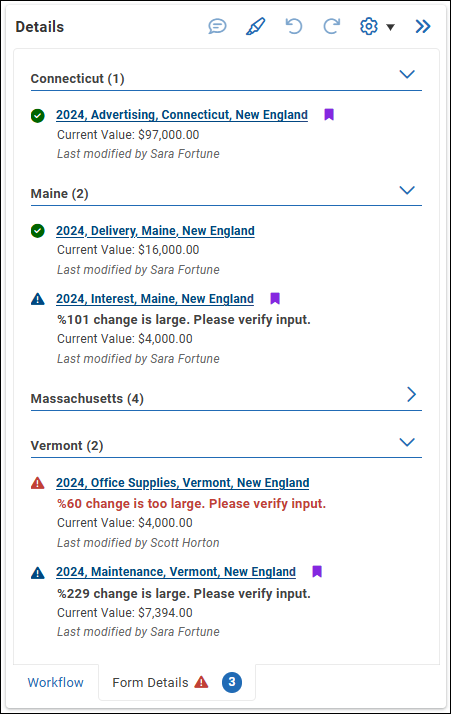
You can expand or collapse the list for each worksheet.
To refresh the list, select a different tab and then select the Form Details tab.
Beside each list item is one of the following icons:
- The data value is valid.
- Validation warning - The data value should be reviewed for accuracy, but it does not block form submission or approval.
- Validation error - The data value is not valid. It must satisfy validation requirements before the form can be submitted or approved.
If the list item is followed by a comment icon , the cell has one or more associated comments. Select the icon to open the cell's comment box.
The Form Details tab shows the number of changes , and indicates the presence of validation warnings or validation errors . If warnings and errors are both present, only the validation error icon is shown.
Viewing and Editing Forms Offline in Excel#
If the Download Form button is present, you can download the form and view it in Excel.
If the Upload Form button is also present, you can download the form, edit it in Excel, and then upload it to Reportworq.

To view, edit, and upload a form:
- Select Download Form. The form is saved to the Downloads folder on your computer, as an Excel .xlsx file.
- Open the form in Excel.
- Edit data in the input range of each worksheet as required.
- Save and close the file.
- In the Reportworq web interface, open the form.
- Select Upload Form, navigate to the file, and select Open. Any values you changed offline appear in Reportworq, just as they would if you had edited them online.
Feedback on this page
Comments, questions, requests, or something missing or unclear? Email us - the page you are on is filled in for you.
Email feedback on this pageOr write to support@reportworq.com directly.