
The Distribution step defines how report output is produced and distributed.
This article includes the following major topics:
- Distribution Options -- Describes settings that define what types of files are produced and where they are delivered. This includes settings related to specific file formats and overall Job settings.
- Destination Options -- Describes settings related to specific distribution methods.
- Reportworq Variables -- Describes variables, which can be used to import distribution-related data such as report file names, email recipients and subject lines, or charts and images for Email, Slack, and Teams messages.
Distribution Options#
In the Distribution Options area, you can specify what types of files are produced and where they can be delivered.
File Name#
Specify a name for the generated report.
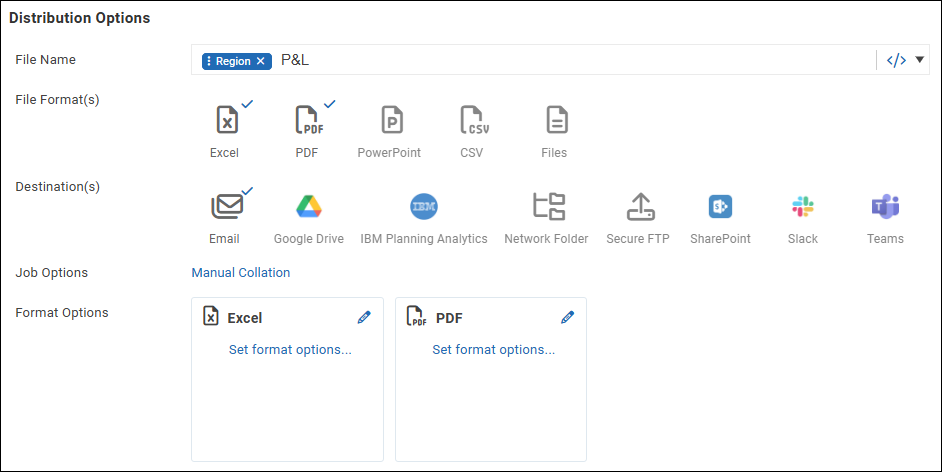
The file name can include static text and/or Reportworq variables such as timestamps, parameter values, or cell data from the generated report. The following example includes text and a parameter variable named Region.

File Format(s)#
Select zero or more file formats for report output. In the following example, Excel and PDF are selected.

If no output formats are selected, the distribution will not include any files. This is useful when developing an HTML newsletter where all the content is placed in the body of an email. Another example is an exception report where a message or warning is sent if the report triggers an exception, but an attached report is not required. For example, sending a Slack message if the trial balance doesn't tie out or data did not load properly from a nightly process.
Settings that affect how each output format is generated are described in the Format Options section, later in this article.
Supported file formats are as follows:
- Excel -- Produces the report as a Microsoft Excel file (.xlsx). If any PDF files were used as source files in the Job, they are excluded from the output. Reportworq does not convert PDF files into Microsoft Excel files. When exporting reports to Google Drive, Reportworq automatically converts the format to Google Sheets. If a source report Excel workbook or individual worksheets are password-protected, they will also be protected in Excel output files generated by Reportworq. The same password applies.
- PDF -- Produces the report as a PDF file (.pdf). Note: If the Job includes source reports in PDF, Word (.docx), or PowerPoint presentation (.pptx) formats, they are included in Job output only if PDF is selected. The content of these source reports is added to the Job output PDF.
- PowerPoint -- Produces the report as a PowerPoint presentation file (.pptx) based on a PowerPoint source presentation file (.pptx) that acts as a template. For more information about PowerPoint presentations linked to Reportworq Jobs, see PowerPoint Presentations.
- CSV -- Produces a comma-delimited or tab-delimited .csv file from the first worksheet of the generated report file.
- Files -- Enables you to add other files as attachments to be delivered alongside report output files.
Destination(s)#
Select one or more Reportworq Distributors as destinations for report delivery. Only enabled Distributors are shown. In the following example, Email is selected.

Job Options#
When you select the blue link beside Job Options, the options appear.

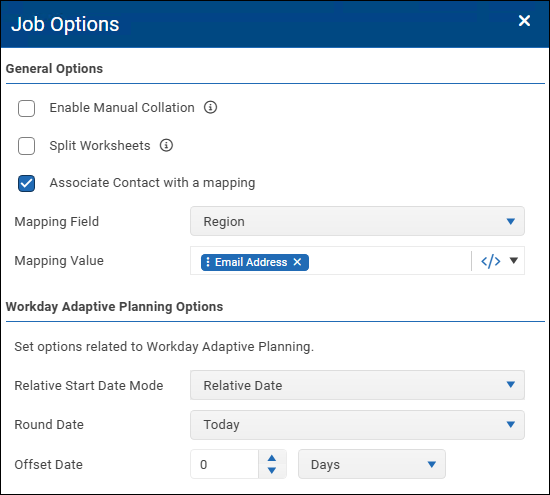
Note: The Workday Adaptive Planning Options area appears only if a Workday Adaptive Planning Datasource is configured and enabled.
General options are as follows:
- Enable Manual Collation -- This option is used in conjunction with the Output Order report option. If manual collation is enabled, Reportworq uses calculated numeric values from the Output Order option to determine a custom sort order for the output report.
- Split Worksheets -- Generates a separate file for each visible worksheet.
- Associate Contact with a mapping -- Creates a mapping that dynamically looks up information related to one or more contacts, to determine which contacts receive the Job output. For more information, see Contact Mapping. Contact mapping options are as follows:
- Mapping Field -- A field from the Address Book, usually a custom field. The value of this field is compared to the Mapping Value to determine which contacts receive the Job output.
- Mapping Value -- A dynamic value from a report, usually a parameter or a variable. As each iteration of a burst report is generated, if the current Mapping Value matches a contact's Mapping Field value, that contact becomes a recipient of the current iteration's output.
Workday Adaptive Planning Options#
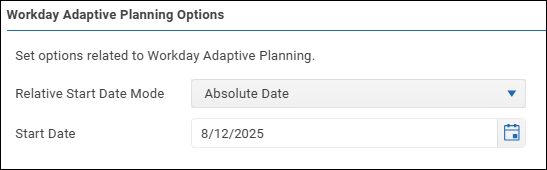
These options enable you to adjust the Relative Start Date that is used in Workday Adaptive OfficeConnect report specifications. The date can be adjusted to a specific absolute date, or a relative date based on today, for example, beginning of the week or the beginning of last month.
To configure the relative start date:
- To use the default relative start date with no adjustments, select Do Not Override.
- To set a specific start date, select Absolute Date and then specify the Start Date.
- To set a relative start date, select Relative Date and then do the following:
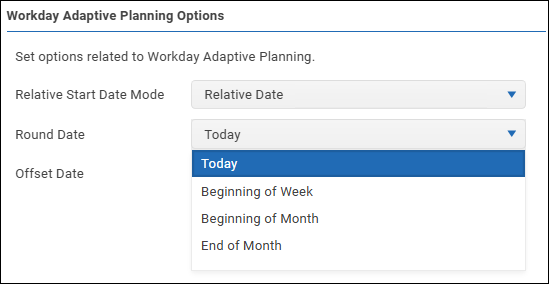
- Select a Round Date, which is the basis of the relative date. The options are Today, Beginning of Week. Beginning of Month, or End of Month.
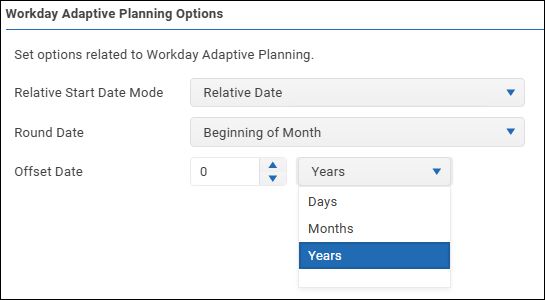
- Select a numeric Offset Date value and time units. The options are Days, Months, or Years.
Format Options#
The Format Options area has one box for each selected format, listing current options for that format. Select a box to access its options settings.

Excel#
When you select the Excel box, options for Excel output appear.
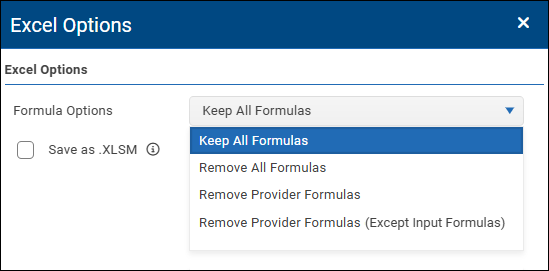
Format options for Excel output are as follows:
- Save as XLSM -- Saves output as a macro-enabled .xlsm format, enabling you to retain the VBA project. For this option, there must be only one source report, and it must be an .xlsm file. The file name must include the .xslm extension.
- Formula Options -- Controls what Excel formulas are included in generated report output:
- Keep All Formulas -- All formulas are included.
- Remove All Formulas -- No formulas are included.
- Remove Provider Formulas -- Formulas from the original source reports are removed, but other formulas such as any added using the Reportworq add-in for Excel are included.
- Remove Provider Formulas (Except Input Formulas) -- Formulas from the original source reports are removed, except for input formulas such as those created for Contribution Templates or Data Collection.
PDF#
When you select the PDF box, options for PDF output appear.
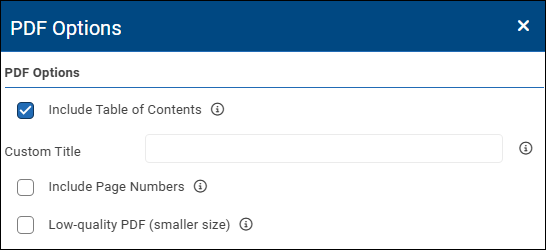
Format options for PDF output are as follows:
- Include Table of Contents -- Adds a table of contents as the first page(s) of the PDF. By default, the name of the Reportworq Job is shown as the title of the document. If you prefer a different title, type it in the Custom Title box.
- Include Page Numbers -- Adds a page number to the footer of each page of the document. If multiple source reports are combined into a single document, this option produces consecutive page numbers for the entire document. The numbering does not restart at 1 for each report.
- Low-quality PDF -- Produces a PDF that has lower resolution text and graphics, which significantly reduces the file size.
PowerPoint#
When you select the PowerPoint box, options for PowerPoint output appear.
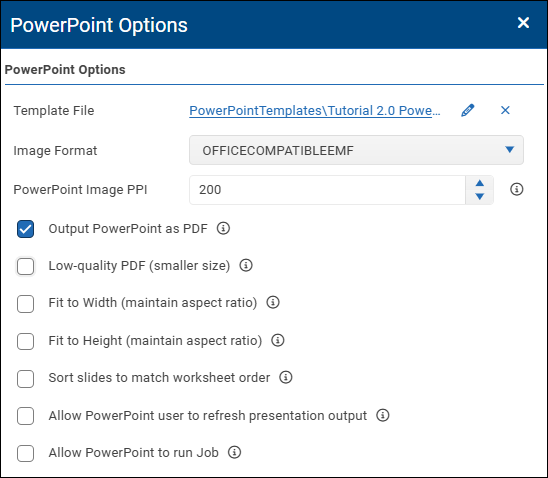
Format options for PowerPoint output are as follows:
- Template File -- Browse to select the PowerPoint source presentation (.pptx file) you want to link to the Job. The source presentation acts as a template for generated PowerPoint output. For more information, see PowerPoint Presentations.
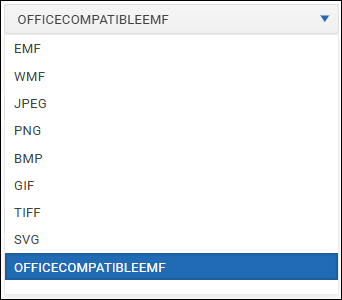
- Image Format -- Select the desired file format for images that appear in generated PowerPoint presentations.
- PowerPoint Image PPI -- Specify the resolution, in pixels per inch, for images that appear in generated PowerPoint presentations.
- Output PowerPoint as PDF -- Produces output as a .pdf file instead of a .pptx file.
- Low-quality PDF (smaller size) -- Produces a PDF that has lower resolution text and graphics, which significantly reduces the file size.
- Fit to Width and Fit to Height -- These options determine whether and how Reportworq resizes data-linked images by default, to maintain their proportions:
- Fit to Width -- The width of each picture is maintained, and the height adjusts as needed. This is the default selection.
- Fit to Height -- The height of each picture is maintained, and the width adjusts as needed.
- If both options are selected, Reportworq does not adjust image height or width. Images may appear to be stretched horizontally or vertically.
- If neither option is selected, settings for individual shapes in the source presentation determine whether Reportworq adjusts the height or width of their images. Note: These settings are defaults that may be overridden by settings for individual shapes in the source presentation.
- Sort slides to match worksheet order -- If selected, slides appear in the same order as the source report's Excel worksheets.
- Allow PowerPoint user to refresh presentation output -- Enables report recipients to refresh data based on their choice of Job output versions, using the Reportworq add-in for PowerPoint.
- Allow PowerPoint to run job -- Enables report recipients to run the underlying Job to generate fresh data from the datasource, using the Reportworq add-in for PowerPoint. Note: If you select this option, you must also select Allow PowerPoint user to refresh presentation output. Report recipients cannot run the Job unless they are also allowed to refresh the presentation output.
CSV#
When you select the CSV box, options for CSV output appear.
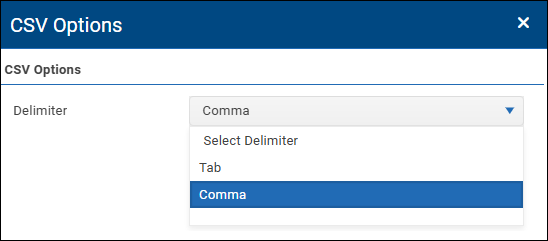
Format options for CSV output are as follows:
- Delimiter -- Select either Tab or Comma to specify the delimiter to be used between data items in the .csv file. The default option is Comma.
Files#
When you select the Files box, the options for adding and removing files appear. In the following figure, two files have been added:
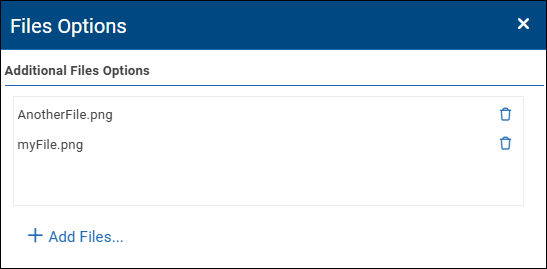
To add files:
- Select Add Files. The Select Files dialog appears. The tree shows a hierarchy of report provider folders.
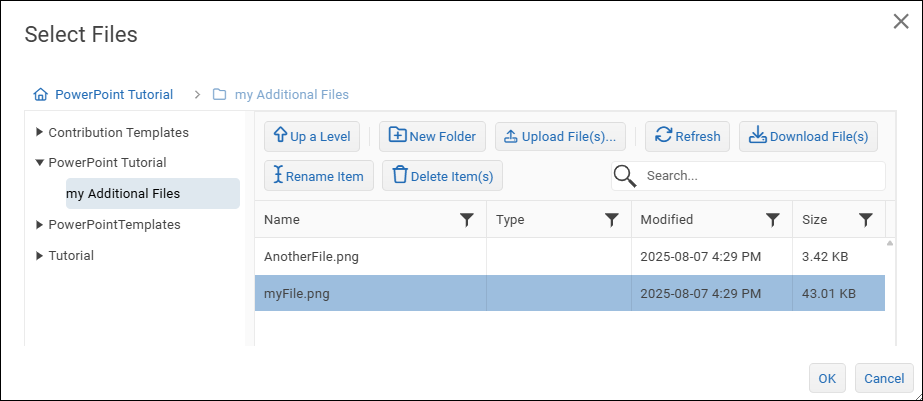
- Browse to the files you want to add and select them. Tip: If the files you want to add are not present, you can upload them to the selected report provider folder.
- Select OK. The Select Files dialog closes, and the files are added.
To remove a file from output:
Select the trash can icon.
Destination Options#
Destination options control what is delivered to each selected destination (Distributor). Options vary by distributor, and may include delivery locations, selection of attachments, and messages to recipients either with or without AI Generated Insights.
There are sets of options for AI Generated Insights and for each distributor. These options appear in collapsible areas below the other distribution options. In the following figure, the Network Folder Options area is expanded, while all others are collapsed. To expand a set of options, select its expansion icon.
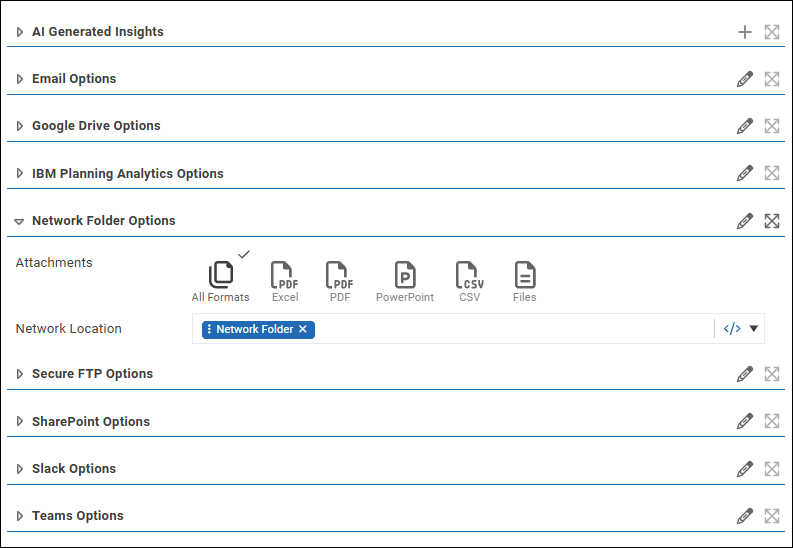
Tip: To view a set of options in full screen mode select Enter Full Screen icon. 
To exit full-screen mode, select the Exit Full Screen icon. 
Text fields in options settings accept static text and/or Reportworq variables. For more information, see Reportworq Variables.
This section contains the following topics about configuring destination options:
- AI Generated Insights
- Message Editor
- Configure Email Options
- Configure Google Drive Options
- Configure IBM Planning Analytics Options
- Configure Network Folder Options
- Configure Secure FTP Options
- Configure SharePoint Options
- Configure Slack Options
- Configure Teams Options
AI Generated Insights#
This section describes how to create AI Insight prompts that can be inserted into message definitions to produce AI Generated Insights.
AI Insight prompts are requests that tell the AI model what to do. They are sets of instructions, questions, and data that tell the AI model to find and/or analyze information and to format the results as requested. Prompts can include Reportworq variables, which enable you to provide the AI model with report data and other Job-related context. The AI model ingests the variable data and provides meaningful analysis to message recipients.
Note: AI Generated Insights require connections to supported AI providers and AI models. For more information, see AI Connections Overview.
Example: Adding AI Generated Insights to a P&L Report#
In this example, a P&L report compares current year results to prior year results. The Reportworq Distribution Job produces one iteration of the report for each state and emails it to the manager for that state as a PDF attachment. The following figure shows report output for New York State.
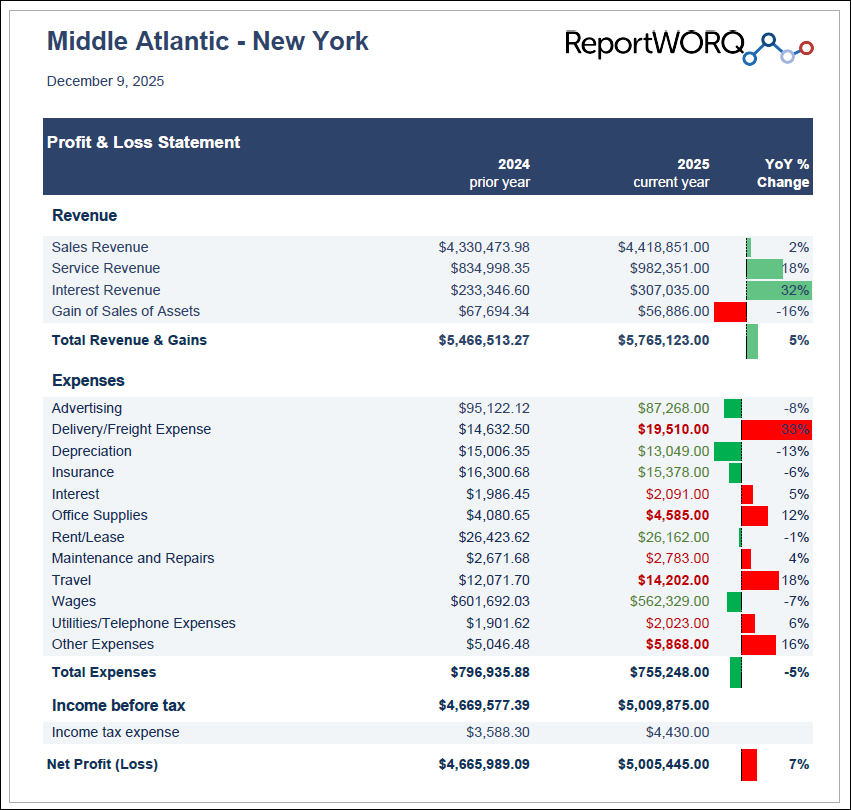
The Job creator decides to enhance the email message that accompanies the report output by adding a summary analysis of the Expenses data. They create an AI Insight prompt named Expenses Summary, as shown below.
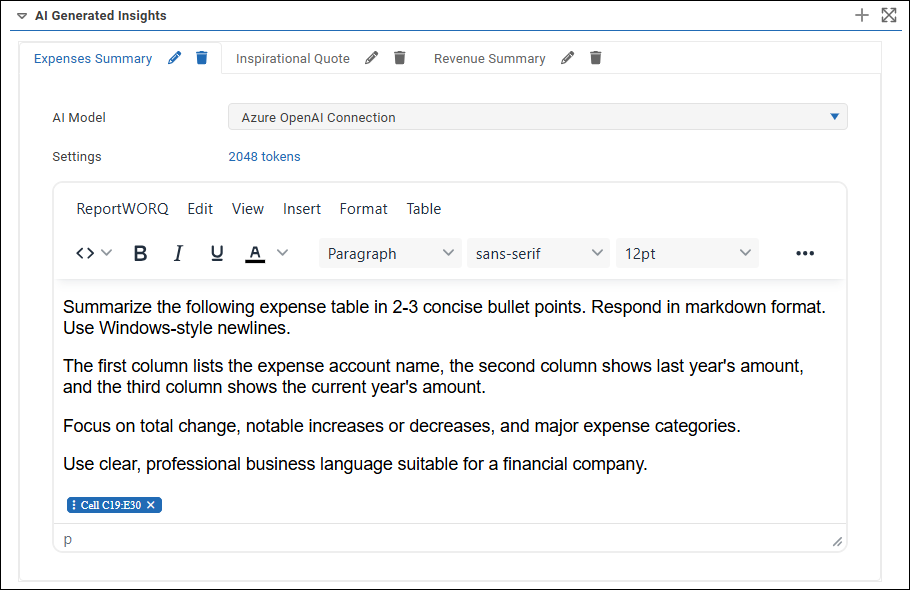
The AI Insight prompt includes instructions about what to analyze and how to present the results, as well as a Cell Value variable that provides the AI model with data from the underlying source report. In this example, the cell range C19:E30 includes the expense category names and the expense data for both years.
All AI Insight prompts created for the Job are available to be added separately to Email messages, Slack messages, and Teams messages, so you can fully customize the message for each distributor. You can add any number of prompts to a message. The following figure shows a message definition that includes the Expense Summary AI Insight prompt.
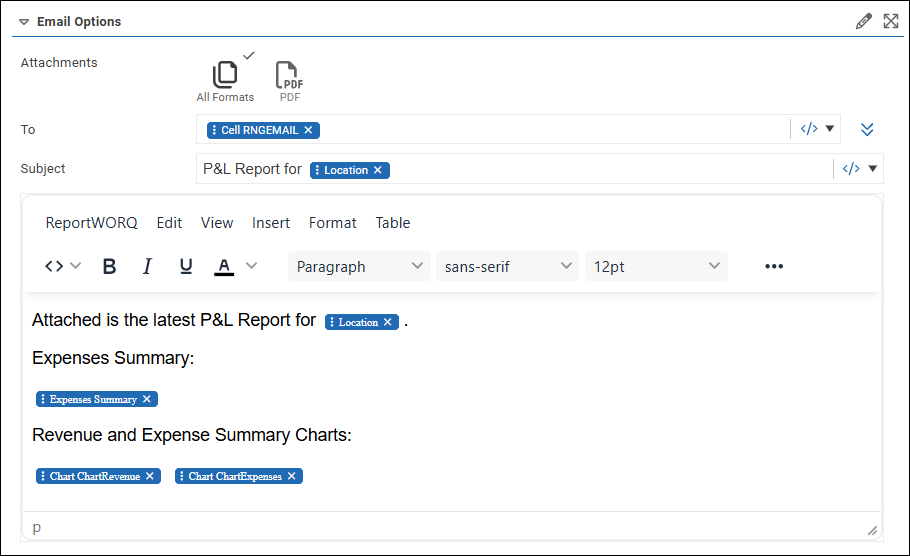
In this message definition:
- The Cell Value variable, Cell RNGEMAIL provides the recipient email address.
- The Parameter variable, Location provides the state name.
- The AI Insight variable, Expenses Summary triggers the AI Insight prompt created earlier.
- Two charts are also included, imported via the Chart variables Chart ChartRevenue and Chart ChartExpenses.
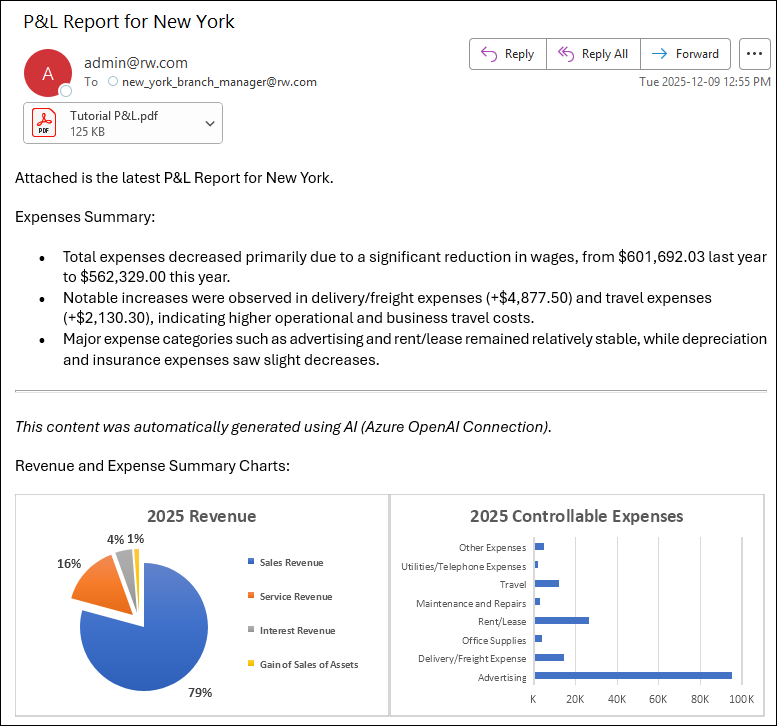
The following figure shows the resulting email message as delivered to the manager for New York State. The three Expense Summary bullets are an AI Generated Insight. The message indicating that the content was automatically generated using AI is optional.
Create AI Insight Prompts#
This section describes how to create AI Insight prompts.
After they are created, you can add them to Job messages as AI Insight variables.
To create an AI Insight prompt:
- At the top of the AI Generated Insights area, select the add icon.
 The New AI Prompt dialog appears.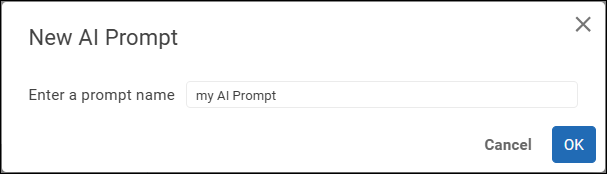
- Enter a name for the new prompt and then select OK.
- Expand the AI Generated Insights area and then select the tab that is named after the new prompt. The tab text turns blue and settings for the AI prompt appear. The following example shows a fully configured AI prompt definition.
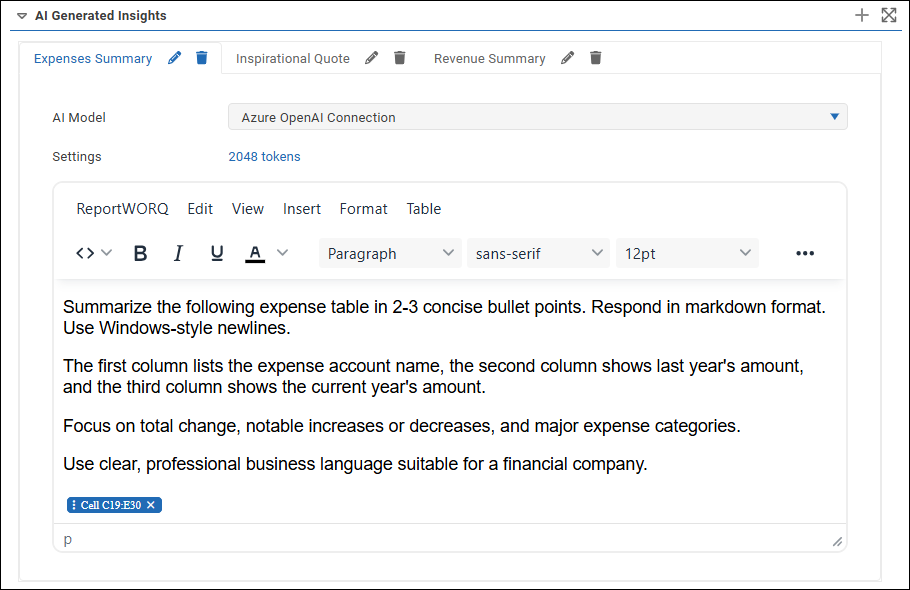
- From the AI Model list, select the AI provider connection you want the AI prompt to query against.
- Select the blue link beside Settings. The AI Prompt Settings panel appears.
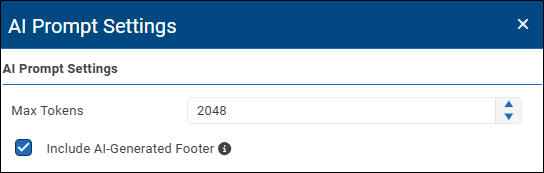
- Configure the following settings:
- Max Tokens -- Sets the maximum number of AI tokens to be consumed each time the AI prompt is processed. The default value is configured in the AI provider connection settings. Tip: An AI token is a small chunk of data, such as a word or part of a word, that the AI model processes to understand an AI prompt. AI services typically charge fees based on the number of AI tokens consumed.
- Include AI-generated footer -- Adds a note to the bottom of the generated AI insight, informing message recipients that the content was generated by AI and listing the AI provider connection. The following example is footer text for an AI provider connection named my Bedrock Connection: This content was automatically generated using AI (my Bedrock Connection).
- In the Message Editor area, create the AI Insight prompt. Prompts are requests that tell the AI model what to do. They are sets of instructions, questions, and data that tell the AI model to find and/or analyze information and to format the results as requested. Prompts can include text, hyperlinks, graphics, and Reportworq variables, which enable you to feed the AI model report data and other Job-related context. The AI model ingests the variable data and provides meaningful analysis to message recipients. Tip: From the Reportworq menu, you can save and load AI prompts as message templates to help you quickly create similar AI prompts for the current Job or other Jobs.
- If you want to test the AI prompt:
- Insert the prompt into a Job message as an AI Insight variable.
- On the Test tab, Generate or Regenerate and then review the test results.
- Expand the AI Insights section, which shows information about each AI Insight processed.
- Review the request, the response, and information about tokens used and time elapsed.
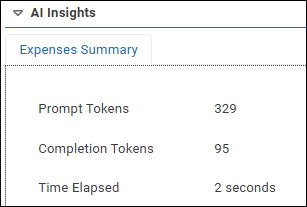
- Send the test output to a test destination and review the message when it arrives.
Message Editor#
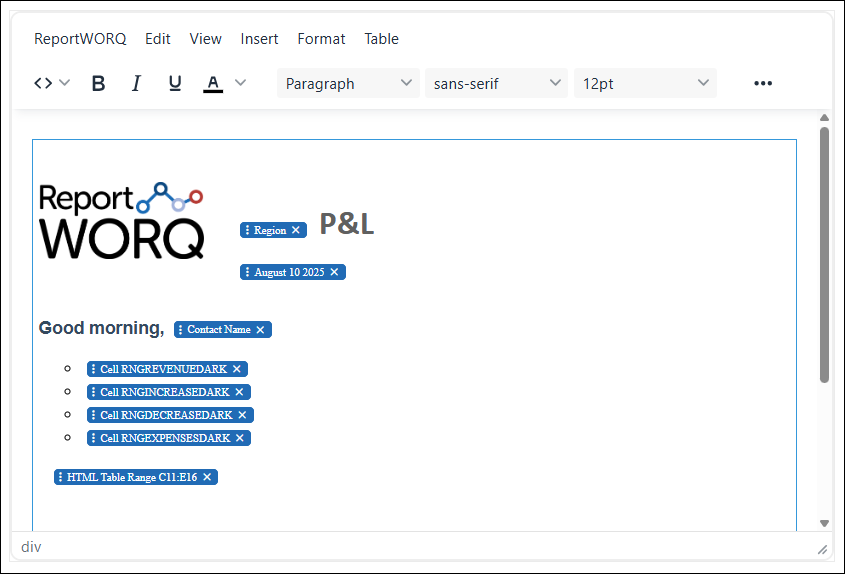
Reportworq uses an HTML message editor to structure Email, Slack and Teams messages as well as AI Insight prompts. This WYSIWYG editor allows you to create and format HTML elements. The body of the message can include static text, Reportworq Variables, and hyperlinks.
Tip: In addition to variables that provide text, messages can contain variables that provide charts, images, screenshots, and AI Insights. For more information about these options, see Reportworq Variables.
Markdown Syntax for Hyperlinks#
The message editor supports the use of Markdown syntax for hyperlinks.
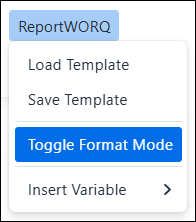
To toggle between editing modes, select Toggle Format Mode from the Reportworq menu.
Markdown syntax for hyperlinks is as follows:
[Insert Link Text Here](Insert Link URL Here)
- The link text (what the user sees) is entered in the square brackets.
- The link URL is entered in the parenthesis.
- The (Link URL) must be entered after the [Link Text].
This text-based syntax allows for the use of Reportworq variables in the link text and URL.
Message Templates#
You can save and load message templates. Loading a saved template can help you quickly create and customize messages.
The list of templates includes templates for Job messages, AI Insight prompts, and Contribution Campaign notifications.
Note: There are six built-in templates designed for use with Contribution Campaigns. Their names begin with either Approver or Contributor. These templates are not intended for report distribution. For more information, see Contribution Campaigns.
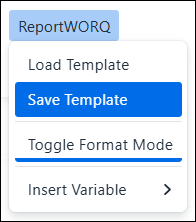
The options to Load or Save templates are on the Reportworq menu.
Configure Email Options#
Email options apply to reports delivered as email messages with attached report output files.
To configure Email options:
- Specify which file formats to include as email attachments. In the following example, Excel and PDF are selected.

- Select the Show More Fields icon beside the To field.

- Configure the following, using static text and/or variables:
- To -- Specify one or more recipients, entered as email addresses and/or variables.
- Cc and Bcc -- Specify additional recipients, if any.
- From -- Optionally, specify a sender email address that overrides the default From address. This box appears only if specifying a sender is allowed. For more information, see Email Distributor.
- Priority -- Select Low, Normal, or High. The default is Normal.
- Subject -- Specify a subject line for the email.
- In the message editor, compose the email message. The message can include text, graphics, hyperlinks, and Reportworq variables, including AI Insights. For more information about composing messages, see Message Editor.
- At the top of the Email Options area, select the edit icon
 to access additional options.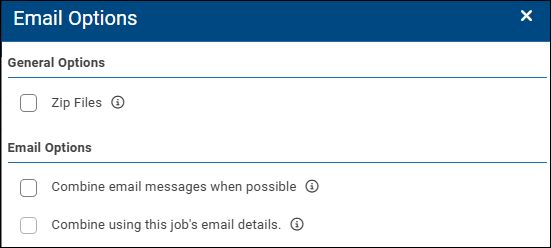
- Configure the options as follows:
- Zip Files -- If selected, all attachments are compressed into a single .zip file.
- Combine email messages when possible -- By default, Reportworq sends files to recipients as soon as they are generated, which may result in multiple email messages to the same person. For Jobs that are scheduled to run together, Reportworq can combine generated reports from multiple jobs into one email message per recipient. If this option is selected, Reportworq defers sending email messages until all output files have been produced. To reduce the potential memory footprint, Reportworq saves the files to a temporary folder in the file system while files are queued. Once all the files have been produced, any email messages where the To, Cc, Bcc, and From fields are identical are reduced to a single email message with the output files attached. If the Zip Files option is also selected, the files are compressed into a single zip file. Temporary files are removed from the file system when email messages are sent. Reportworq uses the email content and options from one of the Jobs to create the combined email message. You can specify which Job's email to use by selecting Combine using this job's email details for that Job.
- Combine using this job's email details -- If selected, the current Job's email content and options are to be used when generating a combined email message for a set of scheduled Jobs. This option is used in conjunction with the Combine email messages when possible option. IMPORTANT: Apply the Combine using this job's email details option to only ONE of the combined Jobs. Otherwise, Reportworq may use the email content and options from any Job in the set.
- Close the additional Email Options pane.

- Select Save Changes.
Configure Google Drive Options#
Reports can be distributed to a user's Google Drive.
To configure Google Drive options:
- Specify which file formats to upload to the Google Drive. In the following example, Excel and PDF are selected.
- Configure the following, using static text and/or variables:
- Impersonate Email -- The email address of the recipient's Google Drive.
- Drive Id -- ID of the recipient's home folder (their My Drive).
- Folder Path or Id -- A forward-slash delimited path to the subfolder where the report is to be uploaded. This is optional.
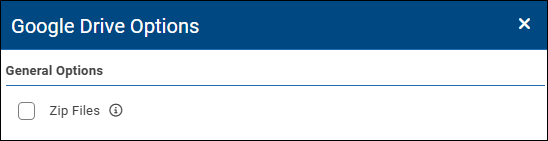
- At the top of the Google Drive Options area, select the edit icon to access additional options.
- Configure the options as follows:
- Zip Files -- If selected, all attachments are compressed into a single .zip file.
- Close the additional Email Options pane.
- Select Save Changes.
Configure IBM Planning Analytics Options#
Reports can be distributed to Planning Analytics TM1 Application Folders.
To configure IBM Planning Analytics options:
- Specify which file formats to include. In the following example, Excel and PDF are selected.
- Configure the following, using static text and/or variables:
- Datasource -- Select the datasource name.
- Folder Path -- Specify the path to the desired Application Folder.
- At the top of the IBM Planning Analytics Options area, select the edit icon to access additional options.
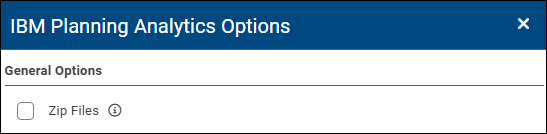
- Configure the options as follows:
- Zip Files -- If selected, all attachments are compressed into a single .zip file.
- Close the IBM Planning Analytics Options pane.
- Select Save Changes.
Configure Network Folder Options#
Reports can be distributed to a local or network file folder.
To configure network folder options:
- Specify which file formats to upload. In the following example, Excel and PDF are selected.
- Specify the UNC Folder Path to the destination folder, using static text and/or variables. The account that is running the Reportworq Bootstrapper Windows Service must have write access to the folder.
- At the top of the Network Folder Options area, select the edit icon to access additional options.
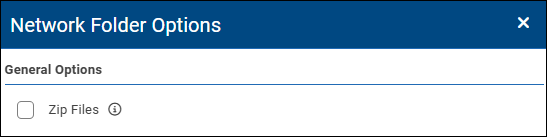
- Configure the options as follows:
- Zip Files -- If selected, all attachments are compressed into a single .zip file.
- Close the Network Folder Options pane.
- Select Save Changes.
Configure Secure FTP Options#
Reports can be distributed to secure FTP folders.
The Secure FTP Distributor is linked to a user account on an SFTP server. Reports are delivered securely to a remote folder associated with that user account.
To configure secure FTP options:
- Specify which file formats to upload. In the following example, Excel and PDF are selected.
- If you want to deliver the reports to a subfolder, specify the SFTP Location using static text and/or variables.
- At the top of the Secure FTP Options area, select the edit icon to access additional options.
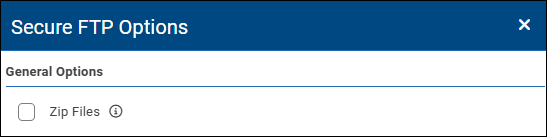
- Configure the options as follows:
- Zip Files -- If selected, all attachments are compressed into a single .zip file.
- Close the Secure FTP Options pane.
- Select Save Changes.
Configure SharePoint Options#
Reports can be distributed to SharePoint folders.
To configure SharePoint options:
- Specify which file formats to upload. In the following example, Excel and PDF are selected.
- Specify the SharePoint Location URL, using static text and/or variables. Do not use the URL visible in a browser for the SharePoint folder. It is not valid. Valid SharePoint Location URLs are case-sensitive, and must be in the following form: https://myofficeserver.sharepoint.com/sites/mysite/myfolder1/myfolder2 The URL consists of the following:
- https://myofficeserver.sharepoint.com -- The base URL of the SharePoint instance.
- /sites/mysite --The specific SharePoint site where the distributed documents should be stored.
- /myfolder1/myfolder2 -- The subfolder where the file should be stored.
- At the top of the SharePoint Options area, select the edit icon to access additional options.
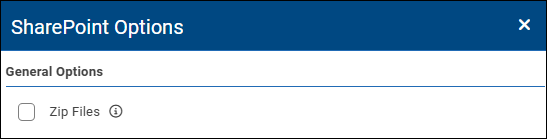
- Configure the options as follows:
- Zip Files -- If selected, all attachments are compressed into a single .zip file.
- Close the SharePoint Options pane.
- Select Save Changes.
Configure Slack Options#
Reports can be distributed directly to Slack channels and users.
To configure Slack options:
- Specify which file formats to include as attachments. In the following example, Excel and PDF are selected.
- Specify the destination Slack Channel, using static text and/or variables.
- In the message editor, compose the email message. The message can include text, graphics, hyperlinks, and Reportworq variables, including AI Insights. For more information about composing messages, see Message Editor.
- At the top of the Slack Options area, select the edit icon to access additional options.
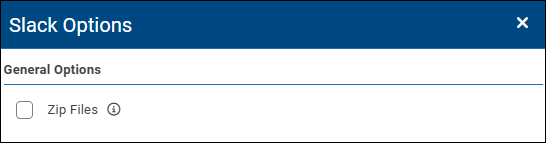
- Configure the options as follows:
- Zip Files -- If selected, all attachments are compressed into a single .zip file.
- Close the additional Email Options pane.
- Select Save Changes.
Configure Teams Options#
Reports can be distributed to Microsoft Teams groups as an email message sent to one or more Teams channels.
Note: The ability to send emails to Teams channels is a feature that must be enabled by a Teams Administrator. For more information, see https://support.microsoft.com/en-us/office/send-an-email-to-a-channel-in-teams-d91db004-d9d7-4a47-82e6-fb1b16dfd51e.
To configure Teams options:
- Specify which files to include as attachments. In the following example, Excel and PDF are selected.
- In the Chats box, specify one or more Teams channel email addresses, using static text and/or variables.
- In the message editor, compose the email message. The message can include text, graphics, hyperlinks, and Reportworq variables, including AI Insights. For more information about composing messages, see Message Editor.
- At the top of the Teams Options area, select the edit icon to access additional options.
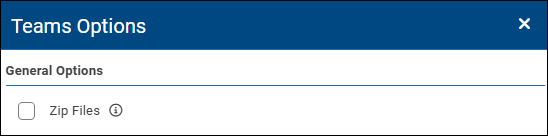
- Configure the options as follows:
- Zip Files -- If selected, all attachments are compressed into a single .zip file.
- Close the additional Email Options pane.
- Select Save Changes.
Reportworq Variables#
Reportworq variables can be used to import distribution-related data such as report file names, email recipients and subject lines, or charts and images for Email, Slack, and Teams messages.
When configuring distribution options, you can insert variables into text fields and message bodies.
To insert a variable in a text field:
- Position the cursor where you want to insert the variable.
- Expand the associated variables list and then select the variable type.
 A red variable pill appears.
- Select the variable pill and then configure the variable's properties as required.
To insert a variable in a message body:
- Position the cursor where you want to insert the variable.
- From the Reportworq menu, select Insert Variable and then select the type of variable you want to insert. In the following figure, Parameter is selected.
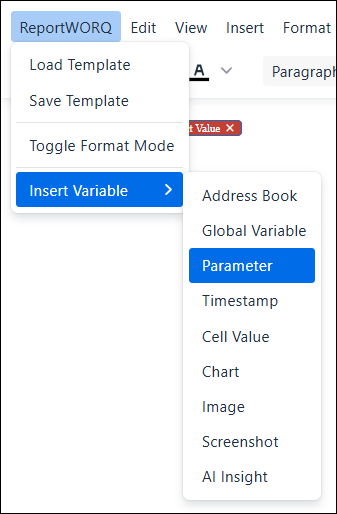 A red variable pill appears. Its text varies by variable type.
- Select the variable pill and then configure the variable's properties as required. Tip: If you want to apply HTML formatting to variables, first select Toggle Format Mode from the Reportworq menu. Variable pills switch to plain text codes that can more easily be selected and formatted. To avoid breaking a variable, do not edit the code between the square brackets, for example, [[code]]. Apply any formatting to the entire pill text. To return to the WYSIWYG view, toggle the format mode again.
The following sections contain information about configuring variable properties:
- Address Book Variables
- Global Variables
- Parameter Variables
- Timestamp Variables
- Cell Value Variables
- Chart Variables
- Image Variables
- Screenshot Variables
- AI Insight Variables
Address Book Variables#
This variable provides access to contact fields and custom fields as defined in the address book. For example, you can drag the Address Book variable to the Email To field and select the contact's email address as the content. This variable is only valid when using burst sets and a contact is associated with each burst set.
Global Variables#
This variable provides access to the value of any defined global variable. Global variables enable you to change a value without navigating through Job configuration settings.
To create a global variable:
- From the menu bar on the left side of the Reportworq window, select the Global Variables icon.
 The list of global variables appears.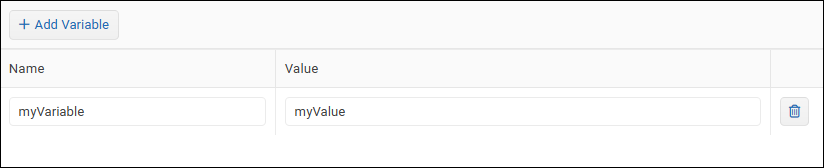
- Select Add Variable.
- Provide a Name and a Value for the new global variable.
Parameter Variables#
This variable provides access to the parameter value(s) used to generate the report. For example, if the report was created for the Canada Business Unit, then we can include the title Canada in the filename by dragging this variable to the filename field and selecting Business Unit as the content. If a parameter resulted in a list of values, the content will include a comma-delimited list of those values. This may be useful in the body of the email message, but likely not desired in the filename if it is long.
Timestamp Variables#
This variable generates timestamps based on the current and local date and time. A custom timestamp format may be selected or created by using the timestamp parts available in the button in this editor. For example, a timestamp in the format MMMM d yyyy might produce August 12, 2025, whereas the format MM.dd.yy would produce 08.12.25. Use this tool and the example output in the editor to craft the desired timestamp format.
Tip: When distributing reports to a folder-based destination, timestamp variables in the folder path can help to organize report outputs by year and month, for example. Reportworq will automatically create these folders based on the timestamp values.
Cell Value Variables#
This variable sources variable information from a cell reference or named range from inside the generated report. The worksheet with the desired information does not need to be included in the final output because Reportworq will obtain this value after calculation but before removing worksheets. If the worksheet that was referenced by this variable was also used with a parameter that caused the worksheet to be replicated multiple times, then this variable will hold the comma-delimited list of values from this cell location from each of the generated worksheets. This variable allows the user to generate, calculate, or source data from the Microsoft Excel file to be used as part of the Distribution step. One example may be to include the title NEEDS REVIEW in the filename if the data in the report exceeded a threshold defined by an IF statement. Another example would be to dynamically load the email address from the report, based on a formula such as a VLOOKUP or element attribute formula for a specific data provider.
Cell value variables can also be used in AI Insight prompts. Data from the referenced cell(s) or named range is included in the AI prompt sent to the associated AI model. The context of the report is respected; in the case of iterative reports such as for burst sets, only data for the current iteration is included.
To insert a cell value variable:
- In the message editor, position the cursor where you want the variable to appear.
- On the Reportworq tab, select Insert Variable and then Cell Value.
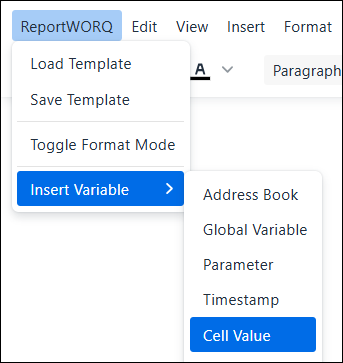
- A red Select Value variable pill appears at the cursor position.

- Select the variable pill. The Edit Cell Value panel appears. In the following example, the settings are fully configured.
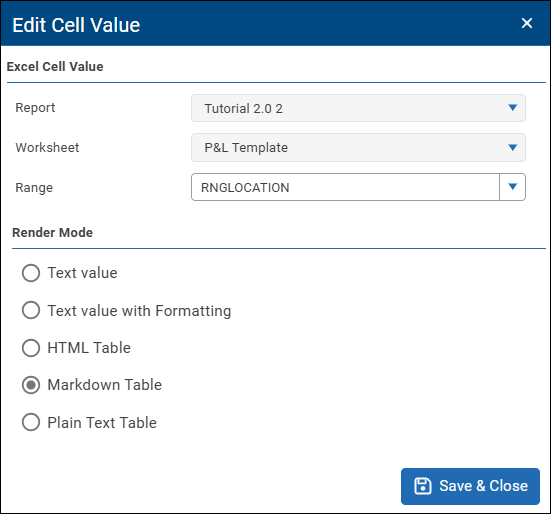
- Select the Report that contains the cell(s) or named range that you want to include in the message or AI prompt.
- Select the Worksheet that contains the cell(s) or named range.
- Select the named Range or enter the cell range reference.
- In the Render Mode area, specify how you would like the data to be rendered in the message. Tip: For AI prompts, select Markdown Table or Plain Text Table for best results.
- Select Save & Close. The variable pill turns blue and displays the render mode and the cell reference or named range. In the following example, the render mode is Markdown Table and the named range is RNGLOCATION.

Chart Variables#
This variable can be used to insert a copy of a named chart into the body of an email message.
The Range option in this editor permits the user to select the name of the chart from a cell location. This option supports the use case where there are multiple candidate charts for the email message, but based on a formula, the most appropriate chart will be inserted.
Image Variables#
This variable can be used to insert a copy of a named image into the body of an email message.
The Range option in this editor permits the user to select the name of the image from a cell location. This option supports the use case where there are multiple candidate images for the email message, but based on a formula, the most appropriate image will be inserted.
Screenshot Variables#
This variable allows for a range of cells to be inserted into the body of the email message as an image.
Tip: If you want to omit the worksheet that contains the inserted cells from all attached files to avoid duplication, clear the worksheet's check box on the Reports tab.
AI Insight Variables#
This variable allows you to insert AI Insight prompts into email messages, Slack messages, and Teams messages that accompany Job output.
Each AI Insight prompt is configured to query an AI model and insert the generated query results directly into the host message.
You can use any number of available AI Insight prompts in a given message.
To insert an AI Insight prompt into a Job message:
- In the message editor, position the cursor where you want the AI Insight to appear.
- On the Reportworq tab, select Insert Variable and then AI Insight.
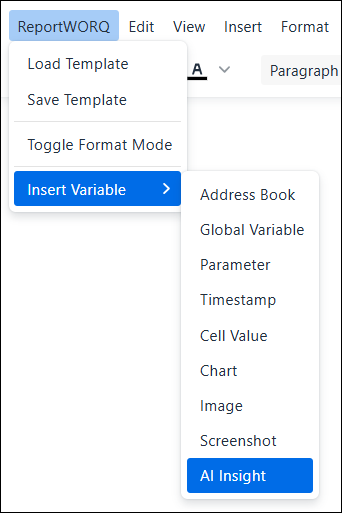
- A red Select AI Prompt variable pill appears at the cursor position.

- Select the variable pill. The Edit AI Insight panel appears.
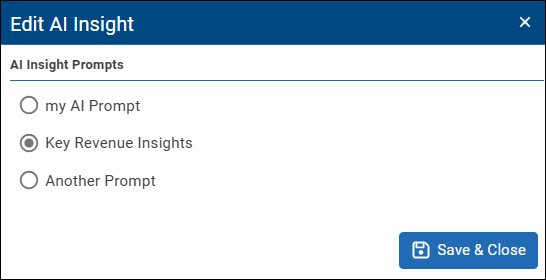
- Select the AI Insight Prompt you want to insert.
- Select Save & Close. The variable pill turns blue and displays the name of the selected AI prompt.

Feedback on this page
Comments, questions, requests, or something missing or unclear? Email us - the page you are on is filled in for you.
Email feedback on this pageOr write to support@reportworq.com directly.