
Configuring the Email Distributor for Reportworq#
Reportworq administrators can open the Administration screen from the Administration button on the top right side of the page and edit Email settings.
There are four types of authentication providers:
Basic Authentication#
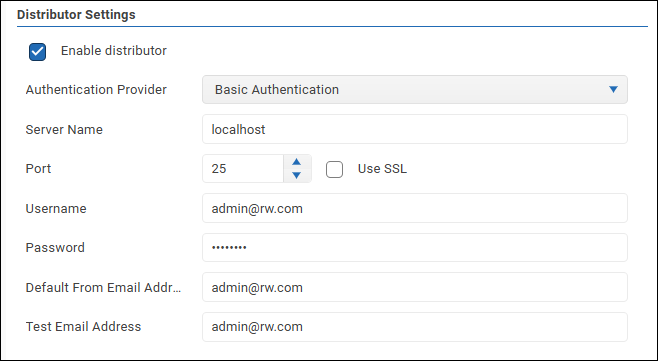
Settings:
- Server Name and Port -- Provide the server name and the port number. The default port is 25 without SSL. If you want SSL, the default port is 587.
- Username and Password -- If your SMTP server requires authentication, provide valid credentials for the username and password.
- Default From Address -- This address is often a username. If your server is whitelisted to send email, this address isn't needed.
- Test Email Address -- This email address will be used for validation testing.
- Enable distributor -- When selected, the distributor is available for use.
See Toolbar Options for additional settings.
Microsoft 365 SMTP#
If Microsoft 365 SMTP authentication has not yet been configured to work with Reportworq Azure, App Registration can be referenced here.
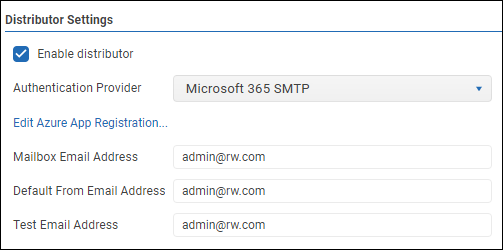
Settings:
- Mailbox Email Address -- The name of the mailbox used to send email from, which is typically the same account that was used for the Microsoft 365 Authentication.
- Default From Address -- This address is often a username. If your server is whitelisted to send email, this address isn't needed.
- Test Email Address -- This email address will be used for validation testing.
- Enable distributor -- When selected, the distributor is available for use.
See Toolbar Options for additional settings.
SendGrid API Settings#
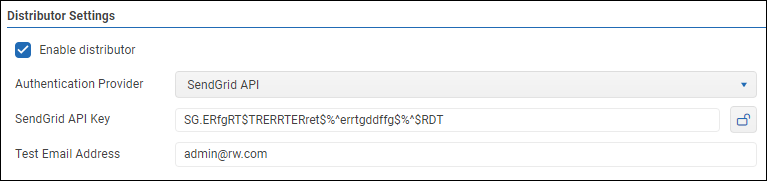
Settings:
- SendGrid API key: Enter your key here.
- Test Email Address: This email address will be used for validation testing.
- Enable distributor -- When selected, the distributor is available for use.
See Toolbar Options for additional settings.
Microsoft 365 Graph#
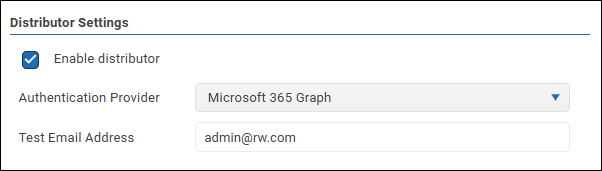
Settings:
- Test Email Address: This email address will be used for validation testing.
- Enable distributor -- When selected, the distributor is available for use.
See Toolbar Options for additional settings.
Toolbar Options#
- Test -- Select the Test Connection button to test the settings. Reportworq will either display a success message or show error messages with further information about missing or misconfigured settings.
- Save -- Select the Save button to save changes made to the distributor settings.

Advanced Options -- Select the Advanced Options button to access additional settings. 
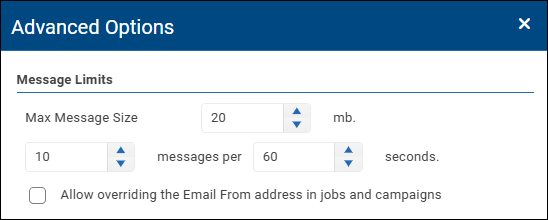
Advanced Options are as follows:
- Max Message Size -- Use the value box to specify the maximum size of outgoing messages, in megabytes (MB). Doing so will either prevent Reportworq from sending the email, or Reportworq may split it into multiple email messages. If set to 0, the maximum message size is determined by Email server settings.
- Maximum message frequency -- Set message throttling if your server requires it. Use the value boxes to limit the maximum number of messages Reportworq sends for a specified period. For example, to limit outgoing messages to ten per minute, set the first box to 10 and the second box to 60 (seconds), as shown below. If values are set to 0, Reportworq does not limit the frequency of messages.

- Allow overriding the Email From address in jobs and campaigns -- If selected, users creating a Distribution Job or a Contribution Campaign can specify the From address that Reportworq uses when sending messages related to that Job or Campaign. Notes:
- If this setting is cleared, the From box is not shown in settings for Jobs and Campaigns. Reportworq retains any previously-created From addresses and reapplies them if this setting is later reselected.
- If the Email Distributor is configured to use Microsoft 365 Graph as its authentication provider, any From address other than the default must be a delegated email sender.
Delegating Email Senders in Microsoft Exchange#
The information in this section applies only if the Email Distributor uses Microsoft 365 Graph as its authentication provider.
By default, emails sent by Reportworq are sent from the email address of the account that was used to authenticate to Microsoft 365.
If the Allow overriding the Email From address in jobs and campaigns option is enabled, Reportworq Distribution Jobs and Contribution Campaigns can use an alternative email address as the From address. Any From address other than the default must have Send as privileges in Microsoft Exchange.
You can assign Send as privileges to any number of mailboxes. To do so, you must be a Microsoft Exchange Administrator for your organization and know the email address of the account that was used to authenticate to Microsoft 365.
To assign Send as privileges:
- Log in to the Microsoft Exchange Admin Center at https://www.admin.exchange.microsoft.com.
- Select Recipients > Mailboxes. A list of mailboxes appears.
- For each mailbox to which you want to assign Send as privileges, do the following:
- Select the mailbox. Mailbox settings appear.
- Select the Delegation tab.
- In the Send as area, select Edit. The Manage mailbox delegation dialog appears.
- Select + Add members and select the email address of the account that was used to authenticate to Microsoft 365.
Feedback on this page
Comments, questions, requests, or something missing or unclear? Email us - the page you are on is filled in for you.
Email feedback on this pageOr write to support@reportworq.com directly.