
Overview#
The Configuration page of the Administration interface contains settings related to the following:
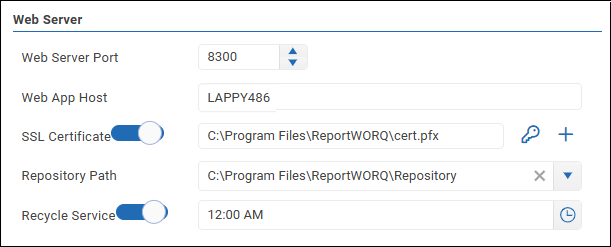
- Web Server -- settings for the web server port, web app host, SSL encryption, repository location, and recycling service.
- Backup -- settings for enabling repository backup and for generating a repository report.
- Logging -- settings related to debug logs and audit logs.
- Execution -- settings related to Job execution for managing performance, Job history, and failure notification.
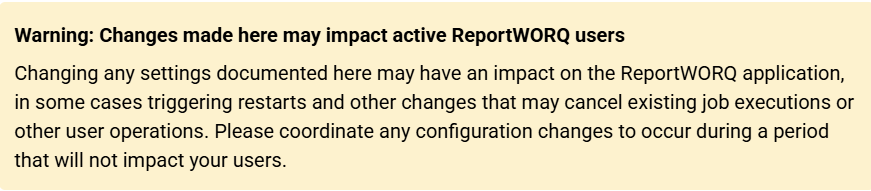
- Restart Reportworq Service: This triggers a restart of the Reportworq application, which typically takes a matter of seconds. After a restart, users must refresh their browser to reconnect to the application.
Web Server#
Reportworq is a web application that runs within the host service created during initial installation and first-time configuration. This topic describes web server settings.
Web Server Port and SSL Certificate#
The Web Server Port is the port number that Reportworq users will use to access the web application and APIs.
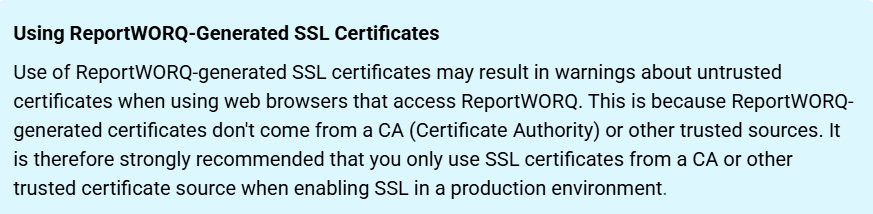
The SSL Certificate switch determines whether Reportworq traffic uses SSL encryption protocol. If using SSL, you can create a self-signed SSL certificate or use one issued by a Certificate Authority (CA). To ensure that users can access the Reportworq web application, you must also import the SSL certificate into the Trusted Root Store on the Reportworq computer.
Notes about self-signed SSL certificates:
- Self-signed certificates are not intended to be used permanently and should be replaced by a CA-issued SSL certificate as soon as possible.
- If a user receives certificate-related errors in their web browser when they try to access Reportworq, importing the SSL certificate into the Trusted Root Store of the user's computer may resolve the issue.
- When using the Reportworq add-in for Excel, if the add-in task pane repeatedly displays the Reportworq login dialog, open Reportworq in a web browser to check for certificate-related problems. Resolve any such issues before trying to use the Excel add-in again.
Changing any of these settings requires a restart of the Reportworq application for the settings to take effect.
Tip: SSL encryption is required in order to use the Reportworq Add-in for Excel.
To create a self-signed SSL certificate:
- In the text box beside the SSL Certificate switch, type the path where you want to store the new certificate. For example, C:\Program Files\Reportworq. Note: This procedure will replace and overwrite any previous self-signed Reportworq SSL certificate located in the specified path.
- Select the plus icon
 .
. - In the Confirmation dialog, select OK.
- In the Certificate DNS Entry dialog, specify the DNS entry for the certificate, and then select OK. IMPORTANT: Do not use localhost in the DNS entry. Users must use the exact address specified here when they access the Reportworq web application. A new self-signed SSL certificate is created in the path you specified in Step 1. The filename is cert.pfx.
- From the Certificate Created dialog, record the certificate password and then select OK. IMPORTANT: You will need this password to import the SSL Certificate into the Trusted Root Store. This is the only opportunity to view the password; it cannot be displayed again.
To use a CA-issued SSL certificate and password:
- In the text box beside the SSL Certificate switch, type the path where the existing SSL certificate is located, including the filename. For example, C:\Program Files\Reportworq\cert.pfx.
- Select the key icon
 .
. - In the Certificate Password dialog, enter the certificate password and then select OK.
- In the Certificate Password dialog, confirm the certificate password by entering it again, and then select OK.
- In the Certificate DNS Entry dialog, specify the DNS entry for the certificate, and then select OK. IMPORTANT: Do not use localhost in the DNS entry. Users must use the exact address specified here when they access the Reportworq web application.
To import an SSL certificate into the Trusted Root Store of the Reportworq Computer:
- Navigate to the folder that contains the SSL Certificate. Tip: For self-signed certificates, the filename is cert.pfx.
- Right-click the filename and then select Install PFX. The Certificate Import Wizard appears.
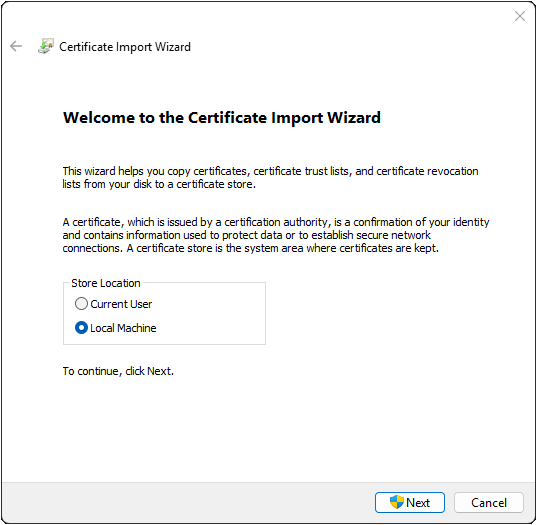
- For Store Location, select Local Machine.
- Select Next. The Wizard shows the File name and path for the SSL Certificate.
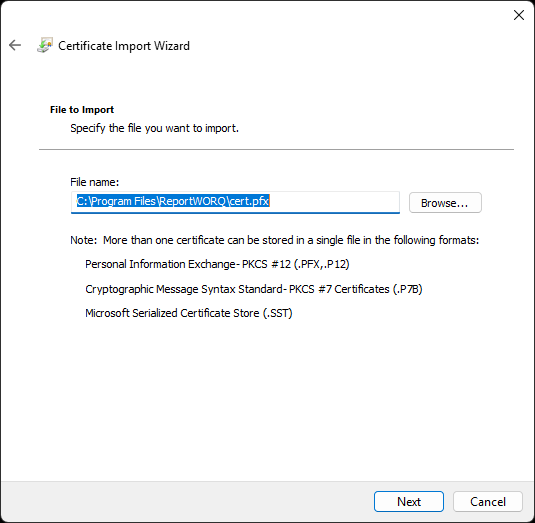
- Select Next. The Wizard requests a Password and provides Import options.
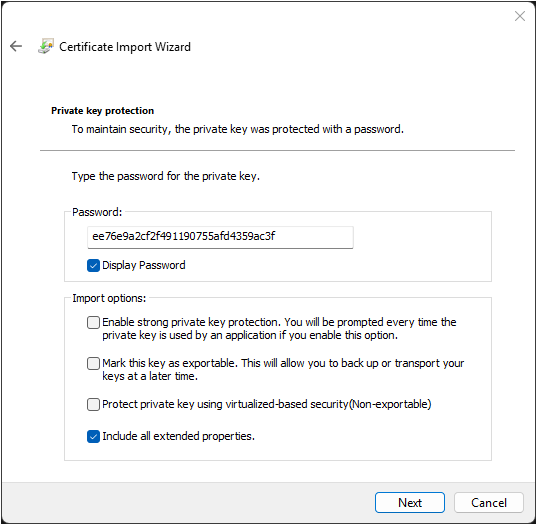
- In the Password box, paste the password for the SSL Certificate.
- In the Import options area, select Include all extended properties, and clear the other options.
- Select Next. The Wizard provides Certificate Store options.
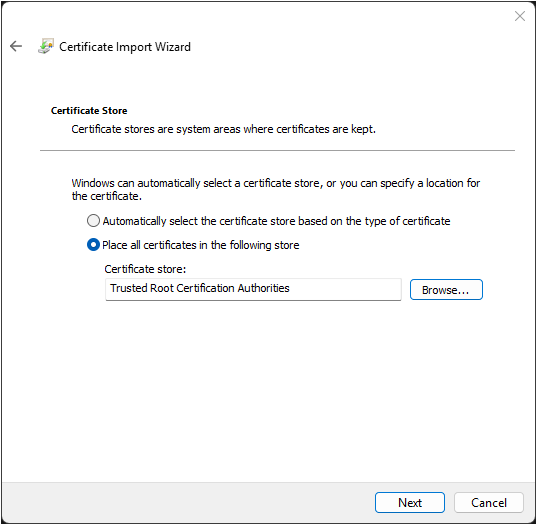
- Select Place all certificates in the following store, then Browse to select Trusted Root Certification Authorities, and then select OK.
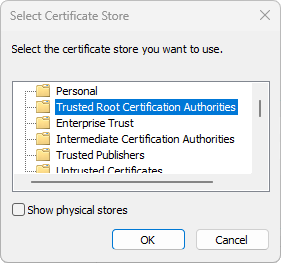
- Select Next.
- The Wizard displays the import details.
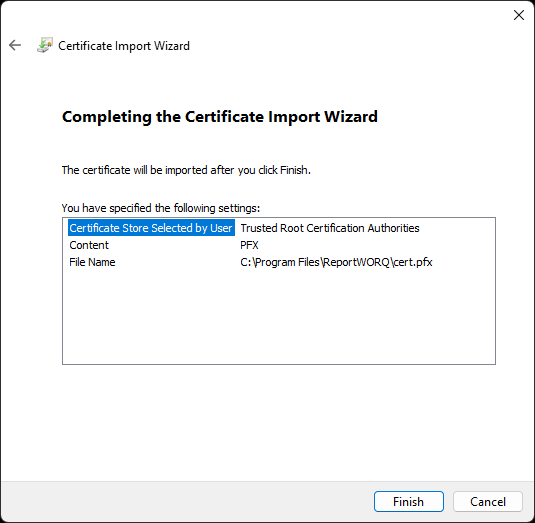
- If the details are correct, Select Finish. Otherwise, select Cancel and then begin this procedure again.
- Confirm that users can access the web application. Note: If previous attempts failed, they may need to restart their web browsers.
Advanced SSL/TLS Configuration
When SSL is enabled in Reportworq, there are advanced SSL configuration options that some customers may wish to modify such as supported TLS versions and cipher suites, to ensure that any SSL/TLS communications aren't at risk of known SSL/TLS vulnerabilities. SSL/TLS support typically has two overall components that impact Reportworq:
- SSL/TLS Client settings: connections from Reportworq to other data sources.
- SSL/TLS Server settings: connections to the Reportworq web application and APIs from Reportworq users.
Reportworq is designed to inherit all its advanced SSL/TLS settings from the operating system configuration. Making changes to these settings varies by operating system version and local policies, so please consult with your network/IT security teams if you believe advanced SSL/TLS configuration is required. Once any of those setting changes are applied, Reportworq will automatically use them after an application restart.
Determining the Reportworq URL Address#
The Reportworq URL that users use to access the application is determined by the settings above and takes this format:
**[HTTP or HTTPS]://[Address of Reportworq Host Machine]:[Port]**
Where:
- HTTP or HTTPS: Secure transfer protocol (HTTPS) is used when the SSL Certificate switch is on (blue). Otherwise, HTTP is used.
- Address of Reportworq Host Machine:
- The fully-qualified domain name (FQDN) of the host server, if configured, for example, reportworq-prd1.company.com
- The machine name of the host server, for example, reportworq-prd1
- The IP address of the host server, for example, 10.20.30.111
- Port: The value of the Web Server Port setting.
Examples:
- Machine name, SSL not enabled, running on port 8300: http://reportworq-prd1:8300
- Fully-qualified domain with SSL enabled, running on port 8300: https://reportworq-prd1.company.com:8300
Web App Host#
The machine name, IP address or DNS name used to access the main web application from a remote machine.
Repository Path#
The Reportworq repository is where all Reportworq application data including Jobs, Data Source Connections, and Distributor Configuration settings are stored. Temporary working files generated during job execution and Job history, are also managed within the repository.
The Repository Path defines the root location of the Reportworq repository. Reportworq's default location for this setting is in a "Repository" subfolder where the application is installed. This setting can be changed at any time, but note that it will impact all application users. Changing this location requires a restart of the Reportworq application for the updated setting to take effect.
Moving the Repository
To move the repository you must perform the following steps:
- Back up the current repository. Tip: The initial default location of the repository is <*install_location*>\Repository, typically C:\Program Files\Reportworq\Repository.
- Change the Repository Path.
- Restart the Reportworq application.
- Restore the repository backup that was created in step 1.
Please see Backup & Support for more details on steps 1 and 4.
Recycle Service#
Some Reportworq administrators like to have the application automatically restart during overnight hours to free up system resources and reset all connections.
To enable the Recycle Service, turn the Recycle Service switch on (blue) and specify when the restart should occur. The time is based on the time zone setting for the Reportworq computer.

Backup#
Backup settings for the Reportworq Repository and for creating a Repository Report are located in the Configuration section of the Administration interface:
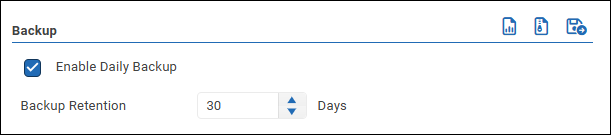
- Enable Daily Backup: If selected, the Reportworq Repository is backed up every day.
- Backup Retention: Sets how long backup files are kept before being deleted.
- Create Backup: Select this icon
 to automatically generate and download a zip backup of the Reportworq repository. Backups can be restored to any Reportworq 5 instance.
 - Send Backup to Support: Select this icon
 to automatically generate and automatically send a zip file of backup files to the Reportworq Support team.
 - Create Repository Report: Select this icon
 to automatically generate and download a Repository Report spreadsheet (.xlsx file). For more information, see Repository Reports, below.
Repository Reports#
The Repository Report contains comprehensive information about configuration settings and values for all Distribution reports in Reportworq. This report enables you to quickly find detailed information about almost every aspect of your reports. The Repository Report is generated as a spreadsheet (.xlsx file) consisting of multiple worksheets, each containing report-related information from a different perspective.
Data rows in the report can be sorted based on any column, and you can omit irrelevant data by applying filters to one or more columns. Some columns may not be present, depending on the properties of your Reportworq Jobs.
Repository Report worksheets are as follows:
- Jobs: Lists all Reportworq Distribution Jobs and their properties such as the Job name, path, and type; schedule details; output format settings; and distribution methods.
- Reports: Lists all Reports and their properties such as the report name, Job name, and path; source report provider, file name, and path; report worksheets; and parameter names.
- Report Parameters: Lists all report parameters and their properties such as report name, Job name and path; worksheet name; and parameter name and location. Report parameters provide values to corresponding cells in source worksheets, thus changing data filters that drive the dynamic loading of data (e.g. changing a period or business unit).
- Parameters: Lists all other parameters and their properties such as Job name and path; parameter name, type, and value; whether the parameter allows for bursting; and whether the Job generates one worksheet per parameter item or one report per parameter item.
- Static Burst Sets: Lists all burst sets and their properties such as Job name and path; contact name and Id; and burst parameter name, type, and value.
- Schedules: Lists all scheduled Jobs and their schedule-related properties such as Job name and path; schedule name, Id, frequency, and description; notification email addresses; and last run time.
- Contacts: Lists all contacts from the Address Book and their properties such as unique Id, name, and tags; report output locations and email addresses; and custom fields. Note: The Contacts worksheet does not necessarily list everyone who receives reports, because reports can also be sent to email addresses based on calculations or metadata lookups.
The following tables list the data items presented on each worksheet of the Repository Report.
Jobs Worksheet
| Job Name | Job Path | Job Type |
| Is Scheduled | Scheduled Count | Schedule Names |
| Last Modified | Date Created | Reports |
| Output Type | PowerPoint file Path | Enable Job Contact Mapping |
| Job Contact Mapping Field | Job Contact Mapping Value | Excel Split Worksheets |
| Excel Remove Formulas | Job Sort Manual Collation | PDF Add Page Numbers |
| PDF Add Cover Page | PDF Low Quality | CSV Separator |
| PowerPoint PDF Output | PowerPoint Low Quality PDF | PowerPoint Sort Slides in Worksheet Order |
| PowerPoint Maintain Aspect Ratio | Additional File Name Paths | File Distribution to zip |
| File Distribution to zip Exclusion | Distribution type | Distributor Type |
| SharePoint.SharePointFolder | Email.EmailTo | Email.EmailSubject |
| Email.EmailFrom | Email.EmailMessage | Email.AllowCombineFiles |
| Email.EmailCC | Google Drive.EmailTo | Google Drive.FolderPath |
| Network Folder.OutputFilePath | Email.EmailBCC | Email.AttachFiles |
| Email.EmailPriority | Email.EmailCombineKey | Teams.TeamsTarget |
Reports Worksheet
| Job Name | Job Path | Report Name |
| Report Source Provider | File Name | File Path |
| Worksheet CodeName | Worksheet Name | Parameter Names |
| Sheet Name Type | Sheet Name Value | Parent Bookmark Name Type |
| Parent Bookmark Name Value | Tab Color type | Tab Color Value |
| Suppression Type | Suppression Value | Output Order Type |
| Output Order Value | Exception Type | Exception Value |
Report Parameters Worksheet
| Job Name | Job Path | Report Name |
| Report File Name | Worksheet Name | Parameter Name |
| Parameter Location |
Parameters Worksheet
| Job Name | Job Path | Parameter Name |
| Parameter Type | Parameter Value | Allow for Bursting |
| Cycle Mode |
Static Burst Set Worksheet
| Job Name | Job Path | Contact Id |
| Contact Name | Parameter Name | Parameter Type |
| Parameter Value |
Schedules Worksheet
| Job Name | Job Path | Schedule Name |
| Id | Is Enabled | Notification |
| Notification Failure Only | Frequency | Description |
| Frequency Advanced Mode | Hold For Delivery | Last Actual Run Time |
| Last Run Time | Filter Mode | Filter Days |
| Run Now Flag |
Contact Worksheet
| Id | Name | Tags |
| D_Google Drive_EmailTo | _Google Drive_DriveId | D_Google Drive_FolderPath |
| D_Network Folder_FileLocation | D_Secure FTP_FileLocation | D_Slack_SlackChannel |
| D_Email_EmailAddress | D_SharePoint_SharepointFolder | D_Teams_TeamsTarget |
| custom field name (0 or more columns) |
Logging#
Reportworq can create application logs to help the Reportworq support team diagnose and resolve problems. Logging settings are located on the Configuration page of the Administration interface:
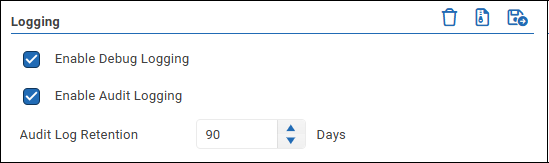
Settings are as follows:
- Enable Debug Logging -- When selected, Reportworq creates detailed technical logs, including HTTP Archive (HAR) files that record interactions between Reportworq and your web browser. We recommend that you enable debug logging only when requested by the Reportworq support team, as it generates several large files. Disable debug logging when not needed.
- Enable Audit Logging -- When selected, Reportworq creates audit logs that record Reportworq activities such as Job execution and changes in application settings. By default, Reportworq retains audit logs for 90 days. For more information, see Audit Log.
Select the following icons to clear, download, or submit application logs:
 -- Clears all application logs.
 -- Downloads all application logs as a .zip file in your Downloads folder. The filename includes a timestamp and resembles the following: Reportworq_Logs_2025-05-30 11.19.16.zip.
 -- Automatically sends application logs to the Reportworq support team and notifies them. Please do this only when requested by the support team.
Execution#
Reportworq has options designed to manage the overall application and server performance, and retention of Job execution history when running Reportworq jobs. These settings are located in the Execution area.
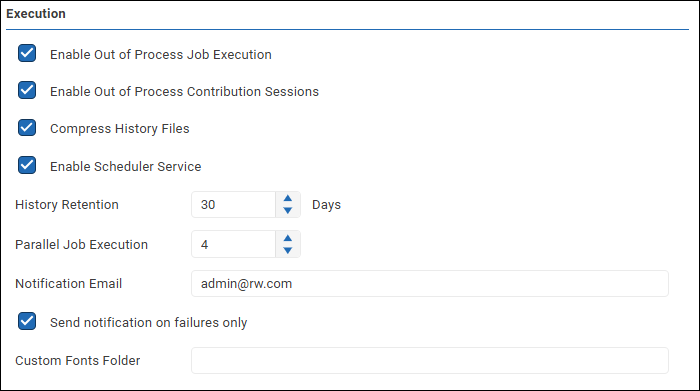
- Enable Out of Process Contribution Sessions: This setting determines whether calculations and other live changes to Contribution input forms can be handled in a separate process or are handled within the same process that is used to support the Reportworq web application. Enabling out of process Contribution sessions reduces memory usage and processing load on the Reportworq server and typically improves application performance for Contribution participants. If there are Load Balancer servers, Reportworq further optimizes performance by assigning these Contribution tasks to servers that have more available processing capacity. This setting should always be enabled unless you have been asked to disable it for Support purposes.
- Enable Out of Process Job Execution: This setting determines whether Job execution happens in a separate process or within the same process that is used to support the Reportworq web application. This setting should always be enabled unless you are asked to disable it for Support purposes. Enabling this setting ensures that Reportworq application users aren't impacted by Job execution and that memory & related resources are freed up following Job execution.
- Compress History Files: This option can be enabled/disabled here.
- History Retention: This setting determines how much Job execution history is preserved. History older than the specified number of days is automatically purged from the Reportworq repository.
- Parallel Job Execution: This setting determines both the number of Jobs that can be executed at the same time as well as the number of operations (threads) used for each Job. Each Job is executed in its own, separate process when the "Enable Out of Process Job Execution" setting is enabled. Examples describing the impact of this setting on RAM and CPU usage are provided below.
Selecting the optimal Parallel Job Execution depends on the available host server CPU and Memory resources. Some examples of CPU and Memory usage are described here, using Parallel Job Execution = 5 as an example:
- CPU Usage: in this example, Reportworq will allow 5 Jobs to run at the same time AND also allow up to 5 threads within each Job to run concurrently. In this example, this means that up to 25 threads could be consumed at one time.
- Memory Usage: some Reportworq Jobs consisting of very large reports may require significant RAM usage during Job execution. If, for example, your jobs typically use 2GB of RAM at their peak and you are running 5 of these jobs at the same time then you may see at least 10GB of RAM consumed, overall, during the execution of all 5 jobs.
It is important to strike a balance that allows Reportworq to take advantage of parallel Job processing without overwhelming available hardware resources. If Parallel Job Execution is currently set to a number that may result in CPU and RAM being over or underutilized when the maximum number of Jobs are running in parallel, then it may be helpful to adjust this setting accordingly.
- Notification Email: Configure an email address for notifications here.
- Send notification on failures only: This option can be set to alert the email address configured above to any failures specifically.
Feedback on this page
Comments, questions, requests, or something missing or unclear? Email us - the page you are on is filled in for you.
Email feedback on this pageOr write to support@reportworq.com directly.