
Datasources:#
Overview#
Reportworq supports the refresh of Excel-based reports created using the IBM Planning Analytics Perspectives and Planning Analytics for Excel (PAfE) Excel add-ins. These reports use proprietary custom Excel formulas and other Excel settings to help define how to extract data, attributes, and metadata from IBM Planning Analytics (TM1) Server instances. Reportworq reads and writes data to Planning Analytics via the Planning Analytics REST API. The list of IBM Cognos Planning Analytics versions that are supported by Reportworq matches the versions actively supported by IBM (refer to the support lifecycle information provided by IBM).
Reportworq report Parameters can be used to change cell values in Excel reports which can, in turn, change the references to any Planning Analytics formulas and other reporting options, to dynamically update Excel reports from Planning Analytics. Reportworq additionally supports certain Planning Analytics-specific Parameter types (IBM Planning Analytics subsets and MDX Queries).
The RWMDX function can be added to an Excel report to query the datasource and return data to the Excel spreadsheet, using an MDX query.
This article describes how to configure Planning Analytics connections as well as the various IBM Planning Analytics features and integration options that Reportworq supports. It contains the following topics:
- Datasource Configuration:
- Required Security Permissions
- Supported Reporting Features
- Parameters Specific to Planning Analytics
- Turbo Integrator Automation Options
To use IBM Planning Analytics as a data source, at least one IBM Planning Analytics connection (Self Hosted, IBM Cloud, or AWS Cloud with MCSP) must be configured in Reportworq, and you must also have an existing Perspectives or PAfE report which uses that connection.
Datasource Configuration#
Reportworq supports three options for connecting to IBM Planning Analytics. Perform the connection procedure that is appropriate for your Planning Analytics environment:
Connecting to Self Hosted Instances -- These are connections to any Planning Analytics instance which you manage, either by installing Planning Analytics on servers in your corporate data center or a cloud environment, such as a virtual machine on Amazon Web Services (AWS) or Microsoft Azure.
Connecting to IBM Cloud -- These are connections to Planning Analytics instances that are hosted and managed by IBM.
Connecting to Planning Analytics as a Service on AWS Cloud -- These are connections to Planning Analytics SaaS on AWS instances with Managed Cloud Service Provider (MCSP) authentication.
Connecting to Self Hosted Instances#
Planning Analytics Self Hosted connections are defined based on the authentication options supported by your Planning Analytics server instances (Databases), specifically the IntegratedSecurityMode setting defined in your database configuration. All security modes are supported in Reportworq:
- Native (IntegratedSecurityMode 1 + 2): User Logins are fully managed within Planning Analytics.
- Windows Integrated (IntegratedSecurity Mode 2 + 3): User logins to Planning Analytics are mapped to Active Directory (Windows Domain) logins.
- Cognos Access Manager / CAM (Integrated Security Mode 4 + 5): User logins to Planning Analytics are managed as part of CAM Security.
Prerequisites
The following information is required when configuring connections to self hosted IBM Planning Analytics databases:
- REST API Access Must be Enabled: Reportworq communicates with Planning Analytics through the REST API. To enable the Planning Analytics REST API, configure a valid HTTPPortNumber in the tm1s.cfg file.
- Basic Database Connection Information:
- The address of the Planning Analytics Admin Host service where your Planning Analytics Server database is registered, or
- The following Planning Analytics Server database configured settings:
- Name (e.g., Planning Sample)
- Address
- REST API Port Number
- SSL Enabled / Disabled
- Firewall Access Rules: REST API ports (HttpPortNumber setting) must be opened in any firewall between Reportworq and your Planning Analytics server. Additioonally, ports 5895 and 5898 must be opened in any firewalls between Reportworq and the computer running the Planning Analytics Admin Host service if that service will be used to automatically retrieve settings for a Planning Analytics database connection.
- Login Credentials & Mode: Verify the IntegratedSecurityMode setting for the database that you wish to connect to, and ensure that you have valid login credentials for that database.
- Additional Configuration for Integrated Login: If you plan to use Planning Analytics Integrated Login, additional configuration related to Active Directory and Kerberos is required to ensure that Reportworq can successfully connect to Planning Analytics.
To add and configure a Self Hosted IBM Planning Analytics Datasource:
- In the Reportworq Administration interface, select the add icon
 beside the Datasources heading. The New Datasource Connection pane appears: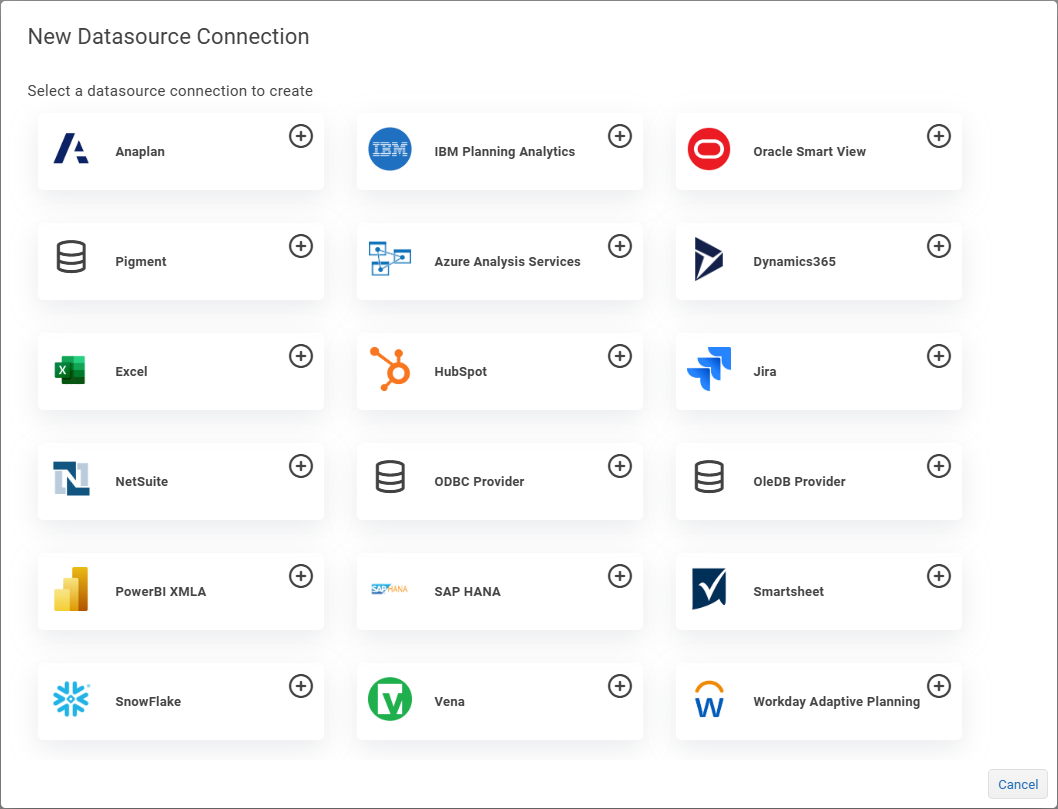
- Select the IBM Planning Analytics button.
 The Datasource Settings and Distribution Credentials appear: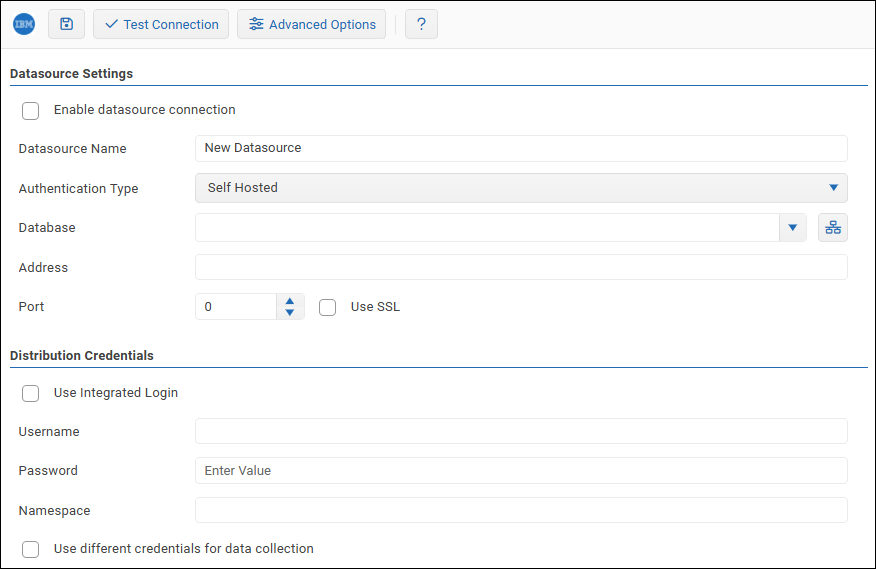
- In the Datasource Name box, provide a meaningful name for the connection. This name is visible to all Reportworq users when they access information related to Planning Analytics, such as when they use Parameters. The Datasource Name must be unique across all Reportworq Datasources.
- From the Authentication Type list, select Self Hosted.
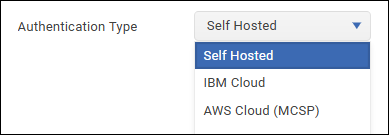 Settings for configuring a Self Hosted connection appear: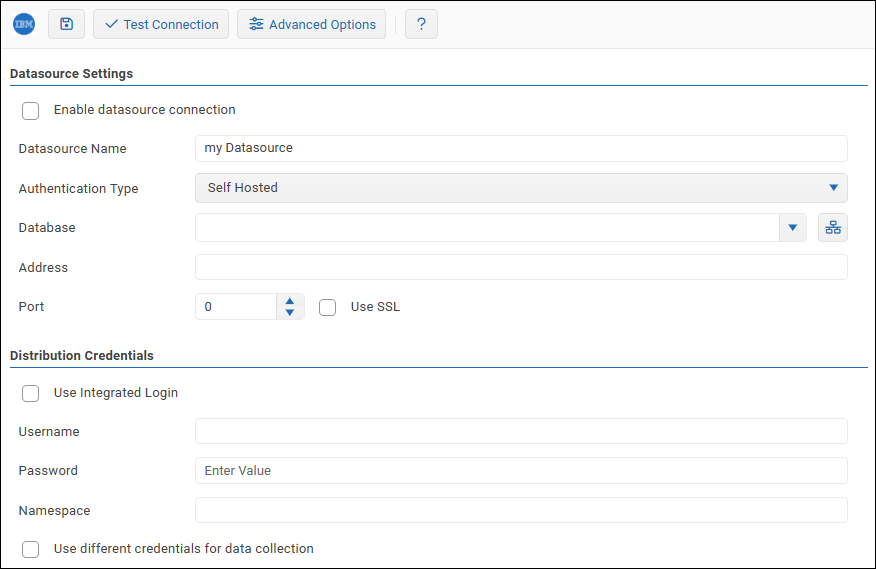
- Configure the following Datasource Settings as required:
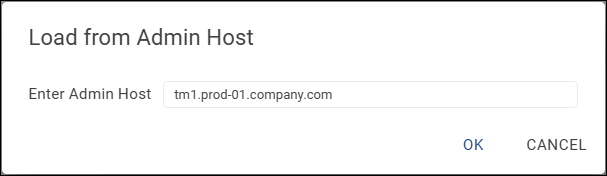
- Database: The Database name as defined in your Planning Analytics configuration. You can type the name, or load a list of database names and then select the correct one. Tip: If you select a database from the list, the database Address and Port settings are configured automatically. To load a list of database names, select
 , provide the URL of the IBM Planning Analytics Admin Host, and select OK.
  IMPORTANT: If you plan to use the Planning Analytics distributor and there are multiple Datasources that use the same database, all such Datasources except the one required for the current job must be disabled while the job is running.
 - Address: This is the address of the computer where your Planning Analytics Server database(s) are running. This address must be accessible by the Reportworq Server and can be:
- An IP address (e.g., 10.0.0.123).
- A machine name (e.g., prod-paserver-01).
- A fully qualified domain name (e.g., prod-paserver-01.company.com).
- Port: This is the REST API port number for the Planning Analytics database.
- Use SSL: If selected, Reportworq uses SSL encryption protocol when communicating with the Planning Analytics database. Whether SSL is required is dictated by settings in the Planning Analytics configuration.
- Configure the Distribution Credentials:
- Use Integrated Login: If selected, Planning Analytics Integrated Login is used to access the database.
- Username and Password: These are the same credentials used to authenticate IBM Planning Analytics Microsoft for Excel. If using Integrated Login, leave the Username and Password boxes blank.
- Namespace: This is the Cognos namespace, which is required when your Planning Analytics Database is configured to use CAM Security.
- Domain: This is the domain name, which is required if using Integrated Login.
- Use Different credentials for data collection: If selected, Data Collection Credentials appear:
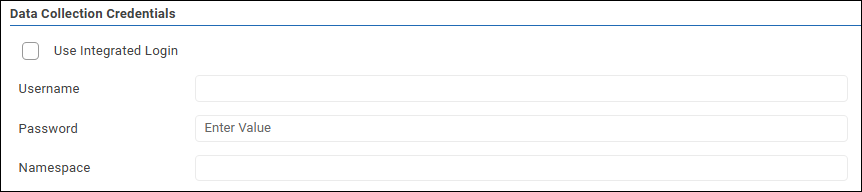 Note: Data Collection settings apply only if your Reportworq implementation includes Data Collection, which is a set of legacy features that remain available only to customers who are already licensed to use them.
- Configure the Data Collection Credentials, if applicable:
- Use Integrated Login: If selected, Planning Analytics Integrated Login is used to access the database.
- Username and Password: Data Collection credentials are optional. When enabled, they limit contributor access to specified areas of the system. If using Integrated Login, leave the Username and Password boxes blank.
- Namespace: This is the Cognos namespace, which is required when your Planning Analytics Database is configured to use CAM Security.
- Domain: This is the domain name, which is required if using Integrated Login.
- To confirm that the settings are properly configured, select the Test Connection button.
 If the test fails, edit the settings as required, and then test again. For more information, see Troubleshooting Self Hosted Connections.
 - In the Datasource Settings area, select the Enable datasource connection checkbox.
- Select the Save icon
 to save and apply the settings.
To review and configure Advanced Options:
- Select the Advanced Options button.
 the Advanced Options pane appears: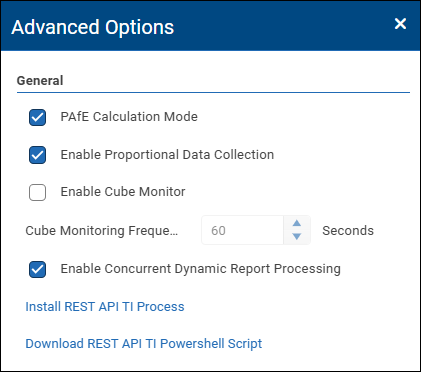
- Configure the advanced options as required:
- PAfE Calculation Mode: This setting tells Reportworq how to calculate and resolve Planning Analytics Excel formula results:
- Enabled: Reportworq calculates formulas like the Planning Analytics for Excel (PAfE) add-in. For example, it returns #VALUE! errors when invalid or missing element names are referenced.
- Disabled: Reportworq calculates formulas like the TM1 Perspectives add-in. For example, it returns blank values when invalid or missing element names are referenced.
- Enable Proportional Data Collection: This enables Reportworq to send data to consolidated cells using the Proportional Spread option. Note: Data Collection settings apply only if your Reportworq implementation includes Data Collection, which is a set of legacy features that remain available only to customers who are already licensed to use them.
- Enable Cube Monitor: This is a method for automating Reportworq Job Execution from Planning Analytics. Enabling this option will create additional objects on this Planning Analytics Database Instance. Note: You can set how often Reportworq polls TM1. The default frequency is once every 60 seconds.

- Close the Advanced Options pane.
- To confirm that the settings are properly configured, select the Test Connection button. If the test fails, edit the settings as required, and then test again.
- Select the Save icon to save and apply the settings.
Integrated Login Support#
Additional configuration related to Active Directory and Kerberos is required to ensure that Reportworq can successfully connect to Planning Analytics using Integrated Login. Before you begin, confirm that the following are true:
- Planning Analytics Integrated Login is already working properly when using Architect or Perspectives.
- The Planning Analytics Server service is running under an Active Directory domain/service account.
- You know the URLs and IP address(es) of the Planning Analytics Server.
- You have verified that you have access to someone (typically an Active Directory administrator) who can:
- Create or modify Service Principal Names (SPNs) in Active Directory.
- Update/push policy changes to client desktops, if needed.
To configure Reportworq to use Integrated Login:
Add one or more Service Principal Names (SPNs) using the following structure,
and replacing placeholders in the command as follows:
- is the address of the server computer running the Planning Analytics Server, which may be:
- Fully-qualified name, for example, ‘app01.company.com’
- Machine name, for example, ‘app01’
- IP address, for example, ‘10.4.121.15’
- **
**is the domain account that the Planning Analytics Server application is running under (the “Log on as” account)

Examples:
If the Active Directory domain is named Corporate. Internal and your Planning Analytics Server runs on a computer named PAAppPrd01 under a service account named TM1Services running at IP Address 10.10.12.34, you might add the following SPNs:
setspn -s HTTP/PAAppPrd01.Corporate.Internal TM1Services
setspn -s HTTP/PAAppPrd01 TM1Services
setspn -s HTTP/10.10.12.34 TM1Services
Note that SPN updates may not be visible to all client desktops immediately; your Active Directory administrator can help determine whether or not those changes have propagated across all client computers.

Connecting to IBM Cloud#
This section describes how to add and configure a Reportworq Datasource connection to IBM Planning Analytics hosted and managed by IBM on IBM Cloud.
Prerequisites
The following is required to connect to IBM Planning Analytics Cloud:
- The Welcome Kit provided by IBM.
- A non-interactive user account, which is part of the Welcome Kit. Note: If the Non-Interactive Account section of the welcome kit is empty, you must request a non-interactive account by opening a support case with IBM.
- Enable REST API nocanon Configuration Setting. This is only required if your reports reference element names containing special characters such as a backslash ("\"), and must be enabled by opening an IBM support case. Below is an example of information to include in your support case request:
IBM,

We need "nocanon" added to the ProxyPass in our IBM Cloud environments:

[Customer cloud environment 1]
[Customer cloud environment 2]
...
[Customer cloud environment n]

This is needed to address an issue with IBM PA Cloud's handling of REST API requests, which is documented in case number TS002469510.

To add and configure a Datasource for Planning Analytics hosted on IBM Cloud:
- In the Reportworq Administration interface, select the add icon beside the Datasources heading. The New Datasource Connection pane appears:
- Select the IBM Planning Analytics button. The Datasource Settings and Distribution Credentials appear:
- In the Datasource Name box, provide a meaningful name for the connection. This name is visible to all Reportworq users when they access information related to Planning Analytics, such as when they use Parameters. The Datasource Name must be unique across all Reportworq Datasources.
- From the Authentication Type list, select IBM Cloud.
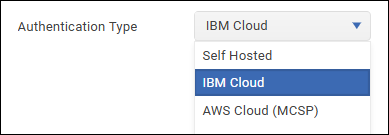 Settings for configuring an IBM Cloud connection appear: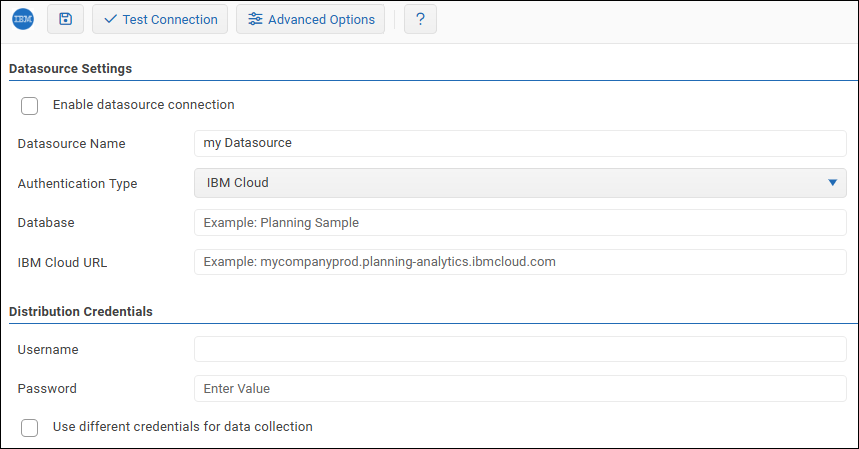
- Configure the following Datasource Settings as required:
- Database: This is the Database name as defined in Planning Analytics Cloud. IMPORTANT: If you plan to use the Planning Analytics distributor and there are multiple datasources that use the same database, all such datasources except the one required for the current job must be disabled while the job is running.
- IBM Cloud URL: This is an IBM-provided URL for your IBM Planning Analytics Cloud environment.
- Configure the following Distribution Credentials as required:
- Username: This is the username for IBM-provided non-interactive login credentials.
- Password: This is the password for IBM-provided non-interactive login credentials.
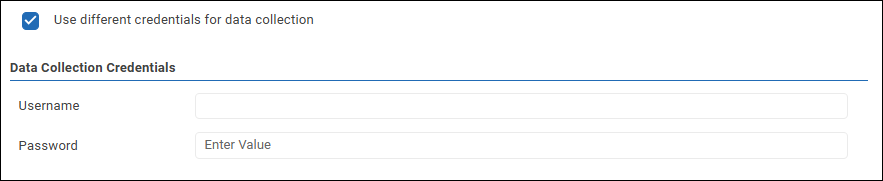
- If you want to Use different credentials for data collection, select that option and then provide a Username and Password if required. Data Collection credentials are optional. When enabled, they limit contributor access to specified areas of the system. Note: Data Collection settings apply only if your Reportworq implementation includes Data Collection, which is a set of legacy features that remain available only to customers who are already licensed to use them.
- To confirm that the settings are properly configured, select the Test Connection button. If the test fails, edit the settings as required, and then test again. For more information, see Troubleshooting IBM Cloud Connections.
- In the Datasource Settings area, select the Enable datasource connection checkbox.
- Select the Save icon to save and apply the settings.
To review and configure Advanced Optiopns:
- Select the Advanced Options button. The Advanced Options pane appears:
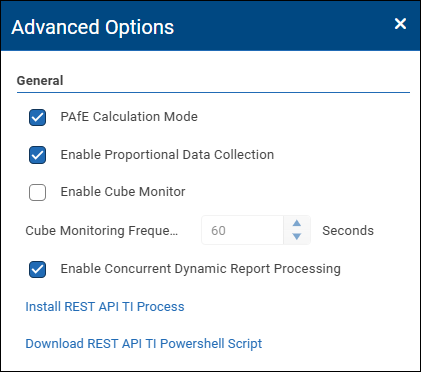
- Configure the advanced options as required:
- PAfE Calculation Mode: This setting tells Reportworq how to calculate and resolve Planning Analytics Excel formula results:
- Enabled: Reportworq calculates formulas like the Planning Analytics for Excel (PAfE) add-in. For example, it returns #VALUE! errors when invalid or missing element names are referenced.
- Disabled: Reportworq calculates formulas like the TM1 Perspectives add-in. For example, it returns blank values when invalid or missing element names are referenced.
- Enable Proportional Data Collection: This enables Reportworq to send data to consolidated cells using the Proportional Spread option. Note: Data Collection settings apply only if your Reportworq implementation includes Data Collection, which is a set of legacy features that remain available only to customers who are already licensed to use them.
- Enable Cube Monitor: This is a method for automating Reportworq Job Execution from Planning Analytics. Enabling this option will create additional objects on this Planning Analytics Database Instance. Note: You can set how often Reportworq polls TM1. The default frequency is once every 60 seconds.
- Close the Advanced Options pane.
- To confirm that the settings are properly configured, select the Test Connection button. If the test fails, edit the settings as required, and then test again.
- Select the Save icon to save and apply the settings.
Connecting to Planning Analytics as a Service with MCSP#
This section describes how to connect to IBM Planning Analytics as a Service with MCSP authentication.
Before you begin:
- Create an API Key for Planning Analytics as a Service with MCSP:
- Select the existing user account in your Planning Analytics as a Service environment that you would like Reportworq to use when refreshing reports.
- Follow IBM's instructions for creating an API Key for that user account.
- Gather connection information for Planning Analytics as a Service with MCSP:
- The name of the Planning Analytics Server database instance(s) that you plan to connect to from Reportworq (e.g., Planning Sample).
- The TenantId where your IBM Planning Analytics as a Service environment is hosted (e.g., A1BCD2EFGHIJK).
- The Data Center URL where your IBM Planning Analytics as a Service environment is hosted. eg: xxx.aws.planninganalytics.ibm.com
To add and configure a Datasource for IBM Planning Analytics with MCSP:
- In the Reportworq Administration interface, select the add icon beside the Datasources heading. The New Datasource Connection pane appears:
- Select the IBM Planning Analytics button. The Datasource Settings and Distribution Credentials appear:
- In the Datasource Name box, provide a meaningful name for the connection. This name is visible to all Reportworq users when they access information related to Planning Analytics, such as when they use Parameters. The Datasource Name must be unique across all Reportworq Datasources.
- From the Authentication Type list, select AWS Cloud (MCSP).
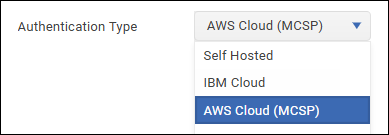 Settings for configuring an AWS Cloud connection appear: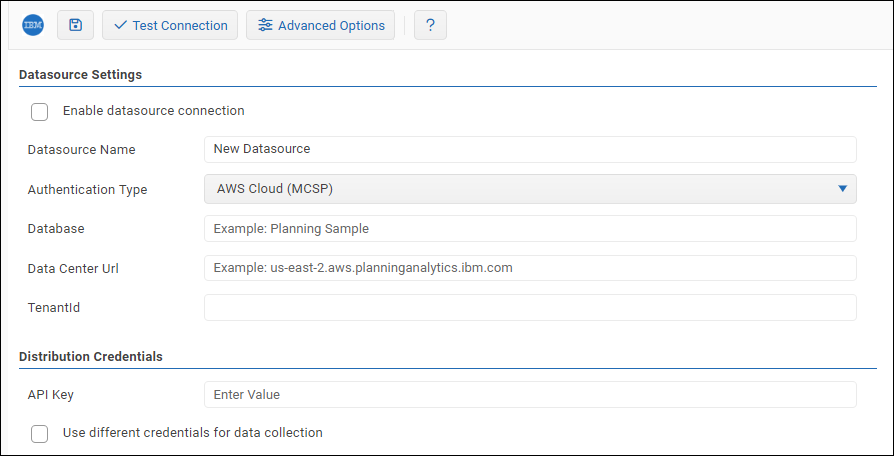
- Configure the following Datasource Settings as required:
- Database: This is the Database name as defined in Planning Analytics Cloud. IMPORTANT: If you plan to use the Planning Analytics distributor and there are multiple datasources that use the same database, all such datasources except the one required for the current job must be disabled while the job is running.
- Data Center Url: This is an AWS/IBM-provided URL for your environment.
- TenantId: This is an AWS/IBM-provided URI for your environment.
- In the Distribution Credentials area, provide the API Key you retrieved earlier. The API Key is used to connect to your IBM Planning Analytics database.
- If you want to Use different credentials for data collection, select that option and then provide the required API Key. Note: Data Collection settings apply only if your Reportworq implementation includes Data Collection, which is a set of legacy features that remain available only to customers who are already licensed to use them.

- To confirm that the settings are properly configured, select the Test Connection button. If the test fails, edit the settings as required, and then test again. For more information, see Troubleshooting AWS Cloud Connections.
- In the Datasource Settings area, select the Enable datasource connection checkbox.
- Select the Save icon to save and apply the settings.
To review and configure Advanced Options:
- Select the Advanced Options button. The Advanced Options pane appears:
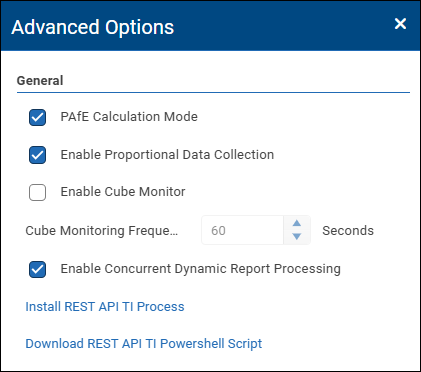
- Configure the advanced options as required:
- PAfE Calculation Mode: This setting tells Reportworq how to calculate and resolve Planning Analytics Excel formula results:
- Enabled: Reportworq calculates formulas like the Planning Analytics for Excel (PAfE) add-in. For example, it returns #VALUE! errors when invalid or missing element names are referenced.
- Disabled: Reportworq calculates formulas like the TM1 Perspectives add-in. For example, it returns blank values when invalid or missing element names are referenced.
- Enable Proportional Data Collection: This enables Reportworq to send data to consolidated cells using the Proportional Spread option. Note: Data Collection settings apply only if your Reportworq implementation includes Data Collection, which is a set of legacy features that remain available only to customers who are already licensed to use them.
- Enable Cube Monitor: This is a method for automating Reportworq Job Execution from Planning Analytics. Enabling this option will create additional objects on this Planning Analytics Database Instance. Note: You can set how often Reportworq polls TM1. The default frequency is once every 60 seconds.
- Close the Advanced Options pane.
- To confirm that the settings are properly configured, select the Test Connection button. If the test fails, edit the settings as required, and then test again.
- Select the Save icon to save and apply the settings
Troubleshooting Connection Problems#
This section contains recommended troubleshooting steps for IBM Planning Analytics connections for all supported connection types:
- Troubleshooting Self Hosted Connections
- Troubleshooting IBM Cloud Connections
- Troubleshooting AWS Cloud Connections
Troubleshooting Self Hosted Connections#
Recommended troubleshooting steps for Self Hosted connections are as follows:
- Try to access the REST API Metadata URL and the Planning Analytics Database Information URL from a web browser on the Reportworq Server. For an example of the URL formats, see the Sample URL Formats provided in this section, below these steps.
- If one or both of the URLs mentioned in Step 1 cannot be reached, try to reach them from a user computer that you know can connect to Planning Analytics from Architect, Perspectives, or PAfE.
- If one or both of the URLs mentioned in Step 1 still cannot be reached, verify:
- Connection settings (address, port, and use SSL).
- Firewall settings on the Planning Analytics Server.
- If the URLs menitoned in Step 1 cannot be reached from the Reportworq Server, but can be reached from a different computer, verify:
- Firewall settings on the Planning Analytics Server.
- Firewall settings on the Reportworq Server.
- If you are able to reach the URLs mentioned in Step 1 from the Reportworq Server and from a different computer but cannot connect from Reportworq, verify your login credentials from Architect, Perspectives, or PAfE.
Sample URL Formats:
- REST API Metadata URL Format:
://:/api/v1/$metadata - Planning Analytics Database Information URL Format:
://:/api/v1/Server
In the URLs above, replace placeholders as follows:
: Use https when Use SSL is enabled in connection settings, otherwise use http. - : Provide the address specified in connection settings.
: Provide the REST API port number specified in connection settings.
For example, if the following are your configured settings for a Planning Analytics Database:
- Address: prod-pa-server-01.company.com
- Use SSL: checked
- Port: 12887
Your test URLs and responses would be as follows:
REST API Metadata Sample
- URL: https://prod-pa-server-01.company.com:12887/api/v1/$metadata
- Response: (only an excerpt of the full response is shown below):
<?xml version="1.0" encoding="UTF-8"?>
<edmx:Edmx Version="4.0"
	xmlns:edmx="http://docs.oasis-open.org/odata/ns/edmx">
	<edmx:Reference Uri="https://oasis-tcs.github.io/odata-vocabularies/vocabularies/Org.OData.Capabilities.V1.xml">
		<edmx:Include Namespace="Org.OData.Capabilities.V1" Alias="Capabilities"/>
	</edmx:Reference>
	<edmx:Reference Uri="https://oasis-tcs.github.io/odata-vocabularies/vocabularies/Org.OData.Core.V1.xml">
		<edmx:Include Namespace="Org.OData.Core.V1" Alias="Core"/>
	</edmx:Reference>
	<edmx:DataServices>
		<Schema Namespace="ibm.tm1.api.v1" Alias="tm1"
			xmlns="http://docs.oasis-open.org/odata/ns/edm">
			<Annotation Term="Core.Revisions">
				<Collection>
					<Record>
						<PropertyValue Property="Version">
							<String>10.2.2.0</String>
						</PropertyValue>
						<PropertyValue Property="Kind">
							<EnumMember>Core.RevisionKind/Added</EnumMember>
						</PropertyValue>
					</Record>
				</Collection>
			</Annotation>
			<Annotation Term="Core.SchemaVersion">
				<String>11.6.0</String>
			</Annotation>
		</Schema>
	</edmx:DataServices>
</edmx:Edmx>
Planning Analytics Database Information Sample
- URL: https://prod-pa-server-01.company.com:12887/api/v1/Server
- Response:
{
	"@odata.context": "$metadata#Server",
	"Name": "Prod",
	"ProductVersion": "11.7.00002.1",
	"PortNumber": 12345,
	"ClientMessagePortNumber": 12346,
	"HTTPPortNumber": 12887,
	"UsingSSL": true,
	"SecurityPackageName": "",
	"ServicePrincipalName": "",
	"IntegratedSecurityMode": "Mixed",
	"ClientCAMURI": "",
	"ClientPingCAMPassport": 900
}
Troubleshooting IBM Cloud Connections#
Recommended troubleshooting steps for IBM Cloud (IBM fully managed and hosted) connections are as follows:
- Try to access the IBM Cloud-specific REST API Metadata URL and Planning Analytics Database Information URL from a web browser on the Reportworq Server. For an example of the URL formats, see the Sample URL Formats provided in this section, below these steps.
- If one or both of the URLs mentioned in Step 1 cannot be reached, try to reach them from a user computer that you know can connect to connect to IBM Planning Analytics Cloud from PAfE.
- If one or both of the URLs mentioned in Step 1 still cannot be reached, verify:
- Connection settings (address, port, and use SSL).
- Firewall settings on the Planning Analytics Server.
- If the URLs menitoned in Step 1 cannot be reached from the Reportworq Server, but can be reached from a different computer, verify your connection settings (IBM Cloud URL and Database Name).
- If you are able to reach the URLs mentioned in Step 1 from the Reportworq Server and from a different computer, but cannot connect from Reportworq, verify with IBM Support that the IBM PA Cloud Interactive User login credentials and related REST API configuration settings are valid for your IBM Cloud-hosted database.
Sample URL Formats:
- REST API Metadata URL Format: https://
/tm1/api//api/v1/$metadata - Planning Analytics Database Information URL Format: https://
/tm1/api//api/v1/Server
In the URLs above, replace placeholders as follows:
- <**IBM Cloud URL**>: Use the address of your IBM Planning Analytics Cloud environment.
- <**Database**>: Use the name of the database instance, as defined in IBM Cloud
For example, if the following are your configured settings for a Planning Analytics Database:
- IBM Cloud URL: company-prod.planning-analytics.ibmcloud.com
- Database: Prod
Your test URLs and responses would be as follows:
REST API Metadata Sample
- URL: https://company-prod.planning-analytics.ibmcloud.com/tm1/api/Prod/api/v1/$metadata
- Response: (only an excerpt of the full response is shown below):
<?xml version="1.0" encoding="UTF-8"?>
<edmx:Edmx Version="4.0"
	xmlns:edmx="http://docs.oasis-open.org/odata/ns/edmx">
	<edmx:Reference Uri="https://oasis-tcs.github.io/odata-vocabularies/vocabularies/Org.OData.Capabilities.V1.xml">
		<edmx:Include Namespace="Org.OData.Capabilities.V1" Alias="Capabilities"/>
	</edmx:Reference>
	<edmx:Reference Uri="https://oasis-tcs.github.io/odata-vocabularies/vocabularies/Org.OData.Core.V1.xml">
		<edmx:Include Namespace="Org.OData.Core.V1" Alias="Core"/>
	</edmx:Reference>
	<edmx:DataServices>
		<Schema Namespace="ibm.tm1.api.v1" Alias="tm1"
			xmlns="http://docs.oasis-open.org/odata/ns/edm">
			<Annotation Term="Core.Revisions">
				<Collection>
					<Record>
						<PropertyValue Property="Version">
							<String>10.2.2.0</String>
						</PropertyValue>
						<PropertyValue Property="Kind">
							<EnumMember>Core.RevisionKind/Added</EnumMember>
						</PropertyValue>
					</Record>
				</Collection>
			</Annotation>
			<Annotation Term="Core.SchemaVersion">
				<String>11.6.0</String>
			</Annotation>
		</Schema>
	</edmx:DataServices>
</edmx:Edmx>
Planning Analytics Database Information Sample
{
	"@odata.context": "$metadata#Server",
	"Name": "Prod",
	"ProductVersion": "11.7.00002.1",
	"PortNumber": 12345,
	"ClientMessagePortNumber": 12346,
	"HTTPPortNumber": 12887,
	"UsingSSL": true,
	"SecurityPackageName": "",
	"ServicePrincipalName": "",
	"IntegratedSecurityMode": "CAM",
	"ClientCAMURI": "https://company-prod.planning-analytics.ibmcloud.com/ibmcognos/cgi-bin/cognosisapi.dll",
	"ClientPingCAMPassport": 900
}
Troubleshooting AWS Cloud Connections#
Recommended troubleshooting steps for IBM Planning Analytics SaaS on AWS connections are as follows:
- Verify your Data Center URL and TenantId by logging into your IBM PA SaaS on AWS environment from a web browser. Once logged in, you'll see a URL similar to the following: https:///?accountId=ABC123DEF456&tenantId=&perspective=pa-home.
- Log in to IBM Cloud and verify that your API Key has been created and is still valid.
- If all of the above tests pass, but you are still unable to connect from Reportworq, you contact IBM Support to troubleshoot API access to your IBM PA SaaS on AWS hosted database(s).

Required Security Permissions#
Planning Analytics login credentials in Reportworq require only the minimum READ access credentials needed to refresh data in any Planning-Analytics-enabled reports. When that feature is enabled, read access may also be required for any Cube Monitoring objects.
When Reportworq Data Collection support is required with Planning Analytics databases, Reportworq will additionally need WRITE access to any database cubes and dimensions that need to be populated as part of Data Collection processing.
Note: Data Collection settings apply only if your Reportworq implementation includes Data Collection, which is a set of legacy features that remain available only to customers who are already licensed to use them.
Administrative permissions are not required for Reportworq, with two one-time exceptions:
- Enabling Cube Monitoring requires one-time Administrative permissions to create cube, dimension, and Turbo Integrator processes needed to support this Reportworq feature.
- Enable Reportworq REST API Integration requires one-time Administrative permissions to create Turbo Integrator processes needed to support this Reportworq feature.
Once any administrative operations have been completed, those permissions may be removed from the stored login credentials used by Reportworq.
Supported Reporting Features#
Reportworq Supports the following Planning Analytics reporting modes and Excel formulas:
Reporting Modes
- Slices (Perspectives) / Custom Reports (PAfE)
- Active Forms (Perspectives) / Dynamic Reports (PAfE)
- Quick Reports (PAfE)
Explorations (PAfE) and In-Spreadsheet Browser (Perspectives) reports are not supported, currently.
Planning Analytics Excel Formulas
The following Planning Analytics Excel formulas are supported in Reportworq:
| DBR | DIMSIZ | ELPARN | TM1PRIMARYDBNAME |
| DBRW | DNEXT | ELSLEN | TM1RPTROW |
| DBS | DNLEV | ELWEIGHT | TM1RPTELISCONSOLIDATED |
| DBSW | DTYPE | MAKEAXIS | TM1RPTELLEV |
| SUBNM | ELCOMP | MAKECALC | TM1RPTFILTER |
| DBRA | ELCOMPN | MAKEQUERY | TM1RPTTITLE |
| DEFINECALC Except SDatasource argument. | ELISCOMP | SUBSIZ | TM1RPTVIEW |
| DFRST | ELISPAR | TABDIM | TM1SET Uri_identifier argument is ignored. ServerName argument is required. Note: Selected Element argument and Active Display argument are case-sensitive and space-sensitive. |
| DIMX | ELLEV | TM1ELLIST | TM1USER |
| DIMNM | ELPAR | TM1PRIMARYDATASOURCE | VIEW Return cube name only. |
The following Planning Analytics Excel formulas are not currently supported:
- DBSA
- DBSS
- ELEMENTFIRST
- TM1GLOBALSANDBOX
- TM1INFO
Planning Analytics v11 vs v12#
Planning Analytics v12 (the containerized PA-Engine, including PA-as-a-Service) differs from the older v11 servers (Planning Analytics 2.x / TM1 11.x) in three ways that affect Reportworq reporting and automation. On the v5 line, upgrade to Reportworq 5.0.0.92 or greater before you report against a v12 server (any version 6 release also supports v12).
v12 enforces stricter, hierarchy-qualified MDX. The v12 engine rejects loosely-qualified MDX that v11 accepted, which affects Dynamic Reports, Active Forms,
RW.PlanningAnalytics.MDX/RWMDXqueries, andTM1RPTTITLE/TM1RPTVIEWTITLEoutput. Reportworq 5.0.0.92 renders v12-compatible MDX; if a query works on v11 but fails on v12, fully qualify each member with its hierarchy. See Excel Functions - IBM Planning Analytics.TM1ELLISTindents with leading blanks by default.TM1ELLISTprefixes each spilled element name with an indent character (a space) for every hierarchy level, so the names appear pushed to the right. A v12 hierarchy's default display levels can differ from v11 and surface indenting you did not have before. If those leading blanks are unwanted, set the 7th parameter (IndentRate) to0to switch indenting off — for example:=TM1ELLIST("server:dimension", "MySubset", , , , , 0).Job-launching TI processes use
ExecuteHttpRequeston v12. The containerized v12 engine has no operating-system shell, so the TIExecuteCommandfunction — which the v11 REST API sample processes use to launch theRunApiJob.ps1PowerShell script — is not available there. On v12, install the v12 REST API "Run Job" sample, which calls the Reportworq API with the native TIExecuteHttpRequestfunction instead: no PowerShell, no shell script, and nothing written to disk. Install it from Advanced Options > Install REST API TI process on the connection; see Turbo Integrator Automation Options below.
Parameters Specific to Planning Analytics#
Reportworq has several Parameter types that can be defined based on information in Planning Analytics:
- Planning Analytics Dimension: Used to return all elements from a Planning dimension hierarchy.
- Planning Analytics Subset: Used to return all elements from a named Private or Public Planning Analytics hierarchy Subset.
- Planning Analytics Subset MDX: Used to return elements from a dimension based on an MDX expression, including a special Repeater Parameter type that is designed to be used dynamically with other parameters.
For more information about these Parameter types and other Reportworq Parameter options, see the Creating Jobs article.
Turbo Integrator Automation Options#
IBM Planning Analytics has built-in capabilities, such as its Turbo Integrator ETL tool, that are well-suited to automating the execution of Reportworq Jobs. Reportworq supports the following Turbo Integrator-related automations:
- REST API Integration for Self Hosted Connections -- This option enables Planning Analytics developers on Self Hosted connections to execute Reportworq tasks, such as running Jobs, by calling the Reportworq REST API from a Turbo Integrator process.
- REST API Integration for IBM Cloud Hosted Connections -- This option enables Planning Analytics developers on IBM Cloud Hosted connections to execute Reportworq tasks, such as running Jobs, by calling the Reportworq REST API from a Turbo Integrator process. The TI process runs a Reportworq job by using Reportworq's Cloud Connector as an API relay; IBM Cloud sends a request to the publicly available Cloud Connector, which sends a request to the Reportworq instance.
- Cube Monitoring -- This option enables Planning Analytics developers on IBM Cloud Hosted connections to insert Reportworq Job execution requests into a cube that Reportworq monitors and processes at regular intervals. IMPORTANT: This option is a legacy solution that is now deprecated. Information about this option is provided to support existing applications. For new installations, use the REST API Integration for IBM Cloud Hosted Connections option instead.
Configure only one of these automation options.
REST API Integration for Self Hosted Connections#
This topic explains how to set up a Turbo Integrator process that integrates with the Reportworq REST API. This integration adds the Reportworq - REST API Run Job Sample 2.4 TI process to your Planning Analytics datasource.
The main steps for setting up this integration are as follows:
- Install the REST API TI process.
- Set up the RunApiJob.ps1 PowerShell script (for Windows only).
- Set up the RunApiJob.bash script (for Linux only).
- Review and configure parameter values for the Reportworq - REST API Run Job Sample 2.4 TI process.
To install the REST API TI process:
- In the Reportworq Administration interface, in the Datasources list, select the IBM Planning Analytics datasource. Datasource settings appear.
- Select Advanced Options.
- Select the link to Install REST API TI process. The Reportworq - REST API Run Job Sample 2.4 TI process is added to your Planning Analytics environment. Leave the Advanced Options pane open.
To upgrade the REST API TI process:
- First delete the existing Reportworq - REST API Run Job Sample 2.4 TI Process
- Follow the steps for the Install REST API TI process
To set up the RunApiJob.ps1 PowerShell script (for Windows only):
- In the Advanced Options pane for your IBM Planning Analytics datasource, select the link to Download REST API TI PowerShell Script. The Run Api Script.zip file appears in the Downloads folder.
- Extract the RunApiJob.ps1 script file and save it in the C:\Reportworq\Scripts\ folder. Notes:
- If the Reportworq\Scripts folder does not already exist, create it.
- The folder path listed above is the default. If you choose to save the script file in a different location, note the path you specified. You will need to know it for a later step.
- If Planning Analytics is running on a different server, copy the file to the same path on the Planning Analytics server.
- Test the RunApiJob.ps1 script file for security policy changes:
- Right-click the RunApiJob.ps1 script file and select Run with PowerShell. If the PowerShell window opens briefly and then closes, the script is ready to run. If the Execution Policy Change message appears as shown below, select Y to enable the script.

- In Turbo Integrator, edit the Prolog of the Reportworq - REST API Run Job Sample 2.4 TI process to update the following variables, so they point to the folders in your environment:
- PowerShellScriptFolder -- This is the folder that contains the RunApiJob.ps1 PowerShell script file. The default is C:\Reportworq\Scripts\. If the script file is in a different folder, change this parameter value accordingly. The value must end with a backslash.
- JobRequestFolder: This is the folder where job requests are written when this process runs. The default is C:\Reportworq Scripts\RunApiJobRequests\. This is a different folder from the PowerShell script folder (C:\Reportworq\Scripts\). The folder must exist, and the value must end with a backslash.
To set up the RunApiJob.bash script (for Linux only):
- Download the RunApiJob.bash script and save it in a folder that can be accessed by Turbo Integrator. To download the script, select this link.
- In Turbo Integrator, edit the Prolog of the Reportworq - REST API Run Job Sample 2.4 TI process to reference the RunApiJob.bash script instead of the RunApiJob.ps1 script, and to point to the folder that contains the script For example: BashScriptFolder = '/reportworq/scripts/'; BashScript = 'RunApiJob.bash' ;
BashScriptFileLocation = BashScriptFolder | BashScript ; - Edit the Epilog of the Reportworq - REST API Run Job Sample 2.4 TI process to reference the RunApiJob.bash script directly in the EXECUTECOMMAND function, and to point to the folder that contains the script. For example: CommandToRun = ' cd '| BashScriptFolder |' ; sh ' | BashScript | ' -token ' | pAccessToken | ' -url ' | pApiUrl | ' -jobPath ' | JobRequestFolder | LOWER(JobFileName) | ' -tlsSecurity ' | pTlsSecurity | ' > ' | BashScriptFolder | 'RunApiJob.log';
To review and configure parameter values:
- In Turbo Integrator, navigate to the Reportworq - REST API Run Job Sample 2.4 TI process, and open the Parameters settings.
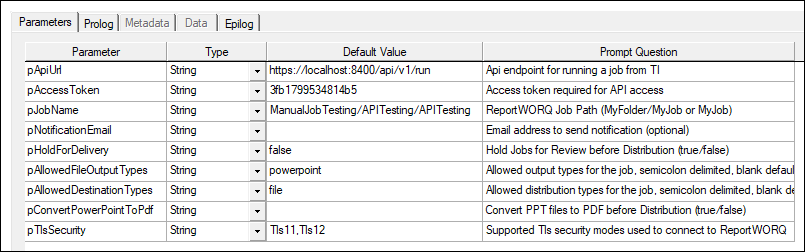
- Configure default values for the following parameters:
- pApiUrl -- Api endpoint for running a job from TI. Set this parameter to the Reportworq REST API endpoint for running Jobs. The format is http://server\_address:server\_port/api/v1/run. For example, https://localhost:8300/api/v1/run.
- pAccessToken -- Access token required for API access. Set this parameter to the value of the Local API Key for the Reportworq REST API. Please note that if you are using Reportworq Workspaces, the Local API Key is distinct per Workspace. So if you are needing to call a job from a different Reportworq Workspace be sure to update the TI process with the correct API Key distinct to that workspace. For more information, see Configuring the Reportworq REST API.
- Review and configure defaults for the remaining parameters as required:
- pJobName -- Reportworq Job Path (MyFolder/MyJob or MyJob).
- pNotificationEmail -- Email address to send notifications (optional).
- pHoldForDelivery -- Hold Jobs for Review before Distribution (true/false).
- pAllowedFileOutputTypes -- Allowed output types for the job, semicolon delimited, blank defaults to all configured (excel/pdf/ppt/csv).
- pAllowedDestinationTypes -- Allowed distribution types for the job, semicolon delimited, blank defaults to all configured (file/sharepoint/sheets/email/slack/teams).
- pConvertPowerPointToPdf -- Convert PPT files to PDF before Distribution (true/false).
- pTlsSecurity -- Supported Tls security modes used to connect to Reportworq. This tells the PowerShell script what TLS protocol versions should be used when connecting to Reportworq. The default values are normally sufficient in most environments (Tls11, Tls12).
For more information about overriding Reportworq Job parameters, review instructions and samples on the Epilog tab of the Reportworq - REST API Run Job Sample 2.4 TI process. The Parameter Override logic uses the Reportworq API Job Run command with the appropriate JSON being constructed through Turbo Integrator.

REST API Integration for IBM Cloud Hosted Connections#
This topic explains how to set up a Turbo Integrator process that integrates with the Reportworq REST API. This integration adds the Reportworq - Rest API Run Job Sample - Cloud - 1.0 TI process to your Planning Analytics datasource.
The main steps for setting up this integration are as follows:
- Install the REST API TI process.
- Review and configure parameter values for the Reportworq - Rest API Run Job Sample - Cloud - 1.0 TI process.
To install the REST API TI process:
- In the Reportworq Administration interface, in the Datasources list, select the IBM Planning Analytics datasource. Datasource settings appear.
- Select Advanced Options.
- Select the link to Install REST API TI process. The Reportworq - Rest API Run Job Sample - Cloud - 1.1 TI process is added to your Planning Analytics environment.
To review and configure parameter values:
- In Turbo Integrator, navigate to the Reportworq - Rest API Run Job Sample - Cloud - 1.1 TI process, and open the Parameters settings.
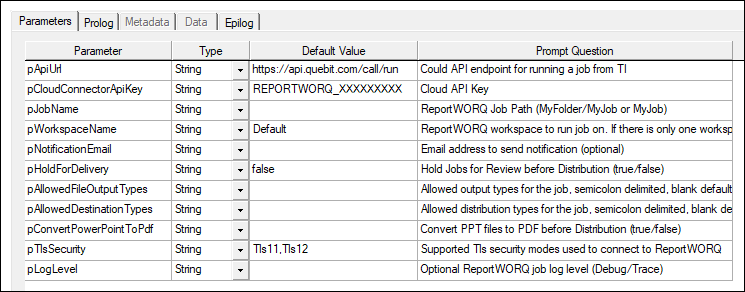
- Configure default values for the following parameters:
- pApiUrl -- Could API endpoint for running a job from TI. Set this parameter to https://api.quebit.com/call/run. This helps relay REST API calls to Reportworq.
- pCloudConnectorApiKey -- Cloud API Key. Set this parameter to the value of the Cloud API Key for the Reportworq REST API. For more information, see Configuring the Reportworq Cloud Connector.
- Review and configure defaults for the remaining parameters as required:
- pJobName -- Reportworq Job Path (MyFolder/MyJob or MyJob).
- pWorkspaceName -- Reportworq workspace to run job on. If there is only one workspace available, this parameter is optional.
- pNotificationEmail -- Email address to send notifications (optional).
- pHoldForDelivery -- Hold Jobs for Review before Distribution (true/false).
- pAllowedFileOutputTypes -- Allowed output types for the job, semicolon delimited, blank defaults to all configured (excel/pdf/ppt/csv).
- pAllowedDestinationTypes -- Allowed distribution types for the job, semicolon delimited, blank defaults to all configured (file/sharepoint/sheets/email/slack/teams).
- pConvertPowerPointToPdf -- Convert PPT files to PDF before Distribution (true/false).
- pTlsSecurity -- Supported Tls security modes used to connect to Reportworq. This tells the PowerShell script what TLS protocol versions should be used when connecting to Reportworq. The default values are normally sufficient in most environments (Tls11, Tls12).
- pLogLevel -- Optional Reportworq job log level (Debug/Trace).
For more information about overriding Reportworq Job parameters, review instructions and samples on the Epilog tab of the Reportworq - Rest API Run Job Sample - Cloud - 1.1 TI process. The Parameter Override logic uses the Reportworq API Job Run command with the appropriate JSON being constructed through Turbo Integrator.

TI Script Troubleshooting#
If a user is having difficulty with their TI script, it is recommended that they check this short list to determine the error before contacting support:
- Is the Reportworq API enabled?
- Are you able to access Reportworq in a browser? (Is it running?)
- Does the pApiUrl value match the Reportworq address and is it accessible from the TM1 server where you are attempting to run the script?
- Does the active accessToken in the TI parameters match the API token configured in the Reportworq API integration?
- Has the process run successfully since the RW5 script upgrade?
- If you follow the Excel reference in the Job definition, does it evaluate to a valid Job name that exists in Reportworq?
- Does the name of the TM1 server you are attempting to use match the value in the pServer parameter?
- If it does, are there multiple jobs with the same name or a job and folder that share the same name? If so, a full path to the job will need to be used instead of just the job name.
- Is the path to the PowerShell file that is referenced in the TI script valid?
Cube Monitoring#
The cube monitoring feature enables Planning Analytics developers on IBM Cloud Hosted connections to insert Reportworq Job execution requests into a cube that Reportworq monitors and processes at regular intervals.
This mechanism was originally designed to support IBM Cloud customers where a Planning Analytics Cloud-hosted TI process would not otherwise be able to create a file or call a REST endpoint on the locally hosted Reportworq Server. This limitation has since been removed. See the IMPORTANT notice below.
IMPORTANT: Cube Monitoring is a legacy solution that is now deprecated. Information about this option is provided to support existing applications. For new installations, use the REST API Integration for IBM Cloud Hosted Connections option instead.
If you have any issues with cube polling, we recommend that you upgrade to the new TI process.
To enable Cube Monitoring for Planning Analytics Cloud Connections:
- In the IBM Cloud Reportworq Datasource configuration settings, select the check box to Enable Cube Monitor. This action adds the following objects to your Planning Analytics datasource:
- }Reportworq__Queued Jobs cube -- This cube, along with its two dimensions, is used by Reportworq to track job requests. Reportworq polls the cube every few seconds to see if a Job has been queued to run. Jobs are queued to run by adding an element to the }Reportworq__Queued Job Id dimension and populating the details of the job to be executed. Reportworq automatically removes processed job requests from the Job Id list. The sample Reportworq - Add Queued Job Turbo Integrator process can be used to add requests to this queue cube.
- Reportworq - Add Queued Job and Reportworq - Add Queued Job for Workspace sample processes -- These Turbo Integrator processes provide a working template of how to create the Job Request entry and can be integrated into other Processes and Chores in Planning Analytics, for instance by requesting that a Reportworq Job be run after a data load is complete, or to provide some self-service reporting bursting options for users. The Add Queued Job for Workspace sample process should be used in conjunction with the Workspaces feature in Reportworq so that the job being executed can be located in the specified workspace. Using the Add Queued Job process or the Add Queued Job for Workspace process without specifying a Workspace name will cause Reportworq to look for a job in the Default Workspace.
- Information about additional parameters for the Reportworq - Add Queued Job process:
- pJobDefinition: The job definition parameter tells Reportworq what to run, and uses the following specification to support optional parameter overrides:
- Job Name;Job Name!ParamName|ParamOverrideValue,ParamName!ParamOverrideValue Tip: For Job definitions, Reportworq supports the use of a single comma (,) or double commas (,,) between parameter names and values.
- Alternatively, you can use a subset parameter override: Job Name;Job Name!ParamName|ServerName:DimensionName:SubsetName where the override parameter value is replaced by the PA model name, the dimension's name, and the override subset's name.
- Sample pJobDefinition parameter values:
- Specify a Job without overrides, by name: Monthly Sales Job
- Specify the path of a Job without overrides: Monthly Reporting/Sales/Monthly Sales Job Tip: the full path of the job name can be obtained by selecting Copy Job Path from the context menu of the Job in the Job Editor tree.
- Override a SalesRep parameter value: Monthly Sales Job;Monthly Sales Job!SalesRep|1001
- Override the SalesRep and Period parameter values: Monthly Sales Job;Monthly Sales Job!SalesRep|1001,Period|Jan-2023
- pNotificationEmail: Email address used by Reportworq to optionally send notifications when the job is complete.
- pWorkspaceName: The name of the workspace where the job is located. The Add Queued Job for Workspace process should be used when more than one workspace has been configured.
- Please note that the delimiter for text lists of parameters is two asterisks (**). When adding multiple parameters ensure that they are separated by **.
No additional configuration in Reportworq is required after this feature is enabled for a Planning Analytics connection.

Feedback on this page
Comments, questions, requests, or something missing or unclear? Email us - the page you are on is filled in for you.
Email feedback on this pageOr write to support@reportworq.com directly.