
Overview#
All users who log in to Reportworq require authentication credentials and licenses. By default, Reportworq uses its native authentication provider. Alternatively, you can configure Reportworq to use Microsoft Entra ID (Azure Active Directory), Google Authenticator, or Custom OpenID Connect (OIDC) authentication.
Users who do not need to log in to Reportworq, such as consumers of distributed reports, do not require licenses or authentication credentials.
If your administrator account is locked out or you forget the password, you can regain control of Reportworq using local administrative control.
This article includes the following major topics:
- Configuring an Authentication Provider
- Managing User Accounts and Assigning Licenses
- Local Administrative Control
Note: Reportworq uses AES encryption to store passwords and connection strings at rest.
To access the Authentication interface:
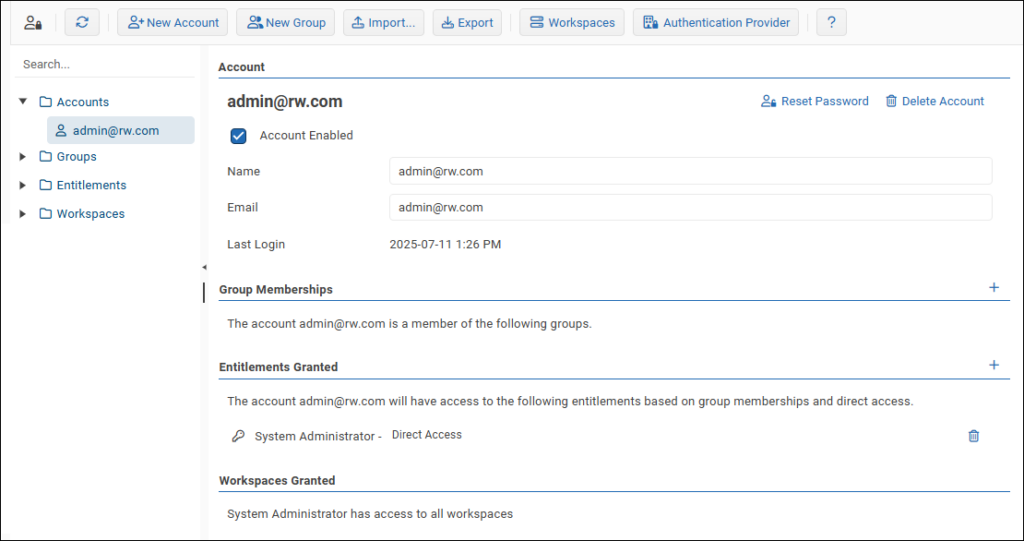
- In the Administration interface, select Authentication. The authentication interface appears.
Configuring an Authentication Provider#
By default, Reportworq uses its native authentication provider. Alternatively, you can configure Reportworq to use Microsoft Entra ID (Azure Active Directory), Google Authenticator, or Custom OpenID Connect (OIDC). If you switch authentication providers, all existing Reportworq accounts remain but their permissions are removed.
Using Security Claims to Manage Group Membership#
Information in this section applies to non-native authentication providers only.
Reportworq authentication and licensing is based on user accounts, groups, workspaces, and entitlements (licenses). Entitlements can be assigned directly, or via group membership. If you use a non-native authentication provider, you can choose to manage group memberships based on roles assigned in the authentication provider interface.
To manage group memberships based on authentication provider roles:
- Create a set of enterprise roles / app roles, complete with security claims. Each role will effectively identify a group of users that require access to a common set of Reportworq features.
- Assign roles to users as required. Each user may have any number of roles. When you later create accounts in Reportworq, they are automatically mapped to users from the authentication provider based on matching email addresses. Each user's security claims are automatically propagated to their Reportworq account. Tip: If you manage groups based on roles, a Reportworq account's entitlements do not consume licenses until the first time the user logs in.
- In the Reportworq authentication interface, create groups based on security claims. User accounts that possess security claims are added to groups with matching claims. For detailed steps, see Creating and Configuring Groups.
- To add or remove an individual group member, edit their user account in the authentication provider to add or remove them from roles. Tip: Changes made in the authentication provider interface are not automatically relayed to Reportworq. After you remove a role from a user, any associated Reportworq licenses are not released for reassignment until the user logs in. To release the licenses immediately, select the account in the Reportworq authentication interface and then clear the Last Claims box. The licence(s) are released, and the user must log in to Reportworq again before they can use any licensed features.
To switch authentication providers:
- At the top of the Authentication interface, select the Authentication Provider button.
 The Advanced Options pane appears.
 - Select the desired Provider.
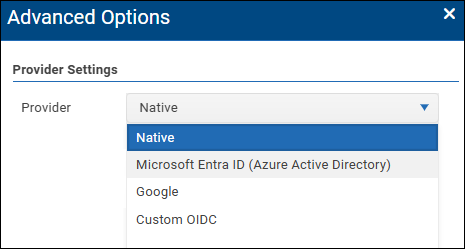 The configuration interface for the selected provider appears.
 - If you selected Native authentication:
- Configure the Lockout Settings and the Password Complexity Settings:
- Lockout Settings include the number of Failed login attempts allowed before the account is locked out, and the Lockout time, which is how long access is denied before another login attempt is allowed.
- Password Complexity Settings apply when a user first logs in to their account, or when they log in after a password reset has been requested. The settings apply rules for passwords, including requirements for the presence of numbers, symbols, lowercase letters, and uppercase letters; minimum password length; and minimum number of unique characters.
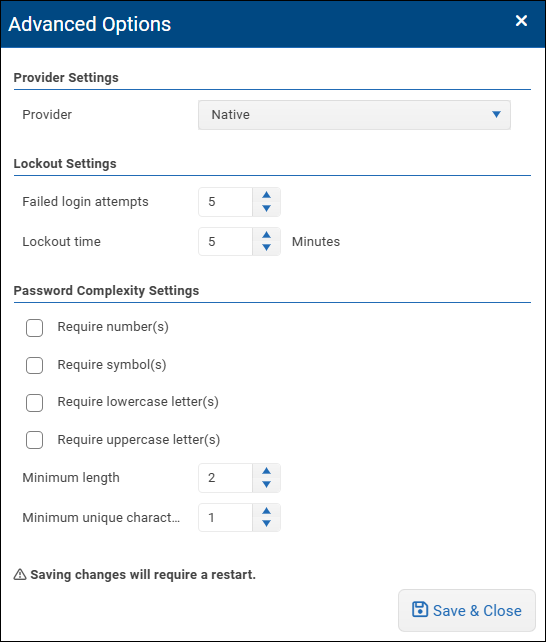
- Select Save & Close.
- When prompted, provide an email address to use for the initial system administrator account, select OK, and then confirm.
- When prompted to restart Reportworq, select OK.
- Skip the remaining steps in this procedure.
- If you selected authentication by Microsoft Entra ID (Azure Active Directory):
- Create an app registration on the Azure Active Directory. For more information, see the Microsoft 365 article.
- Specify the Client Id, Client Secret, and Tenant Id.
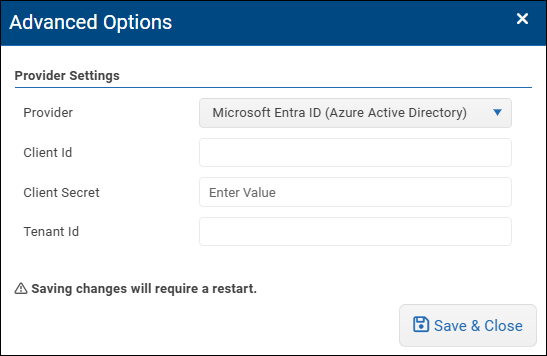
- Select Save & Close.
- When prompted, provide an email address to use for the initial system administrator account, select OK, and then confirm. Note: The email address must exist in Azure Active Directory.
- When prompted to restart Reportworq, select OK.
- Skip the remaining steps in this procedure.
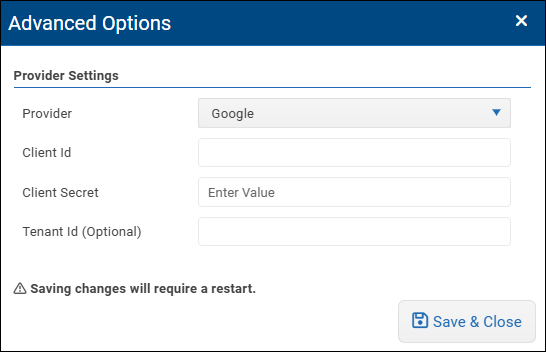
- If you selected Google (Google Authenticator):
- Specify the Client Id, Client Secret, and a Tenant Id (optional).
- Select Save & Close.
- When prompted, provide an email address to use for the initial system administrator account, select OK, and then confirm. Note: The email address must exist in Google Authenticator.
- When prompted to restart Reportworq, select OK.
- Skip the remaining steps in this procedure.
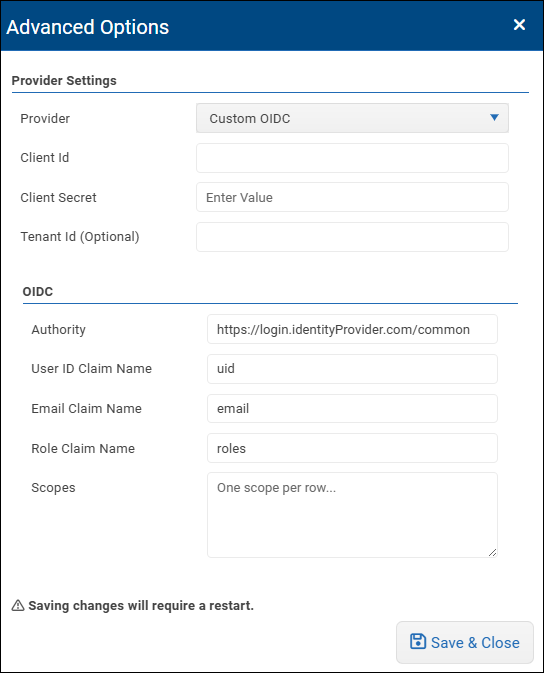
- If you selected Custom OIDC authentication:
- Configure the Provider Settings and the OIDC Settings:
- Provider Settings include Client Id, Client Secret, and optionally, a Tenant Id.
- OIDC Settings include an Authority URI, User ID Claim Name, Email Claim Name, Role Claim Name, and one or more Scopes.
- Select Save & Close.
- When prompted, provide an email address to use for the initial system administrator account, select OK, and then confirm. Note: The email address must exist in the OIDC authentication provider.
- When prompted to restart Reportworq, select OK.
Managing User Accounts and Assigning Licenses#
Reportworq authentication and licensing is based on Accounts, Groups, Entitlements, and Workspaces:
- Accounts are individual user accounts. Each account is linked to an email address in your organization.
- Groups enable you to modify settings for multiple accounts collectively. A group can contain any number of accounts and can be granted entitlements and access to workspaces.
- Entitlements are licenses to use specific sets of Reportworq features. You can grant entitlements to accounts and groups. Each account must have at least one entitlement, granted either directly or via group membership. Reportworq entitlements are as follows:
- Contribution End User -- The account can receive Contribution input forms and complete and/or approve them.
- PowerPoint End User -- The account can receive PowerPoint presentations generated by Reportworq and can format their visual appearance. They may also be able to refresh the report data and run the underlying Reportworq Job to update the data.
- Reporting End User -- The account can use Reportworq's Office365 Excel Add-in to create and manage reports.
- Reportworq Administrator -- The account can use all Reportworq features including the report distribution Job Editor, Contribution Campaigns, and Reporting. Reportworq Administrators can also manage Global Variables, Job Schedules, and the Address Book. If the account has Administrator privileges for a workspace, they can add, configure, and delete Datasources in that workspace.
- System Administrator -- The account can access and configure all Reportworq settings, features, and workspaces. System Administrators configure authentication and application settings, as well as Datasources, Report Providers, and Distributors. Granting the System Administrator entitlement consumes a Reportworq Administrator license. IMPORTANT: Ensure that there is always at least one system administrator. If you log out while there are no system administrators, you must regain administrative control of Reportworq.
- Workspaces are segregated working environments within Reportworq. You can grant workspace access to accounts and groups. Each account must have access to at least one workspace, granted either directly or via group membership. System Administrators automatically have access to all workspaces.
The tree on the left side of the authentication interface has four nodes: Accounts, Groups, Entitlements, and Workspaces.
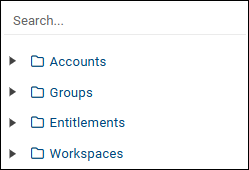
To provide flexibility and ease-of-use, the Reportworq authentication interface allows you to edit settings from multiple perspectives. You can expand a node and then select an item to access that item's properties:
- Accounts -- Review and modify the account name and email address, entitlements, group memberships, and workspaces.
- Groups -- Review and modify the group name, membership list, entitlements, and workspaces.
- Entitlements -- Review and modify the list of accounts and groups that have been granted the entitlement.
- Workspaces -- Review and modify the list of accounts and groups that have been granted access to the workspace.
Tip: Use the Search box above the tree to quickly find specific items.
This remainder of this section includes the following topics:
- Creating and Configuring Accounts
- Creating and Configuring Groups
- Configuring Entitlements
- Creating and Configuring Workspaces
- Importing and Exporting Authentication Data
Creating and Configuring Accounts#
Each user account is based on an email address in your organization. After you create an account, you can grant it entitlements and add it to groups and workspaces.
To create an account:
- Select New Account.
- Enter the email address for the account, and then select OK. Note: Reportworq does not create email addresses. They must already exist in your organization. The new account appears in the Accounts node of the authentication tree.
To configure account properties:
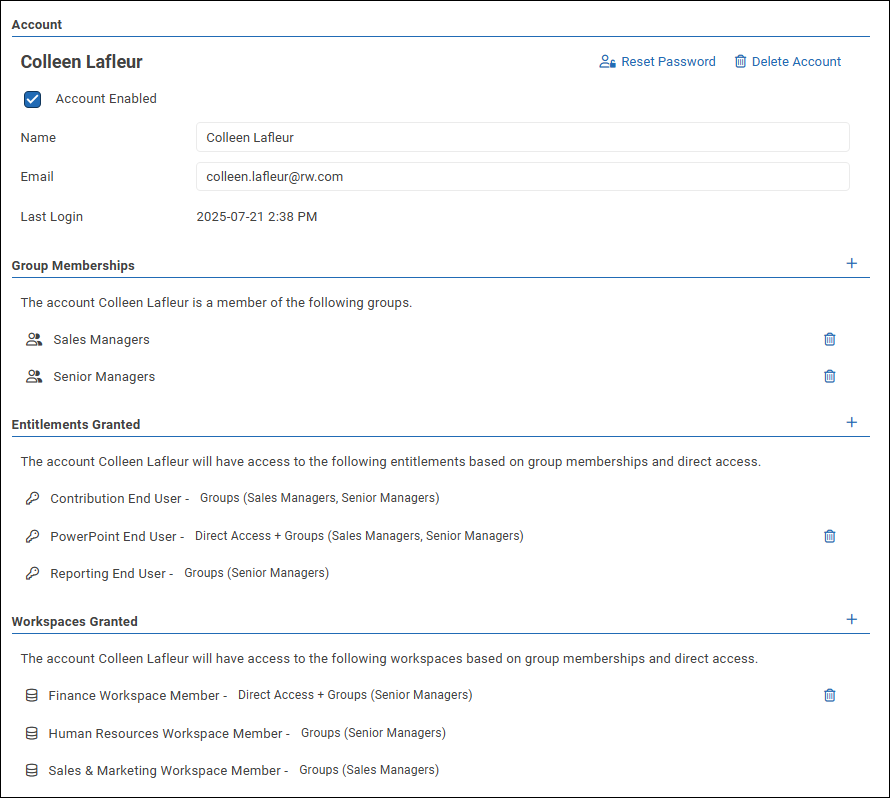
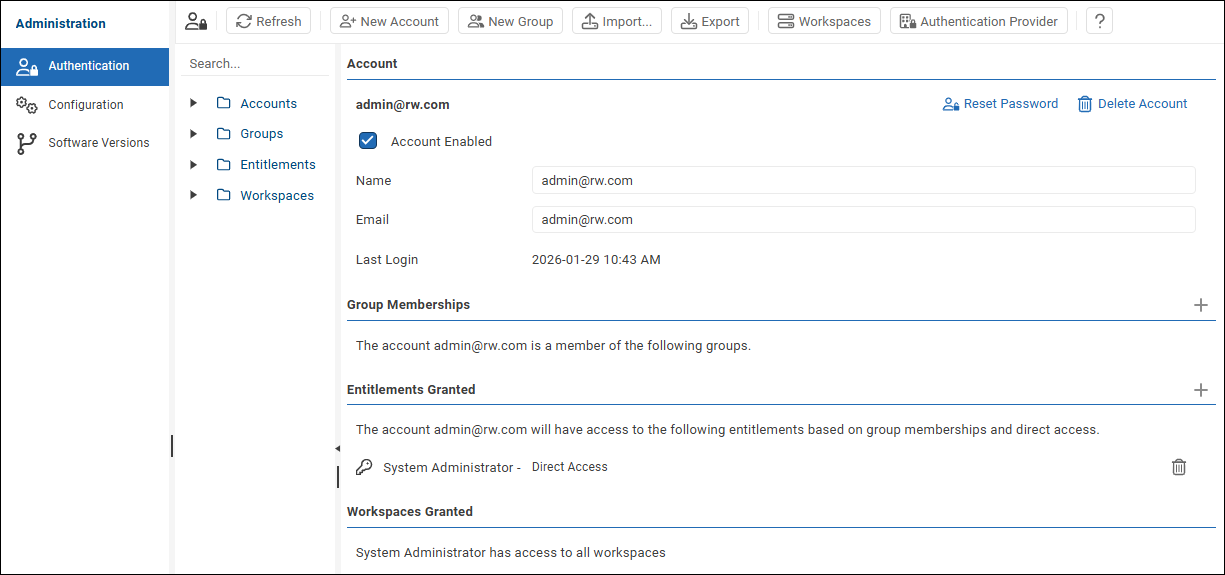
- In the authentication tree, expand the Accounts node and then select the account you want to configure. Account properties appear. The figure below is based on native authentication.
- Review and configure account properties as required:
- Name -- The name of the user.
- Email -- The email address for the account.
- Last Login -- The last time the user logged in to Reportworq. This is not editable.
- Last Claims -- The security claims assigned to the account by the authentication provider (for non-native authentication only). This list of claims is not editable and is refreshed each time the user logs in to Reportworq. Security claims are managed by the authentication provider.
- Group Memberships -- A list of the groups to which the account belongs. Groups are optional, and an account can belong to any number of them. The account inherits entitlements and workspace memberships from the groups to which it belongs. You can add an account to a group directly. For non-native authentication, you can also edit the group properties to add a security claim that the user account possesses. For more information, see Using Security Claims to Manage Group Memberships.
 To manage group memberships for the account directly, select the add icon
  to open the list of groups, add or remove groups as required, and then select OK.
 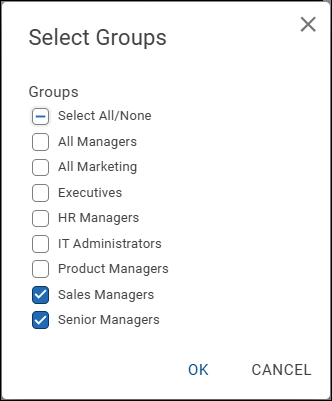 Tip: To remove a group membership without opening the list, select the trashcan icon beside the membership.
- Entitlements Granted -- A list of Reportworq licenses granted to the account. The list indicates whether each entitlement is granted to the account directly or inherited from one or more groups. If an entitlement is granted through multiple means, only one license for the entitlement is consumed. Accounts that have no entitlements cannot log in to Reportworq.
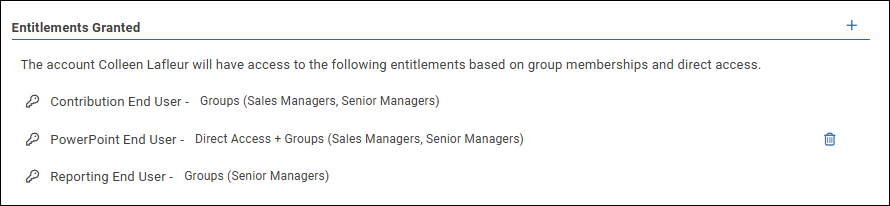 To grant or revoke entitlements directly, select the add icon to open the list of entitlements, select or clear entitlement checkboxes as required, and then select OK.
 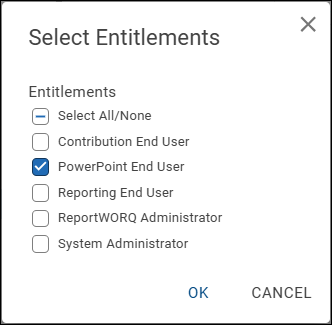 Tip: To revoke an entitlement without opening the list, select the trashcan icon beside the entitlement.
 - Workspaces Granted -- A list of segregated Reportworq working environments that the account can access. The list indicates whether access to each workspace is granted directly or inherited from one or more groups. Each account must have access to at least one workspace. Accounts without workspace access cannot log in to Reportworq.
 To manage workspace access for the account directly, select the add icon to open the list of workspaces, grant or revoke workspace accesses as required, and then select OK:
- For System Administrators, you do not need to select any workspaces. System Administrators automatically have access to all workspaces.
- For Reportworq Administrators, when you grant access to each workspace, select either Member or Administrator privileges for that workspace. The only difference between the two options is that Member privileges do not permit the account to manage Datasources.
- For End Users, when you grant access to a workspace, select Member privileges.
- If you want to force a reset of the account password, select Reset Password (available for native authentication only). The account user is prompted to select a new password the next time they attempt to log in. Tip: If a user forgets their password, they can select Forgot Password from the login dialog to request a password reset. The user is then prompted to provide a new password.
- If you want to delete the account, select Delete Account, and then confirm the deletion. IMPORTANT: Deleted accounts cannot be recovered.
- To make the account unavailable for use, clear the Account Enabled checkbox. All account properties are hidden except the Name and Email. All the account's entitlements are suspended, and those licenses are available for use by other accounts. The account entry in the authentication tree turns red. If you want to re-enable the account, select the Account Enabled checkbox. Tip: When you create an account, it is enabled by default.
Creating and Configuring Groups#
You can create groups of user accounts and grant them entitlements and/or workspace accesses. An account can belong to any number of groups.
To create a group:
- Select New Group.
- Enter a name for the group, and then select OK. The new group appears in the Groups node of the authentication tree.
To configure group properties:
- In the authentication tree, expand the Groups node and then select the group you want to configure. Group properties appear. The figure below is based on native authentication.
- Review and configure group properties as required:
- Name -- The name of the group.
- Claims -- A list of security claims you want to associate with the group (applies to non-native authentication only). When you type the name of a claim, Reportworq recognizes it and immediately updates the Account Members list to include all accounts that possess the claim. Leave a space between claim names. Tip: If you select an account on the Accounts node, you can view and copy the account's claim names and then paste them into the Claims box for a group. Account Members -- A list of accounts that belong to the group.
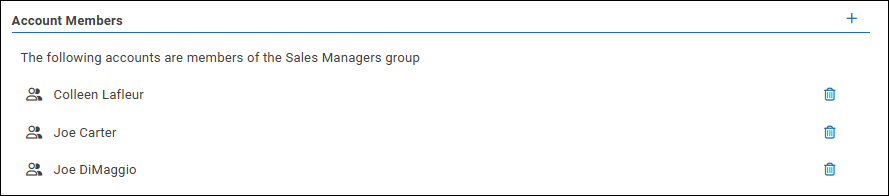 To manage account members for the group directly, select the add icon to open the list of accounts, add or remove accounts as required, and then select OK.
 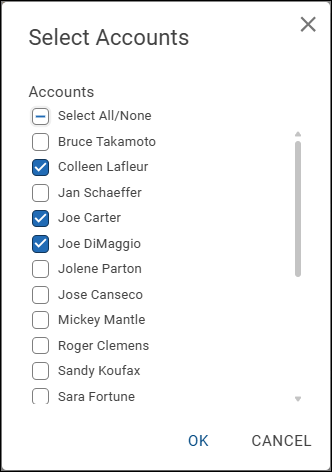 Tip: To remove an account without opening the list, select the trashcan icon beside the account.
Entitlements Granted -- A list of Reportworq licenses granted to the group. All group members inherit these entitlements. Each group must have at least one entitlement.
- To manage entitlements for the group, select the add icon to open the list of entitlements, grant or revoke entitlements as required, and then select OK.
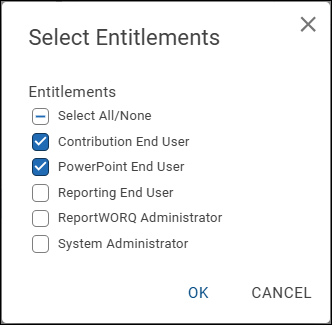 Tip: To revoke an entitlement without opening the list, select the trashcan icon beside the entitlement.
 - Workspaces Granted -- A list of the segregated Reportworq working environments to which group members have access. Each group must have access to at least one workspace.
 To manage workspace access for group, select the add icon to open the list of workspaces, grant or revoke workspace accesses as required, and then select OK. When you grant access to a workspace, select Administrator privileges if you want all Reportworq Administrators in the group to be able to manage Datasources. Otherwise, select Member.
 - If you want to delete the group, select Delete Group, and then confirm the deletion IMPORTANT: Deleted groups cannot be recovered. Group accounts continue to exist as individual accounts, but any entitlements or workspace accesses that were granted via the group are revoked.
Configuring Entitlements#
Entitlements are licenses to use specific sets of Reportworq features. You can grant entitlements directly to accounts, or to groups. If an entitlement is granted to an account through multiple means, only one license for that entitlement is consumed.
- Reportworq entitlements are as follows:
- Contribution End User -- Entitled accounts can receive Contribution input forms and complete and/or approve them.
- PowerPoint End User -- Entitled accounts can receive PowerPoint presentations generated by Reportworq and can format their visual appearance. They may also be able to refresh the report data and run the underlying Reportworq Job to update the data.
- Reporting End User -- Entitled accounts can use Reportworq's Office365 Excel Add-in to work with and manage reports.
- Reportworq Administrator -- Entitled accounts can use all Reportworq features including the report distribution Job Editor, Contribution Campaigns, and Reporting. Reportworq Administrators can also manage Global Variables, Job Schedules, and the Address Book. If the account has Administrator privileges for a workspace, they can add, configure, and delete Datasources in that workspace.
- System Administrator -- Entitled accounts can access and configure all Reportworq settings, features, and workspaces. System Administrators configure authentication and application settings, as well as Datasources, Report Providers, and Distributors. Granting the System Administrator entitlement to an account consumes one Reportworq Administrator license. IMPORTANT: Ensure that there is always at least one system administrator. If you log out while there are no system administrators, you must regain administrative control of Reportworq.
To manage entitlements:
- In the authentication tree, expand the Entitlements node and then select the entitlement you want to configure. The number of consumed licenses for the entitlement is displayed, above lists of groups and accounts that possess the entitlement.
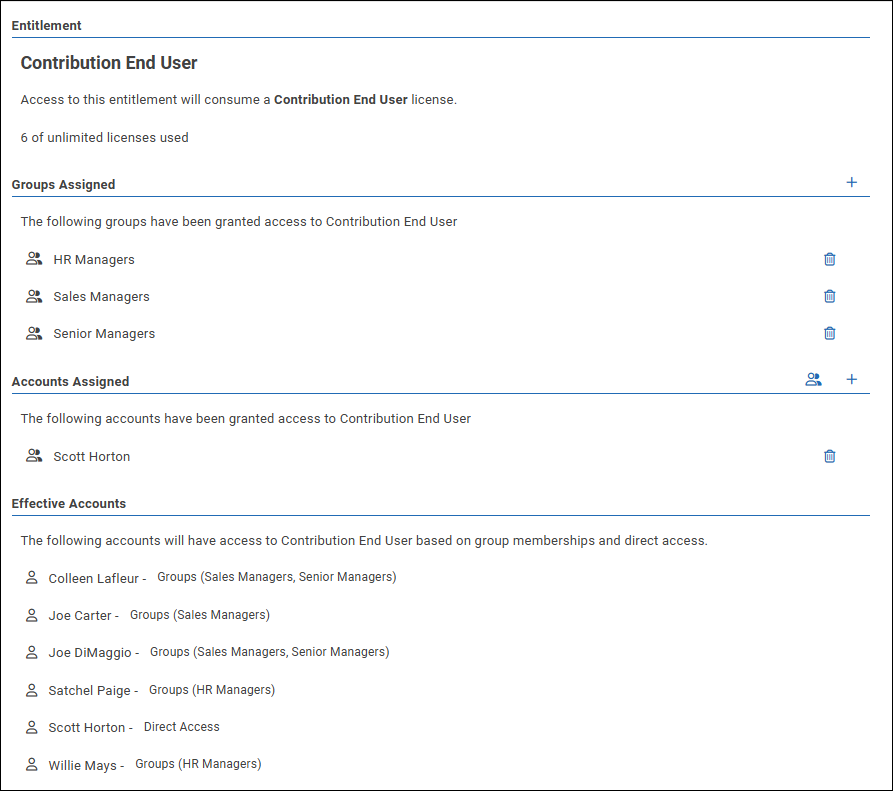
- Review and edit the lists as required:
- Groups Assigned -- Lists all groups that possess the entitlement.
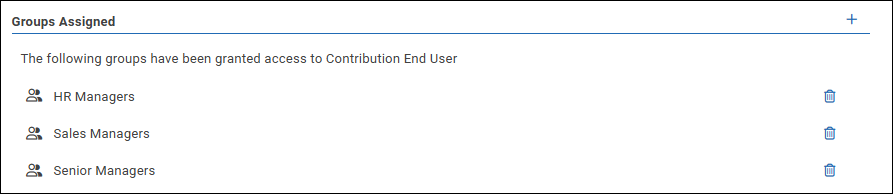 To manage the list, select the add icon to open the list, add or remove groups as required, and then select OK. Tip: To remove a group without opening the list, select the trashcan icon beside the group.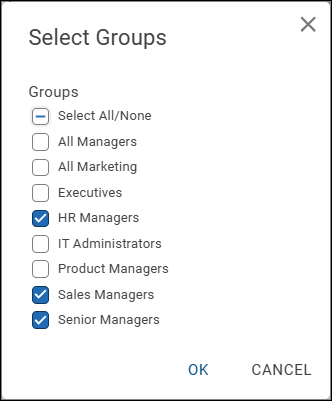
- Accounts Assigned -- Lists all accounts that have been granted the entitlement directly.
 To manage the list, select the add icon to open the list, add or remove accounts as required, and then select OK. Tips:
- To remove an account without opening the list, select the trash can icon beside the account.
- To convert the list of accounts to a new group, select the group icon
 , provide a name for the group, and then select OK.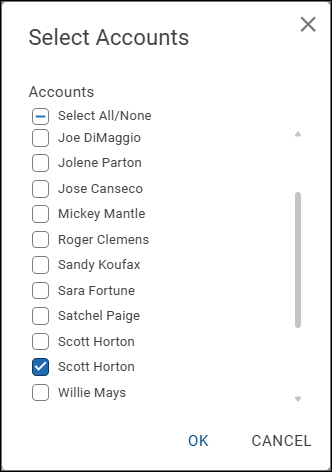
- To remove an account without opening the list, select the trash can icon beside the account.
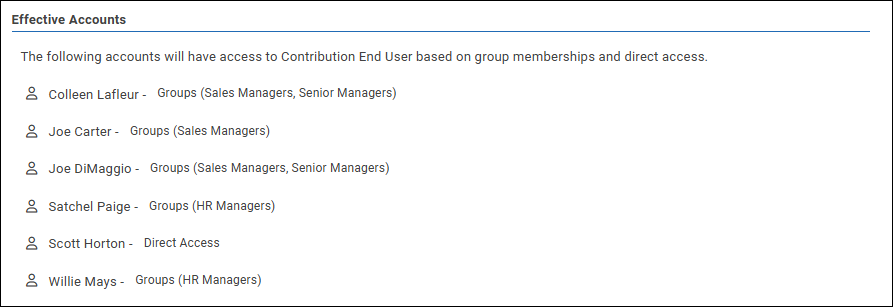
- Effective Accounts -- Lists all accounts that currently possess the entitlement, whether granted to them directly or via group membership.
- Groups Assigned -- Lists all groups that possess the entitlement.
Creating and Configuring Workspaces#
Workspaces are segregated working environments within Reportworq. You can grant workspace access to accounts and groups. Each account must have access to at least one workspace, granted either directly or via group membership. System Administrators automatically have access to all workspaces.
To create, rename, or delete a workspace:
- At the top of the authentication interface, select the Workspaces button.
 The Advanced Options pane appears and displays a list of workspaces.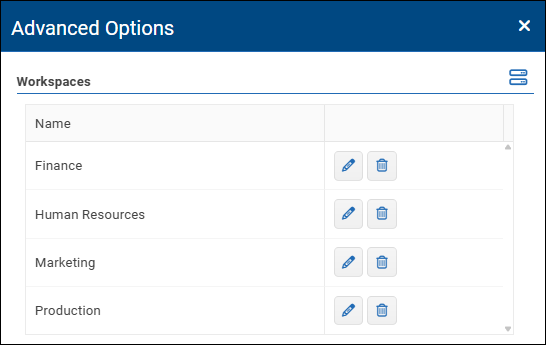
- If you want to create a new workspace, select the Create a new Workspace button
 , provide a name for the workspace, and then select OK. The new workspace appears on the list.
 - If you want to rename a workspace, select the pencil icon
 beside the workspace name, provide a new name for the workspace, and then select OK.
 - If you want to delete a workspace, select the trashcan icon beside the workspace name, and then select OK to confirm the deletion.
To manage workspace access:
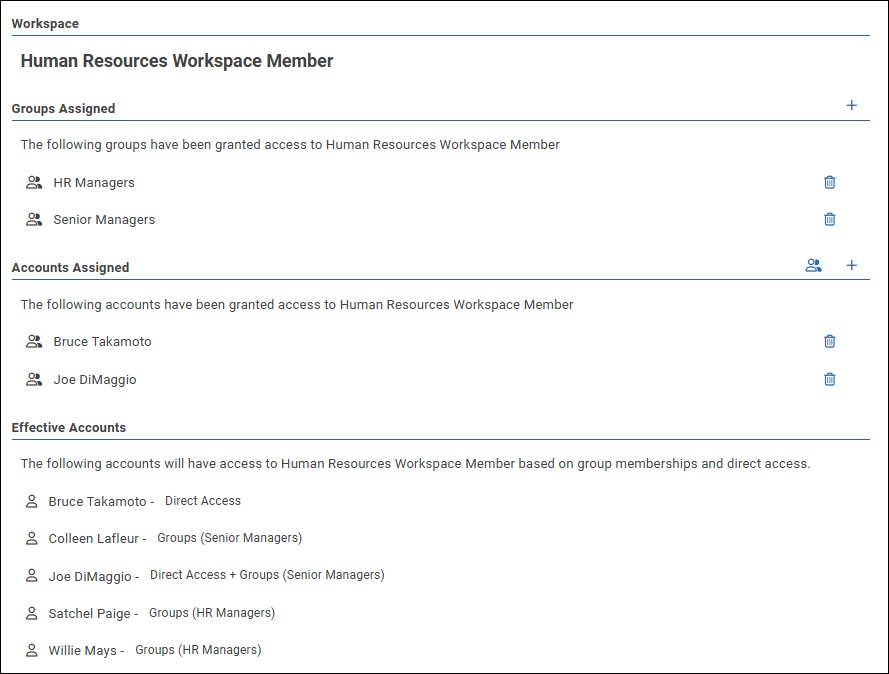
- In the authentication tree, expand the Workspaces node and then select the workspace you want to configure. Lists of groups and accounts that have access to the workspace appear.
- Review and edit the lists as required:
- Groups Assigned -- Lists all groups that have access to the workspace.
 To manage the list, select the add icon to open the list, add or remove groups as required, and then select OK. Tip: To remove a group without opening the list, select the trashcan icon beside the group.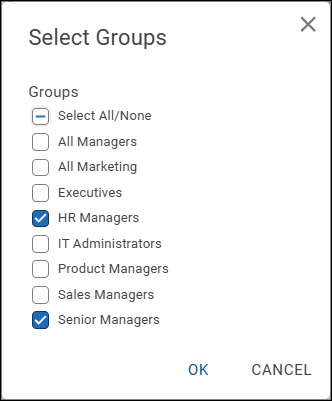
- Accounts Assigned -- Lists all accounts that have been granted the entitlement directly.
 To manage the list, select the add icon to open the list, add or remove accounts as required, and then select OK. Tips:
- To remove an account without opening the list, select the trashcan icon beside the account.
- To convert the list of accounts to a new group, select the group icon , provide a name for the group, and then select OK.
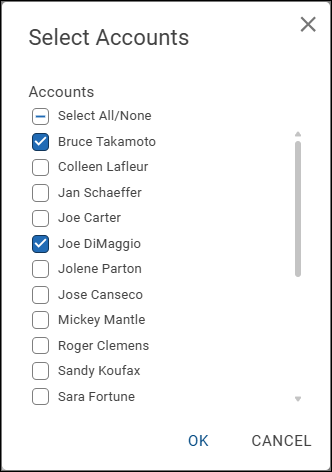
- To remove an account without opening the list, select the trashcan icon beside the account.
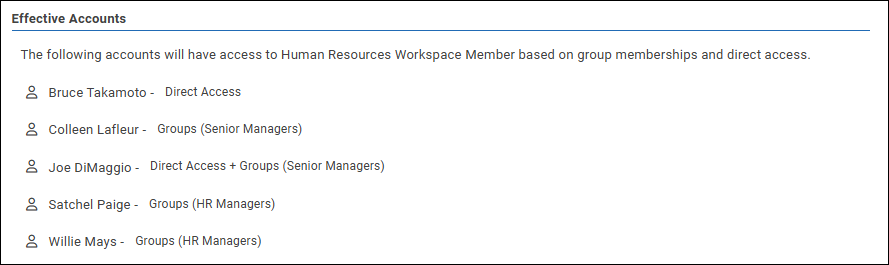
- Effective Accounts -- Lists all accounts that currently possess the entitlement, whether granted to them directly or via group membership.
Importing and Exporting Authentication Data#
You can export account properties as an Excel (.xlsx) file, which you can edit and later import. For each user account, the file includes columns for the account name, email address, status (enabled or disabled), groups, entitlements, and workspaces.
Notes about editing account properties in Excel:
- You cannot delete accounts by deleting account rows.
- Important: Do not edit data in the Id column. The user account Ids are unique identifiers that must not be modified. If you add a new account, do not assign an Id. Reportworq will assign an Id when you import the file.
To export account properties:
- Select Export.
 A file named accounts.xlsx appears in the Downloads folder.
To import account properties:
- Select Import.

- Browse to select the account properties file (typically named accounts.xlsx), and then select OK. The account properties are imported. Edited account data is updated, and new accounts are added. Accounts are never deleted because of importing account properties.
Local Administrative Control#
You can access select administrative controls locally on the Reportworq server. No password is required for local access.
These local controls enable you to:
- Upgrade Reportworq to a different software version.
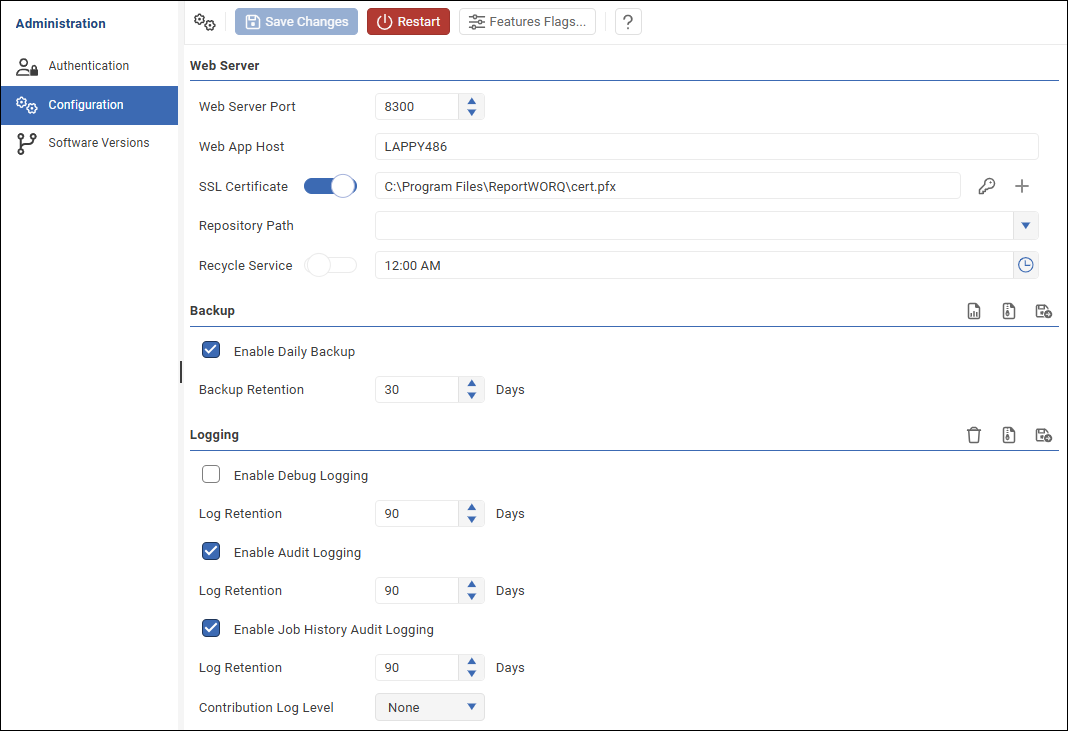
- Modify most Configuration settings, including Web Server options, Backup options, and Logging options.
- Configure Authentication settings. Tip: Accessing Authentication settings locally enables you to unlock and/or reconfigure System Administrator accounts as required to restore online access. This is useful in the following situations:
- Passwords for all System Administrator accounts have been forgotten.
- All System Administrator accounts are locked out.
- No accounts have the System Administrator entitlement.
To access Reportworq administrative settings locally:
- On the computer where Reportworq is installed, use a web browser to navigate to the Reportworq login dialog via the localhost URL. For example, the default URL is http://localhost:8300 or https://localhost:8300.
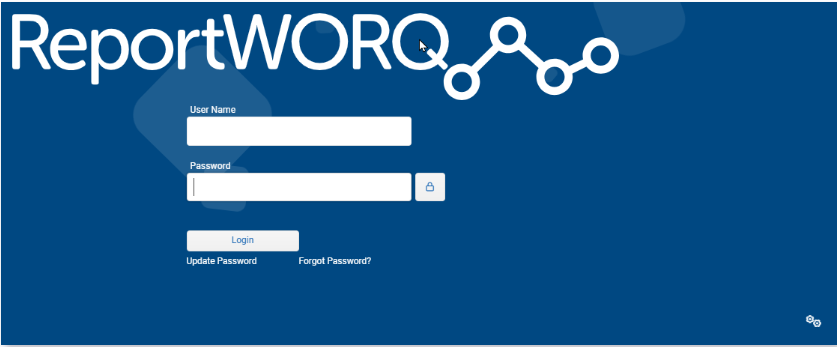
- In the lower right corner, locate the Administration Settings icon.
 If there is no icon, your Reportworq version was released prior to v5.0.0.69 and local access to administrative controls is not available. If you have lost administrative control of Reportworq, see Regaining Administrative Control for Versions Prior to v5.0.0.69.
 - Select the Administration Settings icon. Configuration settings appear, including Web Server options, Backup options, and Logging. For more information, see Configuration.
- If you want to configure Authentication settings, select Authentication from the Administration menu. Authentication settings appear. For more information about these settings, see Authentication.
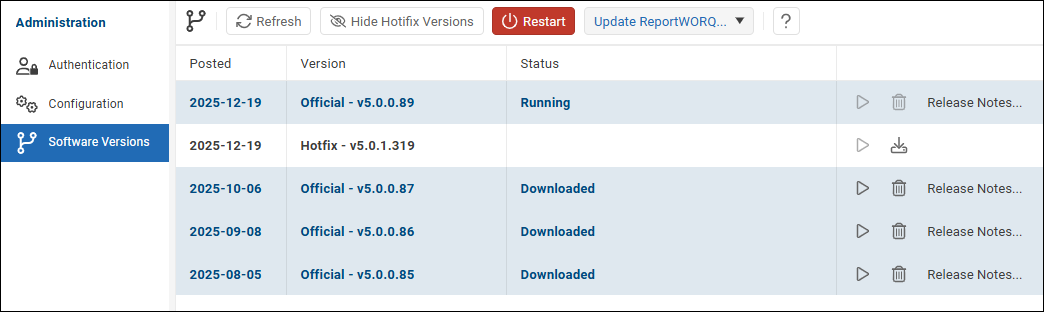
- If you want to upgrade Reportworq to a different version, select Software Versions from the Administration menu. Software version settings appear. For more information about these settings, see Upgrading Reportworq.
Regaining Administrative Control for Versions Prior to v5.0.0.69#
If your Reportworq version was released prior to v5.0.0.69, you can regain administrative control but all configured user accounts will be deleted and the authentication provider will revert to Native mode.
IMPORTANT: Do this only as a last resort if none of the System Administration passwords are known.
To regain administrative control for Reportworq versions prior to v5.0.0.69:
- In Windows Explorer, navigate to the Reportworq Repository following folder: <*install_location*>\Reportworq\Repository Delete the Authentication folder. Restart Reportworq. Follow the configuration wizard prompts to create a new System Administrator account.
Feedback on this page
Comments, questions, requests, or something missing or unclear? Email us - the page you are on is filled in for you.
Email feedback on this pageOr write to support@reportworq.com directly.