
Connect QuickBooks Online#
Reportworq connects to QuickBooks Online through a CData driver, which presents the QuickBooks company as a relational, tabular source you query with the same table or SQL modes as any database. In the connector catalog the tile is QuickBooks Online. Authentication is OAuth 2.0 against Intuit.
This page covers the part of the setup that is different on a server or headless install: completing the OAuth sign-in when there is no web browser on the Reportworq server itself. For the shared CData add-and-test flow, see Connect CData sources.
How server-side sign-in works#
A CData driver's default OAuth flow is a desktop flow: it opens a local loopback listener and launches a browser on the machine running the driver. On a server that has no desktop browser, that flow cannot complete.
Reportworq instead uses the server (web) OAuth flow, so no browser is needed on the server:
- You reach Reportworq in a browser on your own workstation, as you normally do.
- When you select Authenticate, Reportworq builds the Intuit sign-in URL and opens it in a new tab of your browser.
- You sign in to QuickBooks and authorize the app. Intuit redirects back to a redirect endpoint on the Reportworq server, and the server exchanges the authorization code for the access and refresh tokens and stores them, encrypted, in Reportworq's own token store (one record per connection).
Because the sign-in happens in your workstation browser and the token exchange happens on the server, the whole flow works on a headless install.
Before you begin#
- You are an administrator. Only administrators can add or configure datasource connections.
- Reportworq is reachable over HTTPS. OAuth sign-in cannot complete over plain
http://on a non-localhostaddress, and Reportworq stops with a message saying so. On a server install this means the address you use to reach Reportworq must behttps://.... - You have an Intuit Developer account and an app (a QuickBooks Online app) with OAuth 2.0 enabled. If you do not, create them first, following Intuit's own developer documentation, then complete the app setup below.
Set up your Intuit app#
You gather three things from Intuit before you configure Reportworq: the OAuth Client Id and OAuth Client Secret, the Redirect URI, and your QuickBooks Company Id.
Copy the Client Id and Client Secret#
In the Intuit Developer portal, open your app and go to Keys & Credentials. On the Production tab, turn on Show credentials to reveal the Client ID and Client secret, and copy both. You enter them into Reportworq as the OAuth Client Id and OAuth Client Secret.
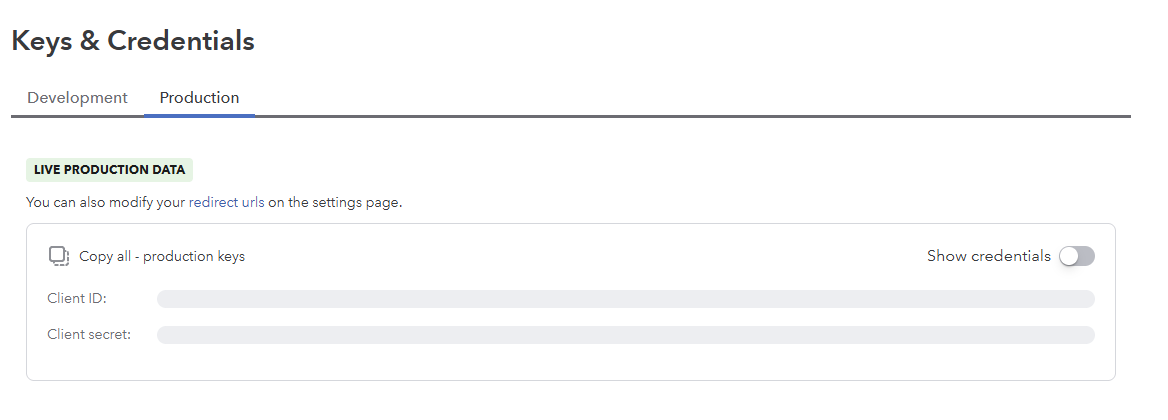
Treat the client secret like a password. Do not paste it into email, chat, or a screenshot: notice that the screen above keeps it hidden until you ask to see it.
Register the redirect URI#
In the same app, go to Settings > Redirect URIs and add this exact Redirect URI, replacing the host with your Reportworq address:
https://<your-reportworq-host>/server/v0/oauth-redirect
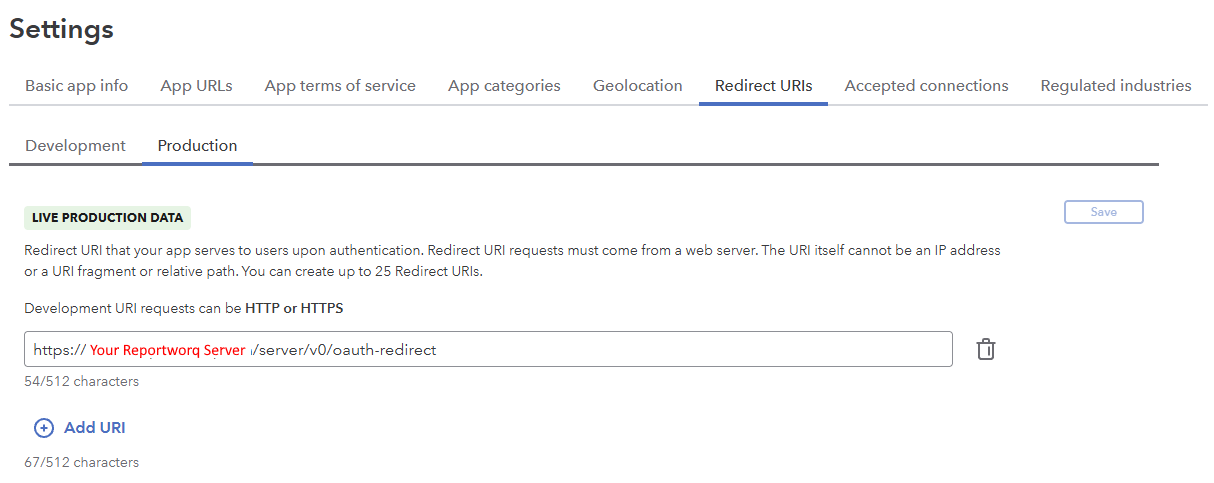
The redirect URI must match exactly between the sign-in request and the token exchange, so register the same value you reach Reportworq at. A mismatch is the most common cause of a failed sign-in. Intuit also requires a real host name here: an IP address is not accepted.
Find your Company Id#
On current builds, Reportworq captures the company automatically when you Authenticate (see below), so you do not normally need to look this up. You still need it if you are on an older build, or if you want to set or override the Company Id by hand. To find it, sign in to QuickBooks Online and open Settings > Subscription and Billing; your Company ID is shown there.

Add the connection in Reportworq#
Sign in to Reportworq as an administrator and go to Settings > Integrations.
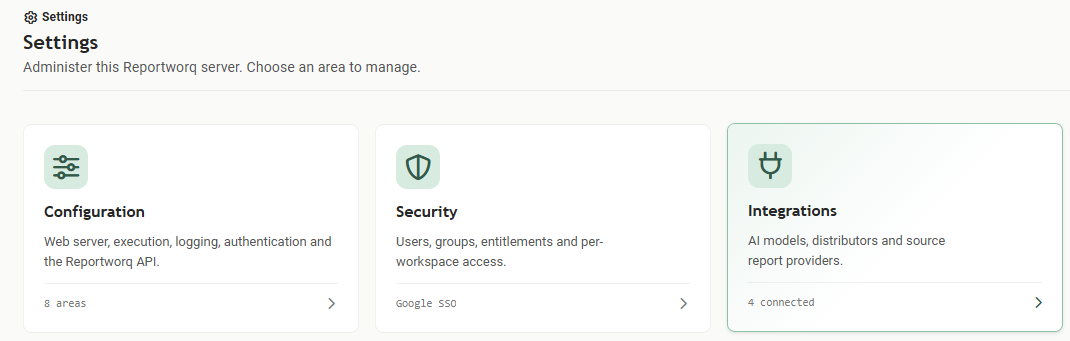
The Reportworq Settings screen showing the Configuration, Security, and Integrations tilesTap or click the image to view it full screen On the DATASOURCES tab, select Add, find QuickBooks Online in the catalog, and add it. The connection editor opens.
Select Enable datasource connection and give the connection a Datasource Name (for example,
QuickBooks). This is the name your formulas refer to, so it must be unique across the instance and is awkward to change later. Select Show Advanced Options to reveal the full OAuth settings.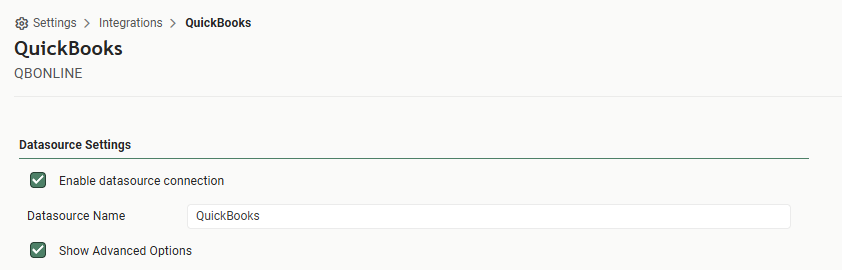
The QuickBooks datasource settings in Reportworq: Enable datasource connection selected, a Datasource Name of QuickBooks, and Show Advanced Options selectedTap or click the image to view it full screen In the OAuth section, set Initiate OAuth to GETANDREFRESH, then enter your OAuth Client Id and OAuth Client Secret from Keys & Credentials. On current builds you can leave Company Id empty: it is captured automatically when you Authenticate in step 6. Enter it only if you are on an older build, or want to target a specific company (find it in QuickBooks Subscription and Billing).
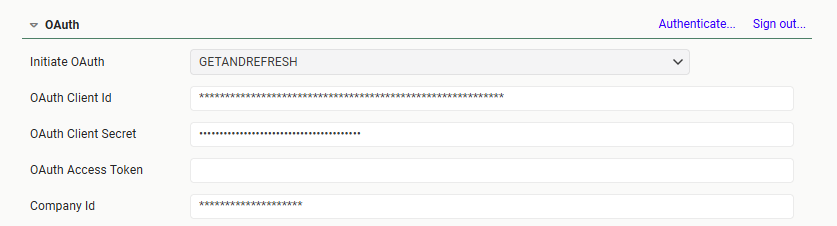
The Reportworq OAuth section with Initiate OAuth set to GETANDREFRESH and masked OAuth Client Id, OAuth Client Secret, and Company Id valuesTap or click the image to view it full screen Save your changes. Selecting Authenticate with unsaved edits returns "Please save changes before performing this operation." The same applies to Sign out.
Select Authenticate. A new browser tab opens with the Intuit / QuickBooks sign-in. Sign in to QuickBooks and authorize the app. When it completes, the tab shows "Authentication complete. You can return to the application. Feel free to close this browser tab." Close the tab and return to Reportworq.
Back in the OAuth section, the token fields (OAuth Access Token, OAuth Refresh Token, OAuth Settings Location, OAuth Expires In) stay empty. That is expected: Reportworq keeps the sign-in tokens encrypted in its own token store, separate from the connection, so they are never shown or saved with the connection. Select Test connection in the next step to confirm the sign-in worked.
Select Test connection, then Save.
To disconnect, select Sign out, which deletes this connection's stored tokens. (Save any other edits first.)
Query the company#
Once the connection tests, a model author builds views over it on each view's Design tab, starting from a table or writing SQL, exactly as for the other CData and relational sources. See Build a view with the designer and Data models.
On a report table, such as an imported Profit and Loss or the built-in report views, Reportworq
recognizes the id columns that sit beside each name column (Class_Id, Account_Id, Customer_Id, and
so on) and offers the matching QuickBooks table on the designer canvas, so you can add, for example, a
customer's full record to a report row. The Name_Id column can hold a customer, a vendor, or an employee,
so it offers all three. See Table relationships.
Bring QuickBooks reports in as tables#
Bring your Profit and Loss, Trial Balance, A/R Aging Summary, or any of 25 standard QuickBooks Online reports in as a table you can use in any data model. The report keeps the rows and columns you know from QuickBooks, it refreshes from QuickBooks on every job run like any other table on the connection, and report authors query it without rebuilding the report from raw transactions. Reportworq calls this an Import, and the action on a QuickBooks connection is Import report.
Only a system administrator can run an Import. For everyone else the button is shown but disabled.
Import a report from a data model#
Open the data model that reads from the QuickBooks connection, and open a view on its Design tab (select Add View for a new one).
In the toolbar above the canvas, select Import report.
In the Import report dialog, choose the report from the Report list. The dialog then shows the settings that report takes, and fills in a Table name for it (for example,
ProfitAndLossSummaryReport).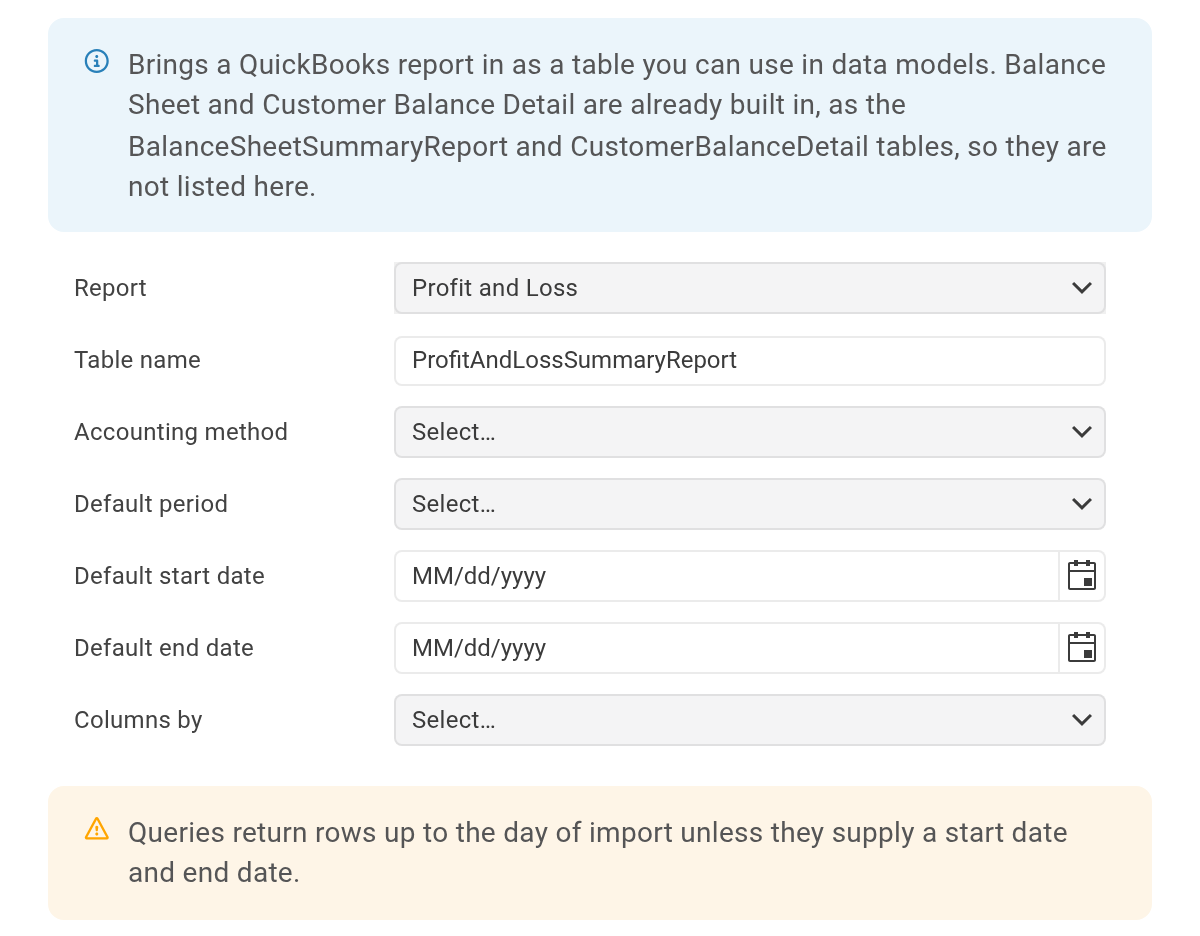
The Import report dialog with Profit and Loss chosen in the Report list, showing Table name, Accounting method, Default period, Default start date, Default end date, and Columns by, and a warning that queries return rows up to the day of import unless they supply a start date and end dateTap or click the image to view it full screen Change the Table name if you want a different one. It must not match a table the connection already has.
Optionally set the report's defaults: Accounting method (Cash or Accrual; leave it empty to use the company's QuickBooks preference), Default period (for example, This Fiscal Quarter), Default start date and Default end date, and Columns by (how a summary report splits its amount columns, for example by Month or Quarter).
Select Import.
When the import succeeds, the dialog reports the table name and its column count. Select Close: the new table becomes the view's starting table on the canvas, with every column ticked, ready for you to choose fields.
You can also run Import report from the connection's own page (Settings > Integrations > the QuickBooks connection), in its Imported objects section. That section lists every report imported on the connection, and is where you regenerate or remove one. See Regenerate, Regenerate all, and Remove.
State the date range in the query. A query over an imported report table returns rows up to the day of import unless it supplies
StartDateandEndDate, or the table has a Default period. Set one of them, or the numbers drift forward every time the job runs. The dialog warns about this while both dates are empty.
Reports you can import#
The table lists the 25 reports Import report offers, the table name each one fills in, and which optional settings it takes.
| Report | Default table name | Accounting method | Default period | Start and end dates | Columns by |
|---|---|---|---|---|---|
| Profit and Loss | ProfitAndLossSummaryReport |
Yes | Yes | Yes | Yes |
| Profit and Loss Detail | ProfitAndLossDetailReport |
Yes | Yes | Yes | No |
| Balance Sheet Detail | BalanceSheetDetailReport |
No | Yes | Yes | No |
| Statement of Cash Flows | StatementOfCashFlowReport |
No | Yes | Yes | Yes |
| Trial Balance | TrialBalanceReport |
Yes | Yes | Yes | Yes |
| General Ledger | GeneralLedgerDetailReport |
Yes | Yes | Yes | No |
| Journal | JournalReport |
No | Yes | Yes | No |
| Transaction List by Date | TransactionListReport |
Yes | Yes | Yes | No |
| Transaction List with Splits | TransactionListWithSplitsReport |
No | Yes | Yes | No |
| Account List | AccountListReport |
No | Yes | Yes | No |
| A/P Aging Summary | APAgingSummaryReport |
No | Yes | No | Yes |
| A/P Aging Detail | APAgingDetailReport |
Yes | No | No | No |
| A/R Aging Summary | ARAgingSummaryReport |
No | Yes | No | Yes |
| A/R Aging Detail | ARAgingDetailReport |
No | No | No | No |
| Customer Balance Summary | CustomerBalanceReport |
Yes | Yes | No | Yes |
| Income by Customer Summary | CustomerIncomeReport |
Yes | Yes | Yes | Yes |
| Sales by Customer Summary | CustomerSalesReport |
Yes | Yes | Yes | Yes |
| Sales by Product/Service Summary | SalesByProductReport |
Yes | Yes | Yes | Yes |
| Sales by Class Summary | SalesByClassReport |
Yes | Yes | Yes | Yes |
| Sales by Department Summary | SalesByDepartmentReport |
Yes | Yes | Yes | Yes |
| Vendor Balance Summary | VendorBalanceReport |
Yes | Yes | No | Yes |
| Vendor Balance Detail | VendorBalanceDetailReport |
Yes | Yes | No | No |
| Expenses by Vendor Summary | ExpensesByVendorReport |
Yes | Yes | Yes | Yes |
| Inventory Valuation Summary | InventoryValuationSummaryReport |
No | Yes | No | Yes |
| Inventory Valuation Detail | InventoryValuationDetailReport |
No | Yes | Yes | No |
Three reports are not on the list:
- Balance Sheet Summary and Customer Balance Detail are already built in, as the
BalanceSheetSummaryReportandCustomerBalanceDetailtables. Query them directly. - Tax Summary is not offered as an Import.
For how imported tables behave on the connection, and the read-only Tools a QuickBooks connection also carries (such as Refresh driver metadata), see Bring reports and saved searches in as tables in the CData sources guide.
Behavior and limits#
- No browser is needed on the server. Sign-in runs in your workstation browser; the token exchange runs on the Reportworq server.
- Tokens are stored encrypted in Reportworq's own token store, one record per connection, so two QuickBooks connections for different companies never share a sign-in. They are refreshed automatically at run time. A connection signed in on an older build has its saved tokens moved into the token store automatically the first time it loads; if the saved sign-in is still valid it keeps working, otherwise run Authenticate again. If the connection later stops authenticating, run Authenticate again to sign in fresh.
- Reportworq must be reached over HTTPS for sign-in to complete (or
localhostin a local dev setup). - The company is captured automatically from the authorization when you Authenticate, and stored as the connection's Company Id. To target a specific company, or on a build that does not capture it, set the Company Id field by hand (found in QuickBooks Settings > Subscription and Billing) and re-authenticate.
- Only administrators can add or configure the connection, and editing, disabling, or deleting a live datasource breaks every job and form that refreshes from it.
Troubleshooting#
| Symptom | Likely cause | What to do |
|---|---|---|
| Please save changes before performing this operation | You selected Authenticate or Sign out with unsaved edits | Save the connection, then try again. |
| Sign-in will not start, or fails to return | Reportworq is reached over plain http:// on a non-localhost host |
Reach Reportworq over HTTPS, then select Authenticate again. |
| Intuit rejects the sign-in with a redirect URI error | The redirect URI registered in the Intuit app does not match the address you reach Reportworq at | Register https://<your-reportworq-host>/server/v0/oauth-redirect in the Intuit app, matching your Reportworq address exactly. |
| Sign-in completes but queries return no company data | The company was not captured, or the Company Id is wrong on the connection | Re-run Authenticate to re-capture the company. If it is still wrong, copy your Company Id from QuickBooks Settings > Subscription and Billing, enter it as Company Id, save, and re-authenticate. |
| A CData or loopback socket error appears during sign-in on the server | The connection is attempting the desktop OAuth flow rather than the server flow | Confirm you are on a build with server-side QuickBooks OAuth, and complete sign-in from your workstation browser against the HTTPS address, not from a browser on the server. |
Related#
- Connect CData sources for the shared CData add-and-test flow and how to find a driver's connection properties.
- Connector catalog for the full connector list and the per-connector traps.
- Connect a data source for the general add, test, and manage flow.
- Data models for turning the connection into curated, reusable data for report authors.
Feedback on this page
Comments, questions, requests, or something missing or unclear? Email us - the page you are on is filled in for you.
Email feedback on this pageOr write to support@reportworq.com directly.