
Hierarchies#
Early release. This feature is in early release, so its screens and behavior may change. Tell us what you think with Send feedback. See Early release features and Send feedback.
A hierarchy rolls the values of a field up into groups: sales reps into teams, markets into regions, products into product lines. You define it once on the data model, attach it to a field, and every crosstab or professional report that uses the field can show the groups with their subtotals. Because it lives in the model, it travels with the model when you copy, export or import it.
When to use it. Use a hierarchy when the source has the detail but not the grouping you report on, or when the grouping changes by report. At Timberline Harvest Co., the Sales Details view lists 36 products, each with a product_line. A Levels hierarchy of product up to product_line lets a crosstab show each product line with its products beneath, and the line totals stay correct as products are added. A grouping that exists only in your head, such as Domestic and International markets, is a Manual hierarchy.
Two kinds of hierarchy#
| Manual | Levels | |
|---|---|---|
| You provide | The members and how they roll up, typed as an indented outline | A view of the model and the fields it rolls up through, most detailed first |
| Members come from | What you typed | The view's data, read each time a report uses the hierarchy |
| Stays current as data changes | No, you edit the outline | Yes |
| Best for | A small, stable grouping that is not in the data | A grouping that is already columns in a view |
Before you start#
- You can edit the data model and it has at least one source.
- Hierarchies are part of web reporting. If the Hierarchies tab is missing from the Source screen, web reports are not available on your installation; ask your administrator.
- For a Levels hierarchy, a view of the model that has a field for every level. Build it first with Build a view with the designer. Sort the view the way you want the hierarchy sorted (see below).
Create a Manual hierarchy#
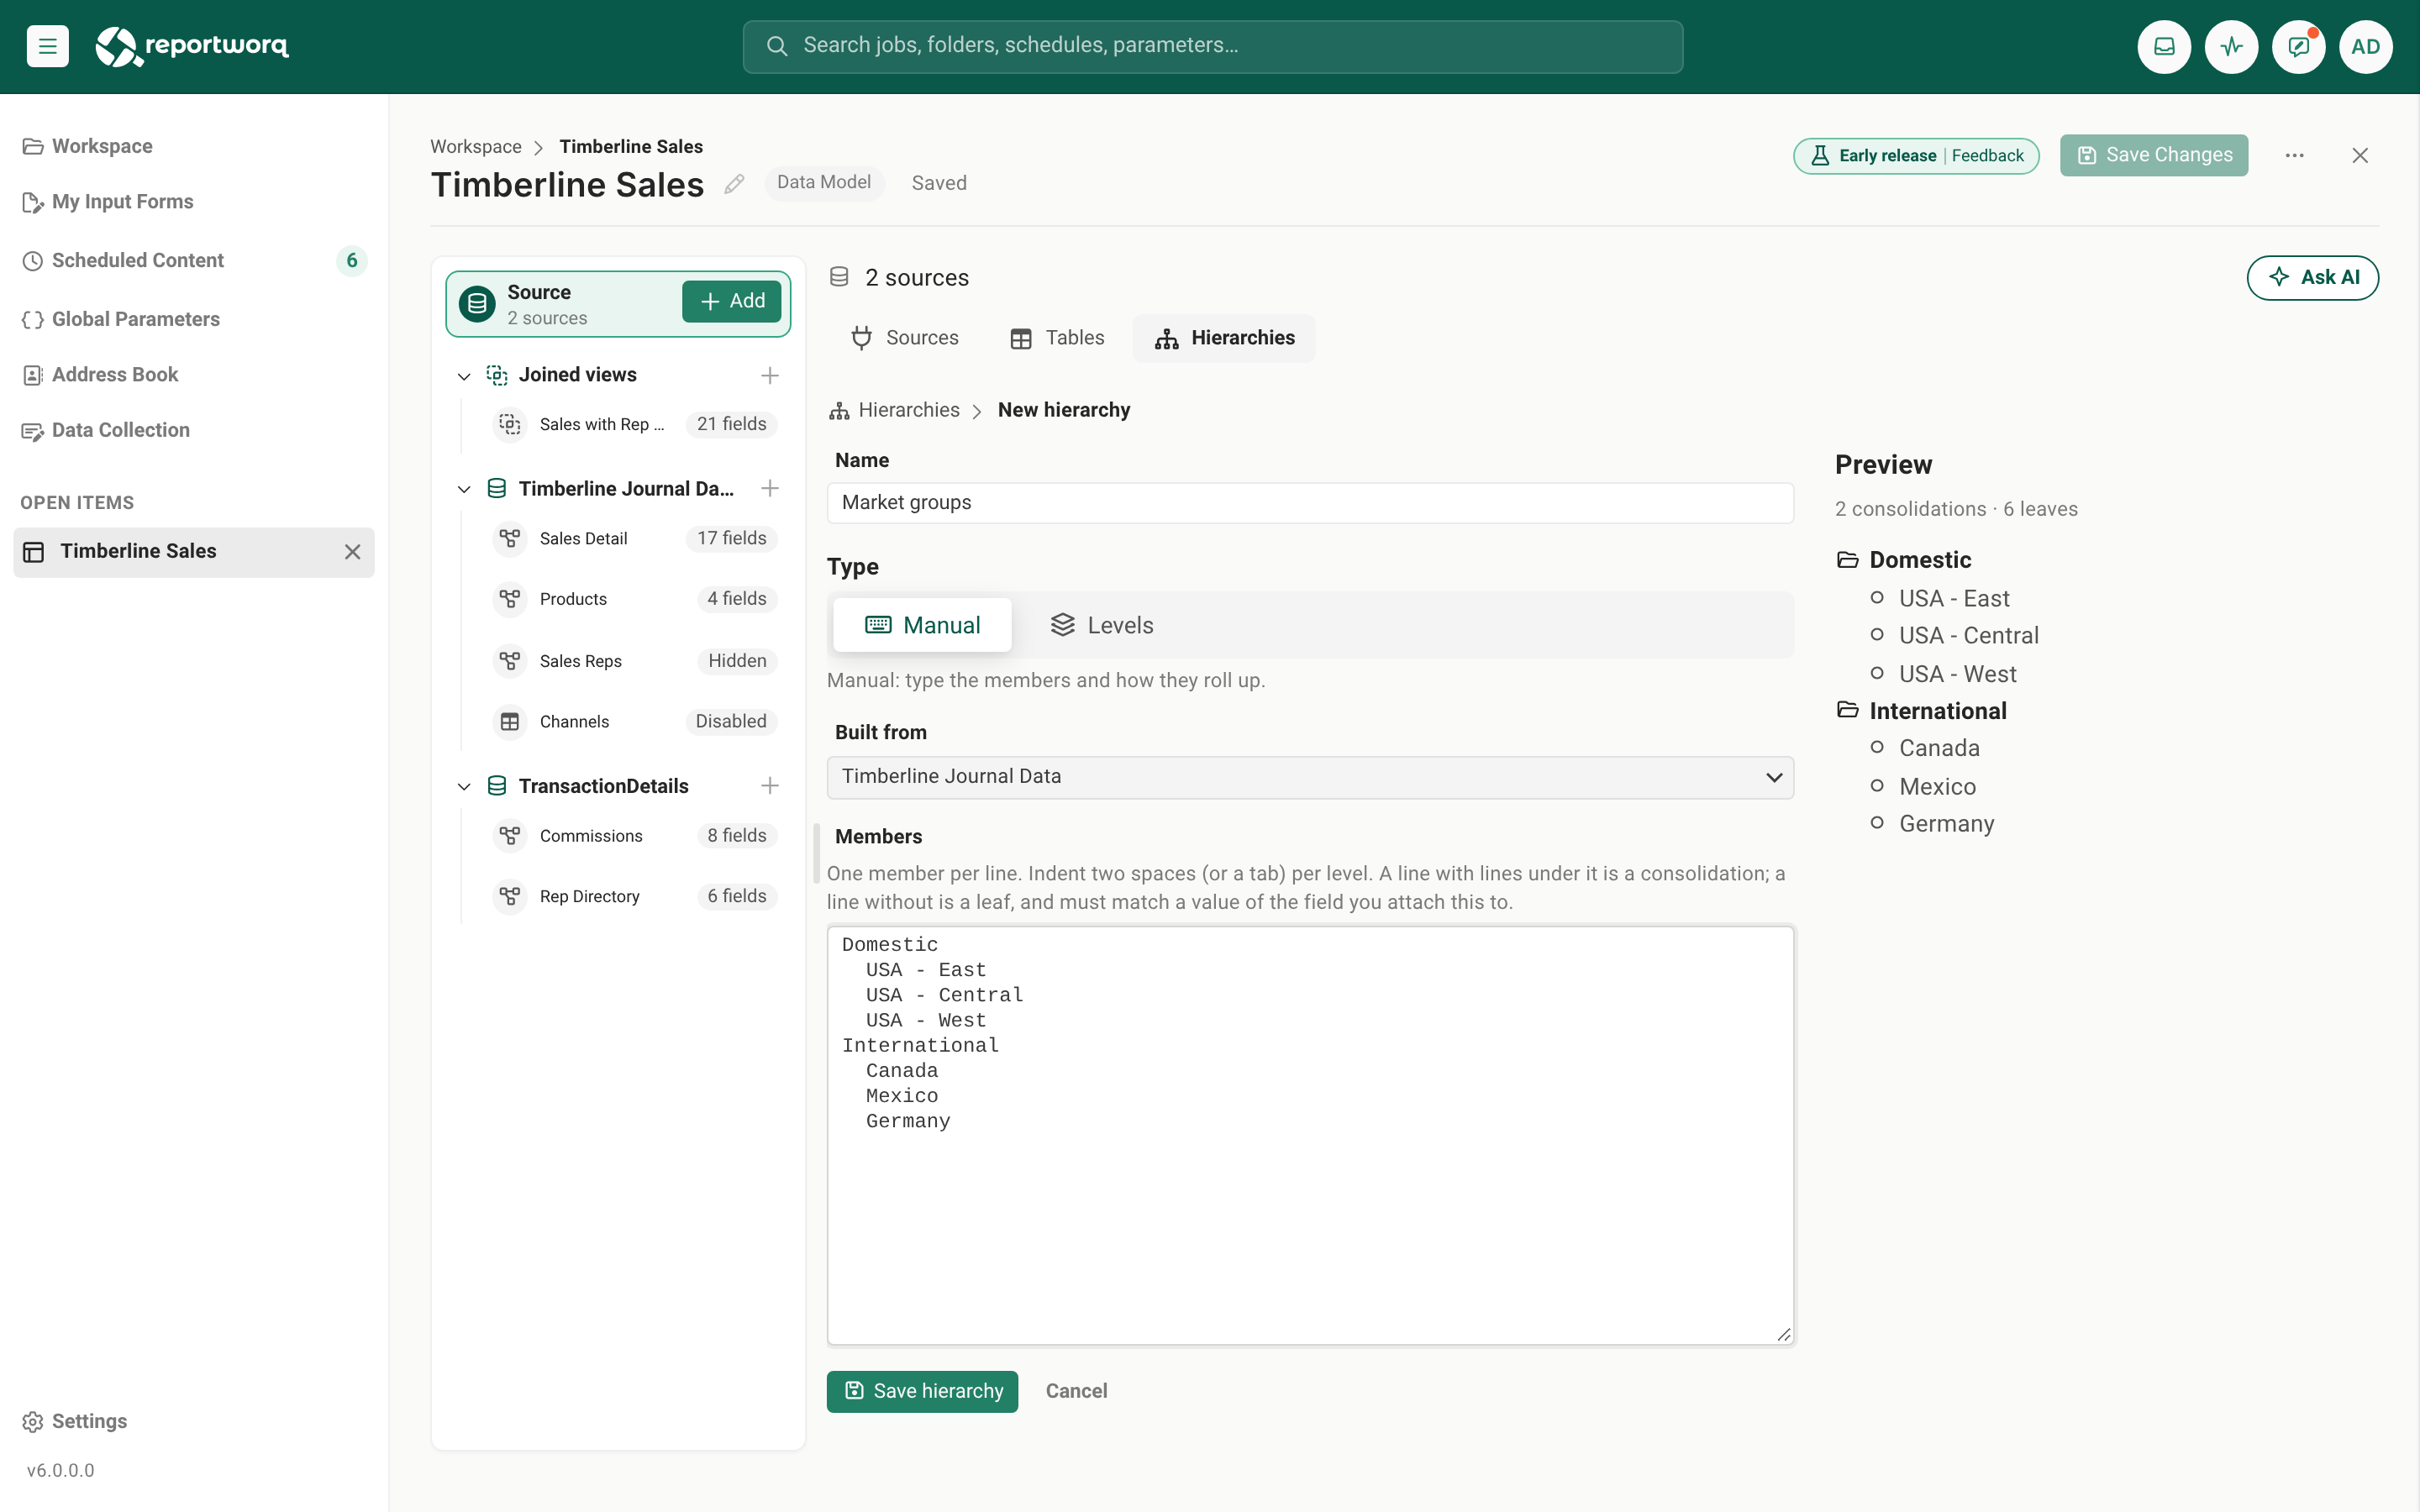
Open the data model, select Source in the rail, then the Hierarchies tab. It lists every hierarchy of the model with its Type, what it is Built from, its Size and the fields it is Attached to. An empty list reads No hierarchies yet.
Select New hierarchy. The hierarchy opens on its own screen.
Enter a Name. It must be unique within its source.
Leave Type on Manual. If the model has several sources, choose the source under Built from; it cannot be changed after you save.
Type the outline under Members: one member per line, indented two spaces or one tab for each level.
Domestic
  USA - East
  USA - Central
  USA - West
International
  Canada
  Mexico
  Germany
A line with lines under it is a group; the editor's hint and preview call it a consolidation. A line with none is a leaf, and it must match a value of the field you attach the hierarchy to, spelled the same way.
Check the tree that appears beside the outline. If the outline cannot be used, the preview reads Reports can't use this yet and lists each problem with its line number. Typical causes: a top-level line with nothing under it, a value listed twice (
a value has one place), an indent that is not two spaces or one tab per level, or an indent that jumps more than one level at a time.Select Save hierarchy. You return to the list with a note,
Updated “<name>” at hh:mm:ss. Save the data model to keep it.Select Save Changes to save the data model. Until then the hierarchy exists only in your editing session.
Create a Levels hierarchy#
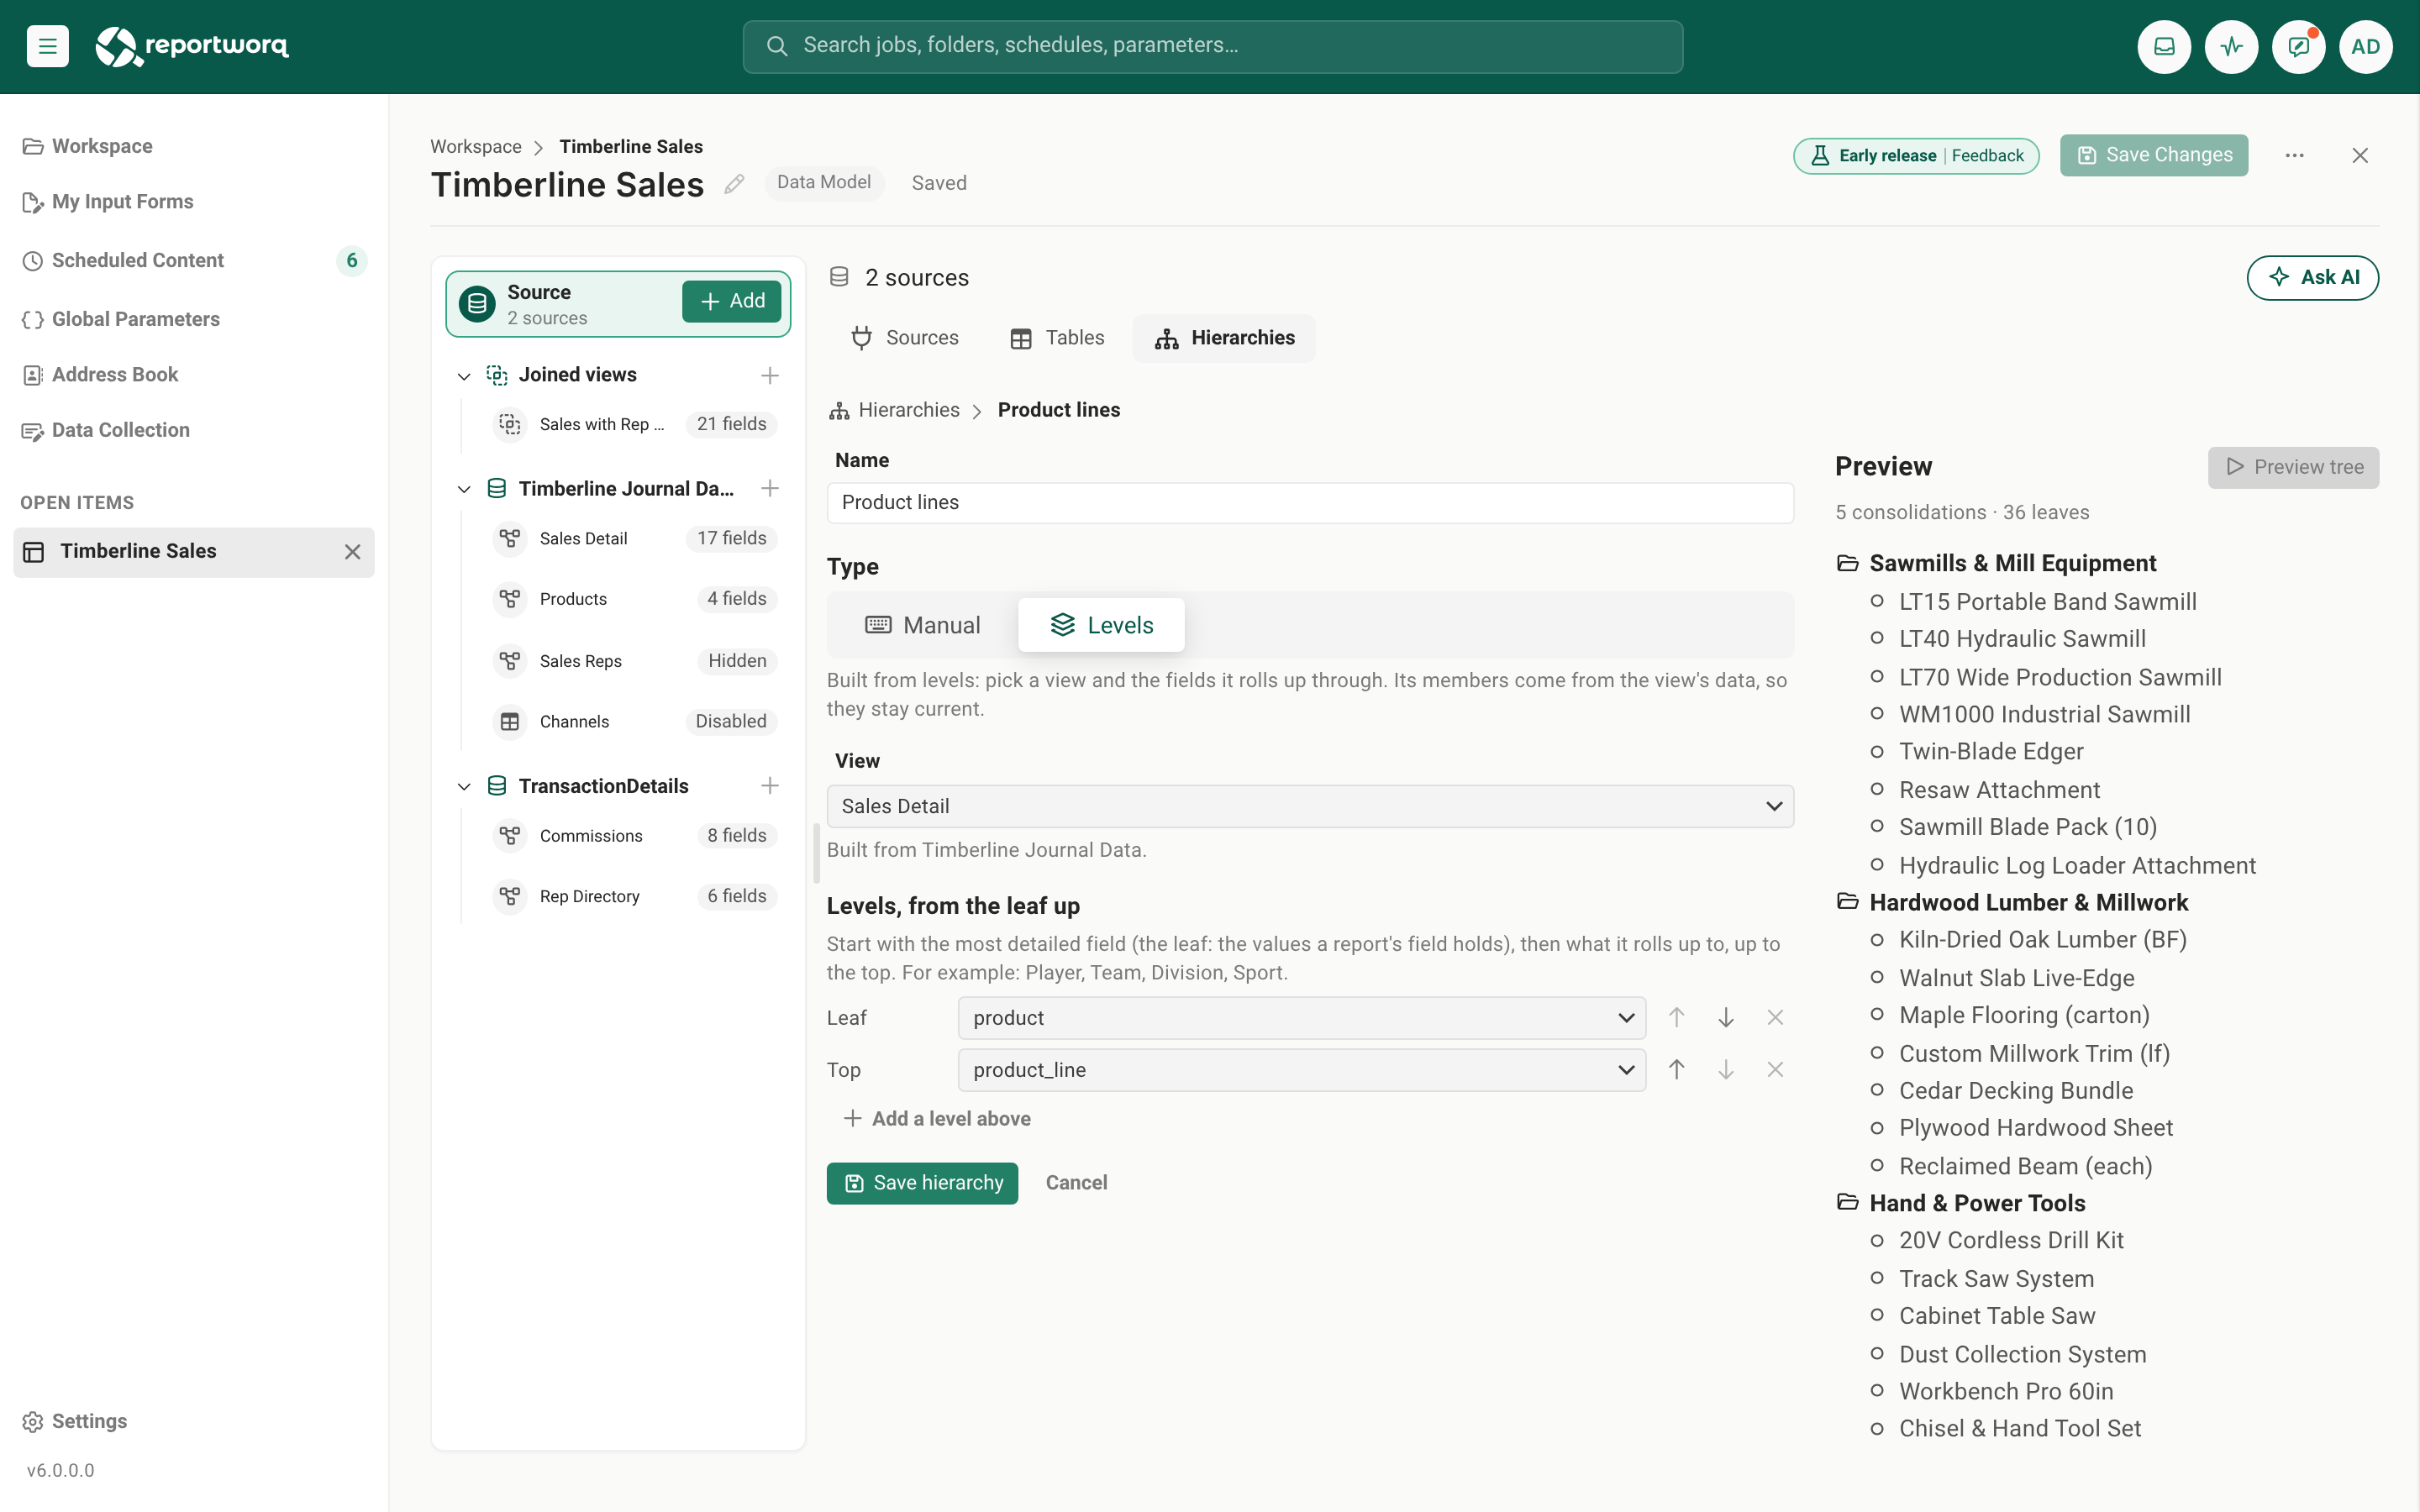
- On the Hierarchies tab, select New hierarchy and enter a Name.
- Set Type to Levels.
- Under View, choose the view to read. The list offers every view of every source in the model, except joined views. When the model has several sources, each entry shows its source in brackets, for example
Sales Details (TransactionDetails). - Under Levels, from the leaf up, choose a field for each level. The first row is the Leaf, the most detailed level: the values your report's field holds. The last row is the Top. For
Product lines, the leaf isproductand the top isproduct_line. Select Add a level above for another level, and use the arrows and the remove button to arrange them. A hierarchy needs at least two levels, and a field can be used only once. - Select Preview tree. Reportworq reads the view as you have it in the editor (unsaved changes included, variables at their defaults) and shows the members, their counts, and anything the data says about them under What the data says.
- Select Save hierarchy, then Save Changes to save the data model.
How a Levels hierarchy reads its view#
- Each value is one member, however many rows hold it, matched without regard to case. Leading and trailing spaces are trimmed.
- The order is the order the view returns its rows. Sort the view to sort the hierarchy.
- A member with two parents is reported, not merged. It is shown under the parent of its first row only, so its totals are counted once. What the data says names every parent, for example
Team “Red” rolls up to more than one parent in the view: “East”, “West”. It is shown under “East” only, so its totals are counted once.Fix the data or the view if that is not what you want. - Blank levels are skipped. A member whose parent is blank sits under the next level up that has a value. A row with a blank leaf gives nothing, and a leaf with every level above blank is left out (a report shows its rows under Unassigned).
- A value used at two levels is kept at both and reported.
- Variables follow the report. If the view has variables, a report reads the hierarchy with its own values, so a report for one season shows that season's members. A report that sets no value for a required variable gets no members.
- At most 1,000,000 rows are read. If the view has more, or cannot be read when a report runs, the field shows its values without the hierarchy and the crosstab says so, for example
hierarchy “Product lines” (its view has more than 1,000,000 rows) unavailable, shown flat. A hierarchy is never built from only some of the rows. Narrow the view, or give it a variable. - Preview tree lists at most 500 members. It applies the same 1,000,000-row rule as a report.
Attach a hierarchy to a field#
A hierarchy does nothing until it is attached to a field.
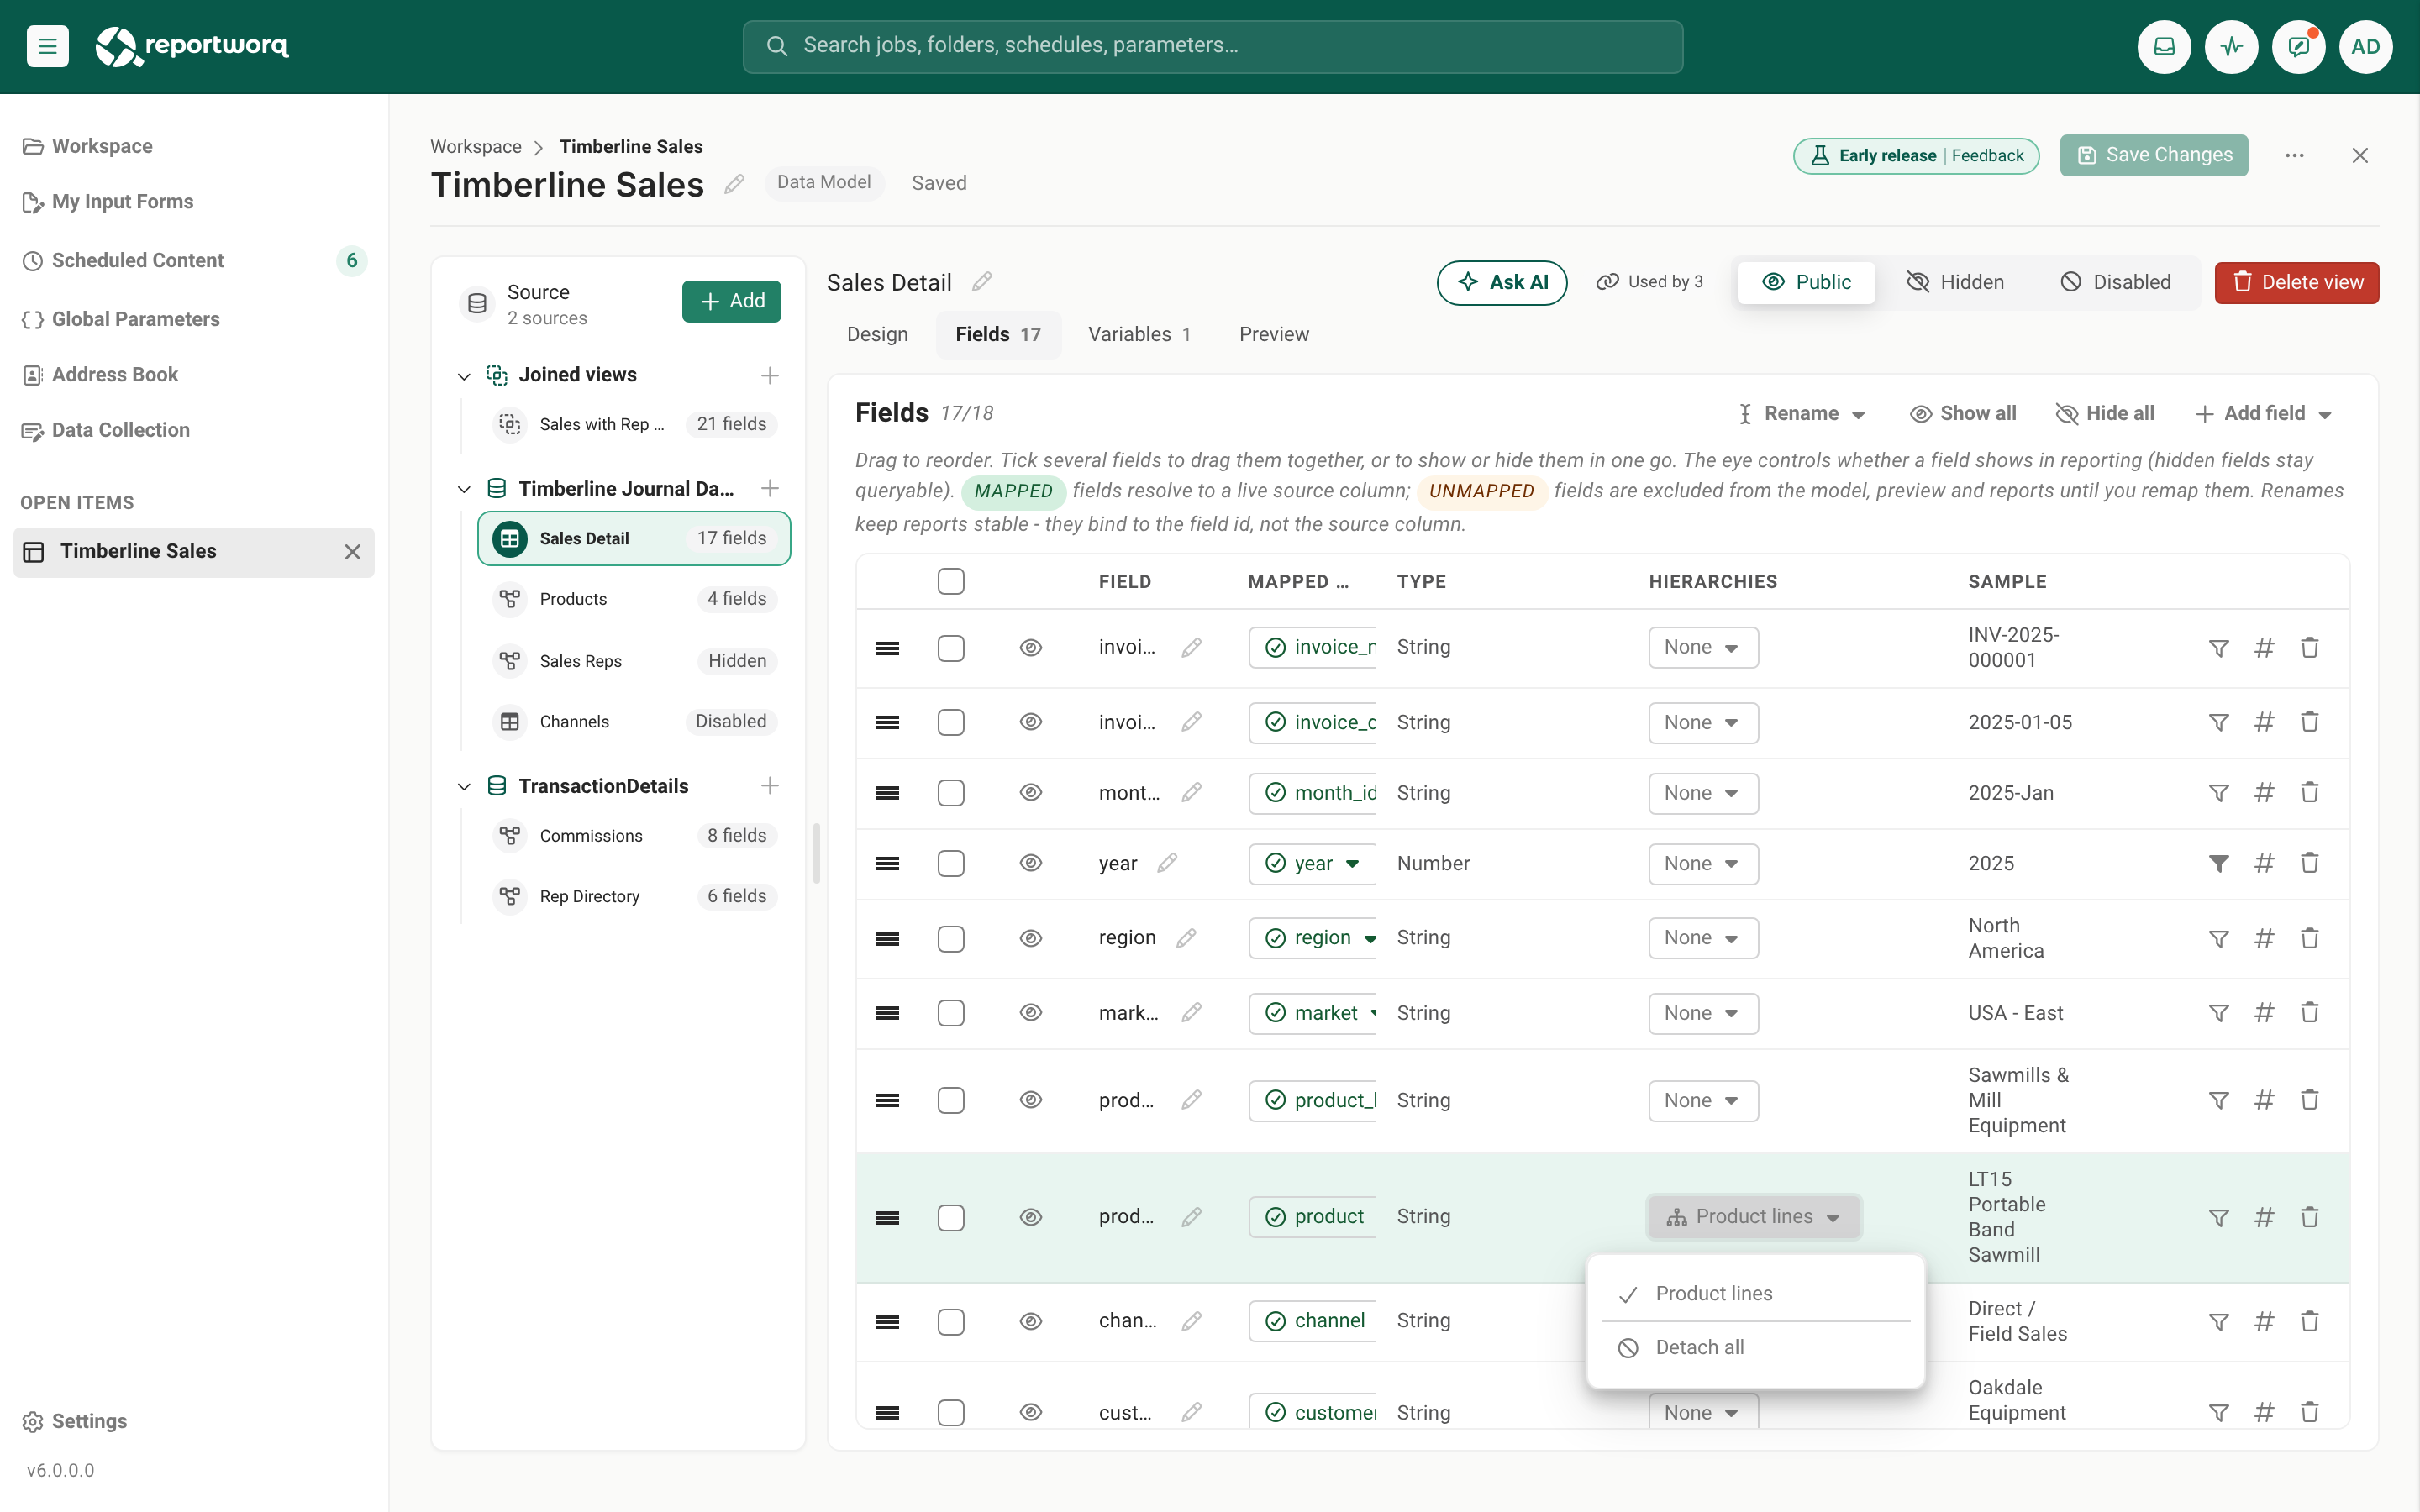
- Open a view of the hierarchy's source and select its Fields tab.
- In the Hierarchies column of the field, open the menu and tick the hierarchy. For a Levels hierarchy, attach it to its leaf field (
productin the example), because the leaves are that field's values. Detach all removes every hierarchy from the field. - Select Save Changes.
Notes on attaching:
- A hierarchy is attached to a field name on its source, so every view of that source with a field of that name gets it.
- A field can carry several hierarchies. A crosstab lets the author choose one, and a professional report uses the first one attached.
- The Hierarchies column appears on views of a single source. A joined view does not have one, and a joined view cannot be a Levels hierarchy's view.
Where a hierarchy shows up#
- Crosstabs in web reports and Explore. On a row or column field in the crosstab editor, open Hierarchy. Under Show as, choose None (field values) (the field on its own, the default) or one of its hierarchies. A field uses a hierarchy only where the author opts in. Groups are then shown with subtotals, and Expand to level controls how many levels are open. See Crosstabs.
- Professional reports. A member that names a group means its leaves together, and an expand lists its members in outline order. See Professional reports.
- Distribution jobs that run a web report use the same hierarchies, so a rolled-up crosstab looks the same in the output. See A web report as a job source.
- A burst keeps recipients apart. Each output lists only the members that have rows for that recipient, so one recipient never sees another's members.
- A value the hierarchy does not name is not lost. If a row has a value no leaf names, or a blank, it appears under Unassigned, and its numbers are still in every total above it.
Edit, move and delete#
- Edit on a row of the Hierarchies tab reopens it. Cancel, or the Hierarchies link at the top, asks
Leave this hierarchy without saving your changes?if you have edits. - Rename a field and the level follows. If you rename a field of the view a Levels hierarchy reads, the level is renamed with it.
- Move a Levels hierarchy to another source by editing it and choosing a view of that source. Reportworq refuses, and says why, while the hierarchy is attached to fields (detach it on the Fields tab first), when the other source already has a hierarchy of that name, or when that source has a problem. A Manual hierarchy stays on the source it was created on.
- Delete asks
Delete the hierarchy “<name>”? Fields it is attached to lose it.and removes the hierarchy with its attachments. - Delete a view a hierarchy reads and the hierarchy keeps its definition but has no members until you edit it and pick another view. The delete confirmation says so.
- Copy, export and import carry hierarchies with the model. A Levels hierarchy follows its view to the copy's own view.
Ask AI can propose hierarchies#
Ask AI on the Source screen can propose Levels hierarchies with its suggested views: a dedicated view of one table and its level columns, the levels leaf first, and the fields to attach it to. Add creates all of it unsaved in your editing session, exactly as if you had made it here. The assistant never writes SQL for a hierarchy's view. Preview the tree before you save, because the assistant does not compare leaf values with your field's values. See Data models.
Notes and limits#
- Hierarchies roll up in web reports, Explore, professional reports and the jobs that run them. The Excel add-in's own list reports do not use them, and crosstabs on a cube use the cube's own hierarchies.
- A joined view cannot carry a hierarchy. Attach it on a view of a single source, or build the Levels hierarchy from the input view.
- Mixed versions. An older version of Reportworq that saves a model drops a Levels hierarchy's definition. Upgrade every server that shares the model before you build one.
- Manual leaves must match the field's values. A leaf the data does not hold is harmless, and a value the outline does not name falls under Unassigned.
- Hierarchies are saved with the model. Nothing is stored until you select Save Changes on the model.
Going deeper. To join sources first and group afterward, see Join views across sources. For the full tour of the Source screen, see Data models.
Feedback on this page
Comments, questions, requests, or something missing or unclear? Email us - the page you are on is filled in for you.
Email feedback on this pageOr write to support@reportworq.com directly.