
Choose the source workbook and worksheets#
Every Reportworq report renders one or more source files, Excel workbooks or PowerPoint templates, into output. The Reports step of the Job Editor is where you choose those source files and pick which of their worksheets the report outputs, and in what order. This is the first thing you do when building a report.
The worked example is a monthly P&L pack built from one workbook that holds a summary tab, detail tabs, and a hidden lookup tab.
Before you begin#
- Open the report in the Job Editor and select the Reports step. A new report starts empty and shows "0 reports, 0 sheets."
- A report provider (a configured source-file location) with at least one source file must exist. If none is configured, Add a Report tells you there are no report providers. Ask your administrator to set one up, or upload a file from within the dialog.
What you can use as a source#
Excel is the report. .xlsx, .xls, .xlsm, and .xlsb are all accepted, and this is the file
Reportworq refreshes, parameterizes, and renders.
You can also attach PDF, Word, and PowerPoint files, and it is worth knowing what they do before you
plan around them. A .pdf, .docx, or .pptx added as a source is appended into the job's PDF
output. Reportworq does not edit or refresh them, and the Excel render pass ignores them entirely, so
they only appear when the job produces a PDF. That makes them right for fixed front matter, a cover page,
standing notes, or terms and conditions that travel with every pack. It makes them wrong for anything
that needs to change with the data.
Encrypted Excel workbooks are not supported as sources. Remove the encryption before you add the file.
Add a source workbook#
On the Reports step, select Add a Report.
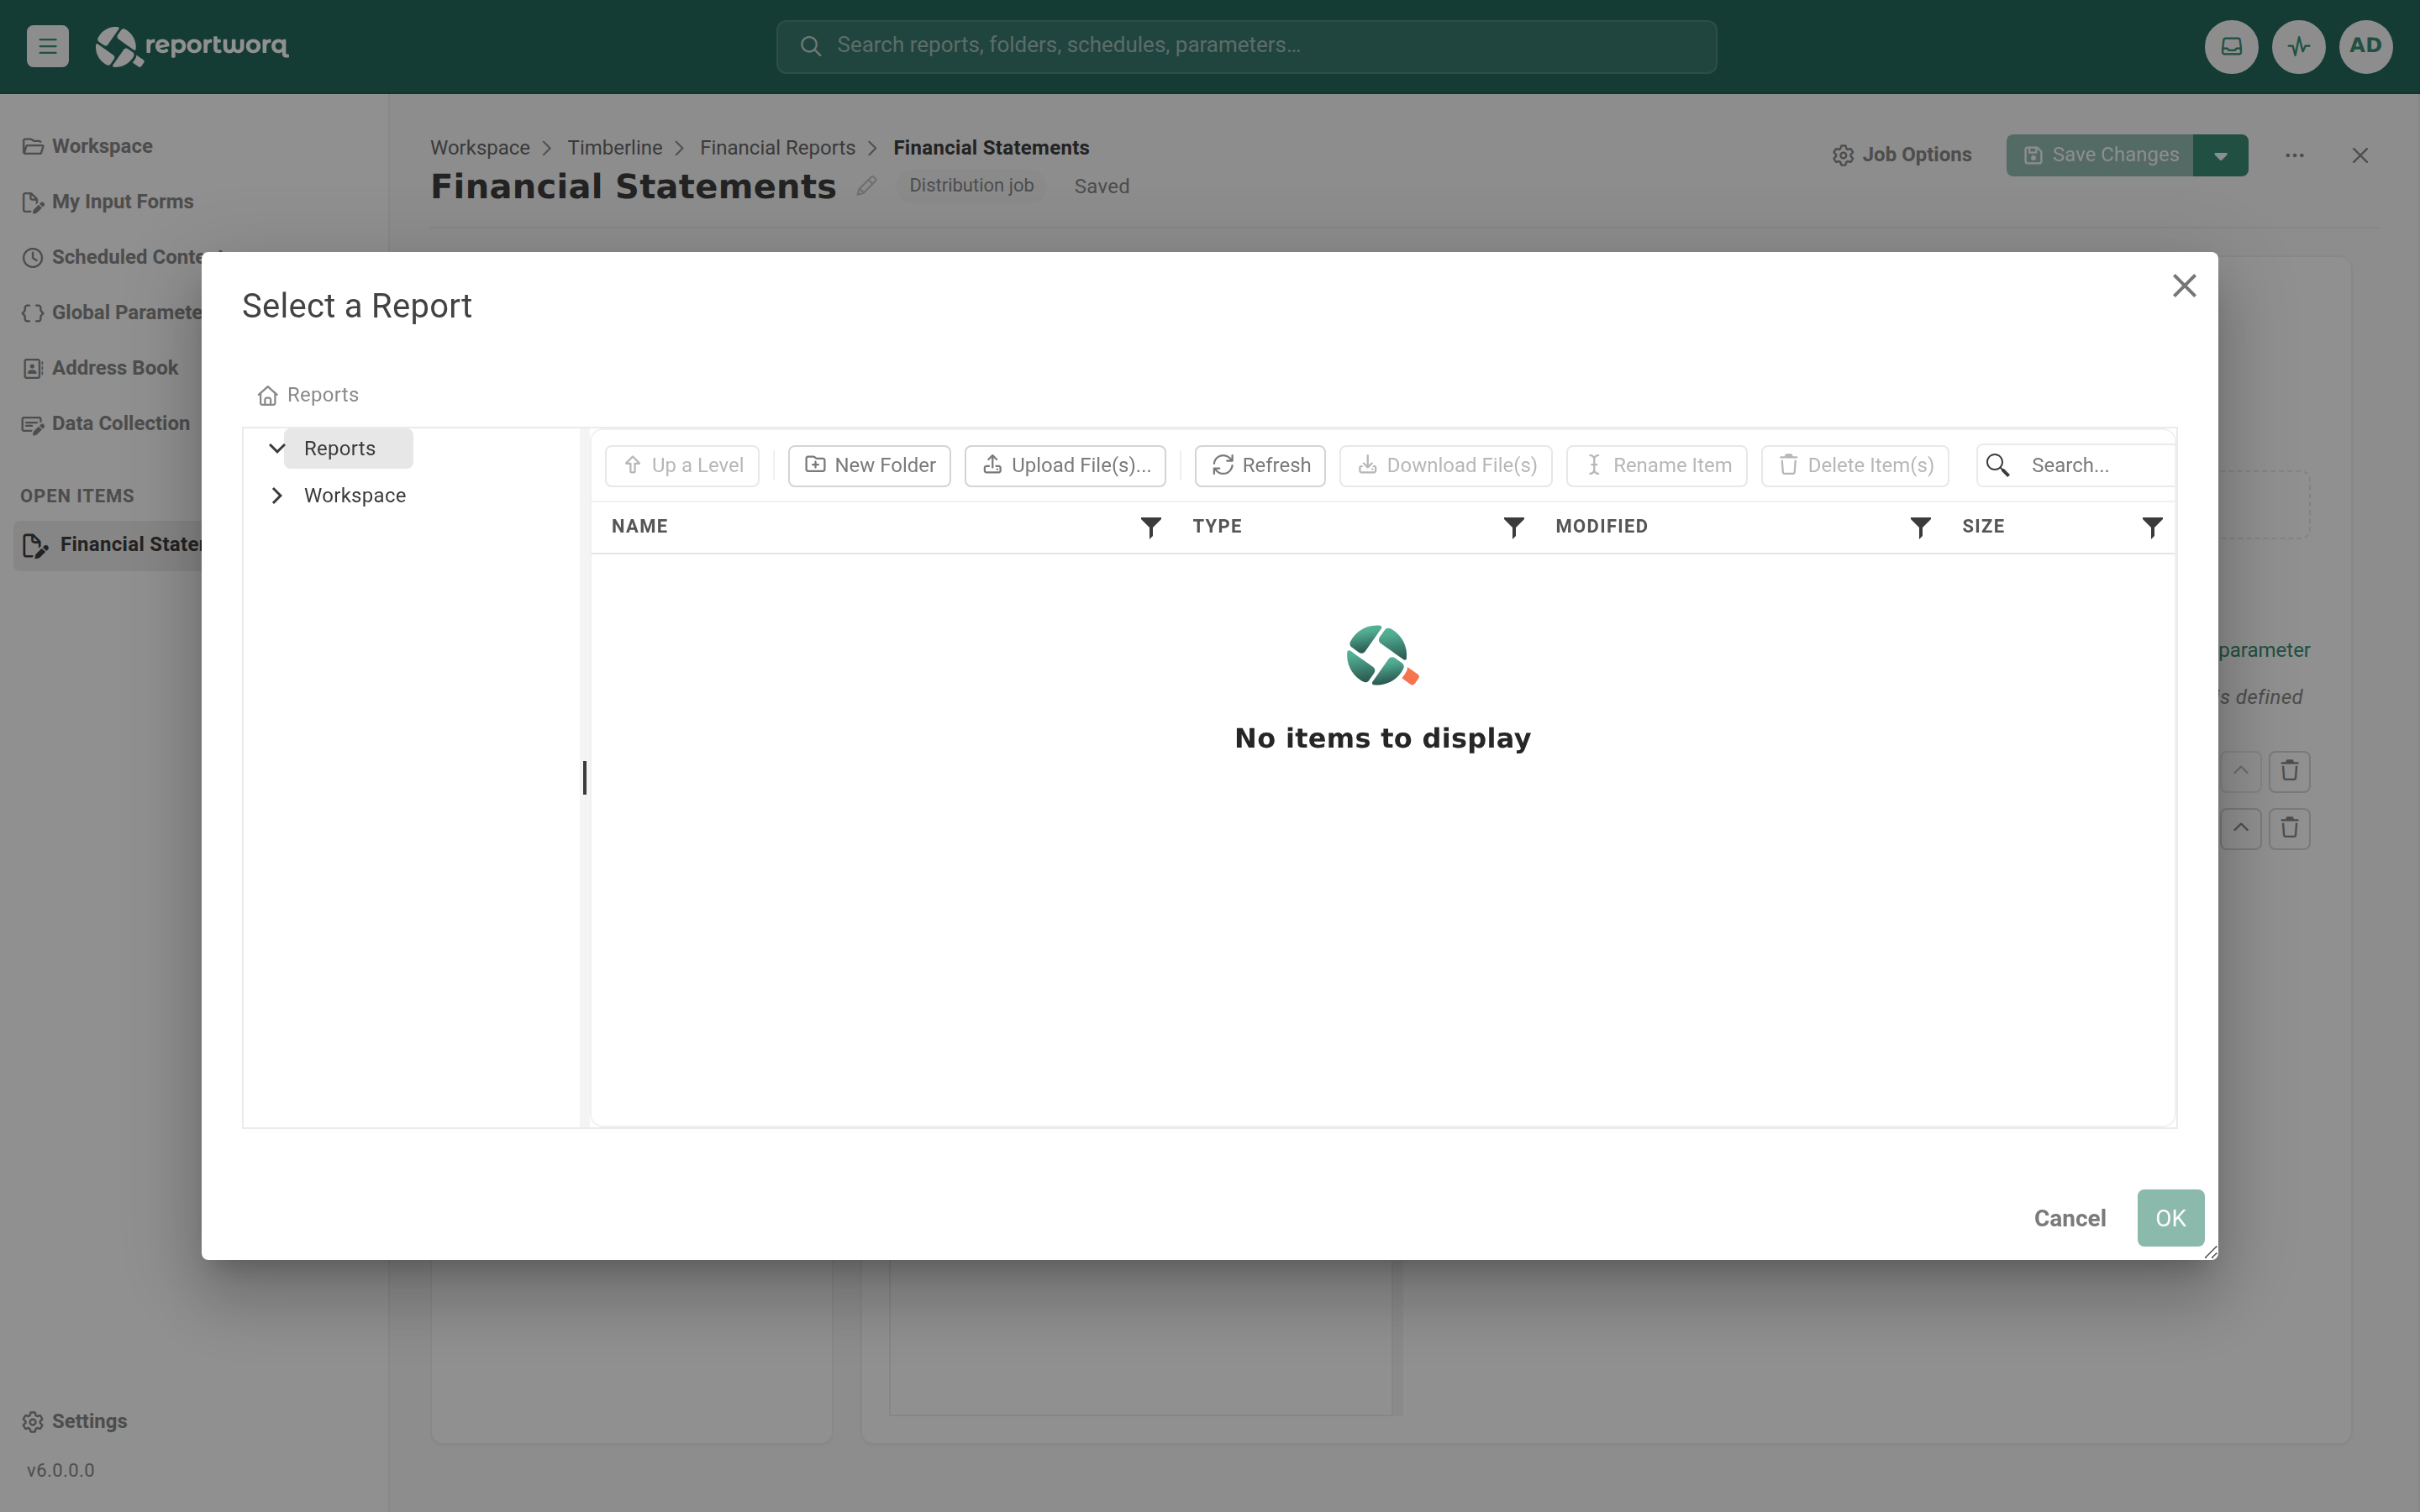
In the Select a Report dialog, browse the report provider's folder tree and select your source file, for example
Monthly_PnL.xlsx. The dialog shows the same folders, names, and permissions as the Workspace file browser.Select OK.
To bring in a file that is not yet in the provider, use Upload File(s)... inside the dialog. Upload honors the provider's allowed file extensions. Uploading a
.zipprompts you to extract it (which recreates the archive's folder structure) or store it as a single file.
Choose the worksheets to output#
Once a source is added, its worksheets appear as a checklist.
- Select the checkbox next to each worksheet you want in the output. Clear the checkbox for any worksheet you want to leave out.
- Drag the worksheets into the order you want them rendered. Included worksheets are output in list order.
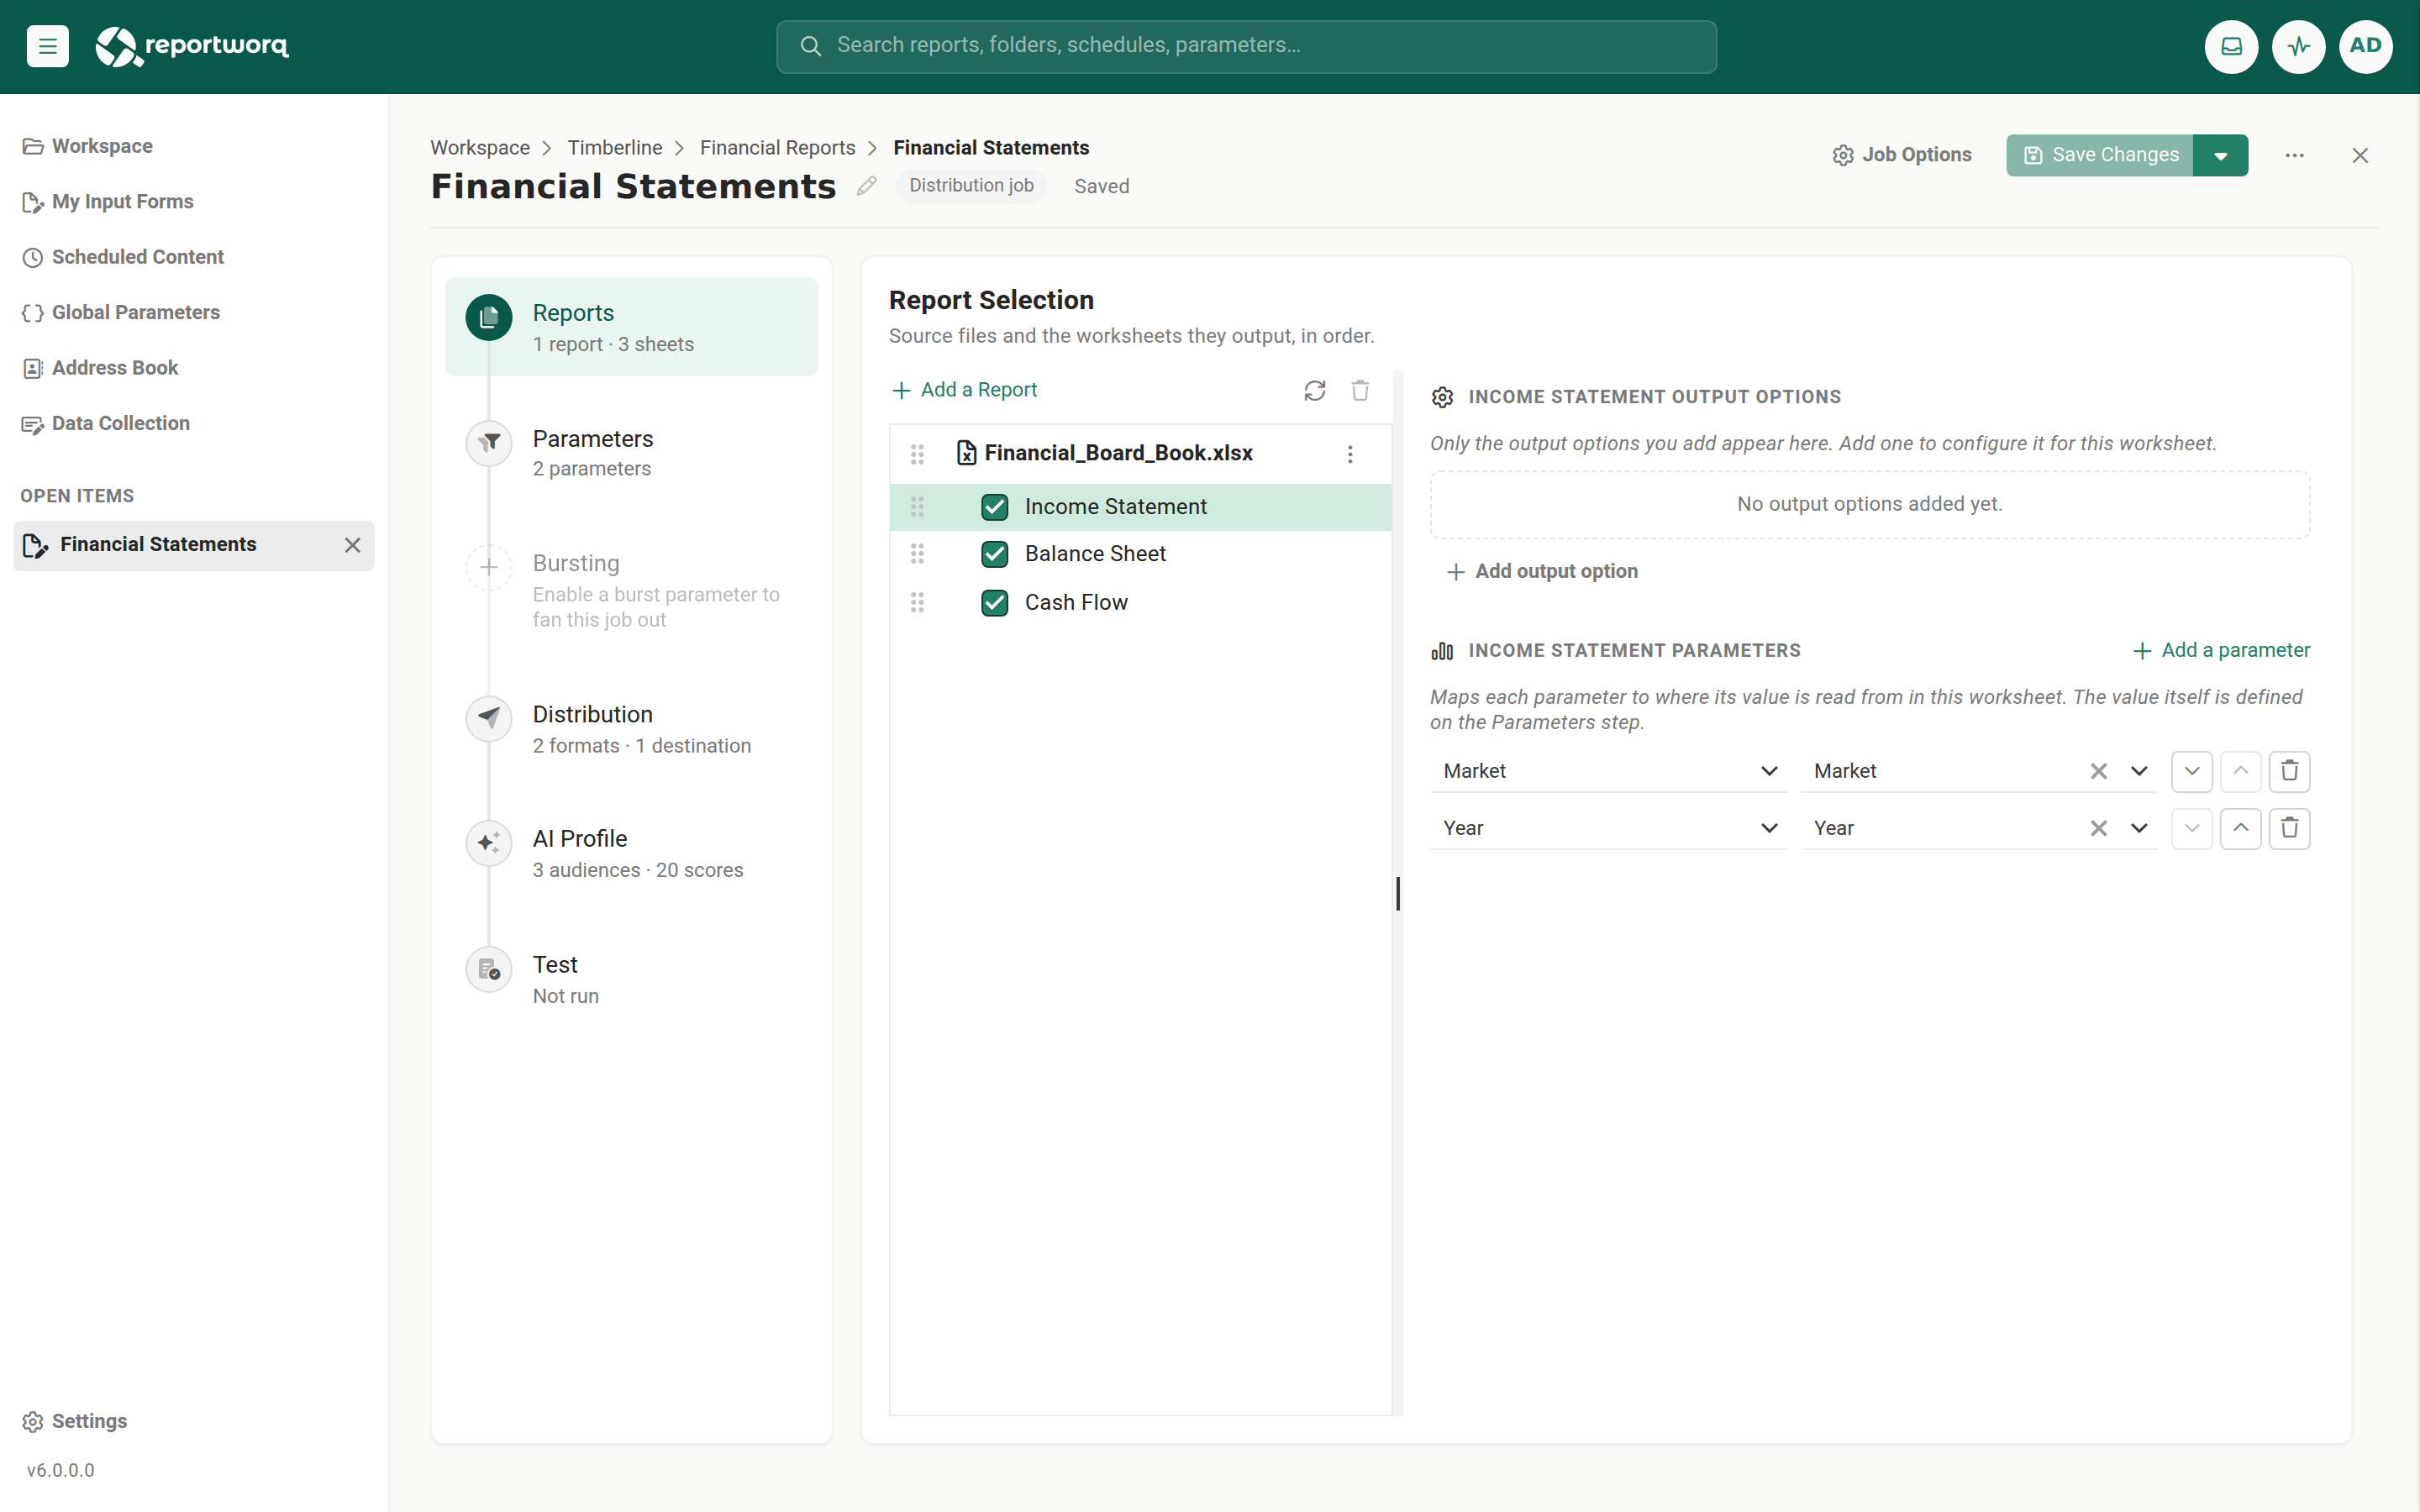
A report can hold multiple source files. Add each one with Add a Report; each contributes its selected worksheets to the output in sequence, so you can combine tabs from two workbooks into a single report.
Each included worksheet also exposes an Output Options panel and a Parameters mapping panel. See Worksheet output options and Parameterize a report.
The most common mistake here is mapping a parameter to the wrong worksheet. A workbook with several similar tabs makes it easy to map
Regiononto the summary sheet when you meant the detail sheet. It fails quietly: the report generates, the parameter resolves, and the numbers are simply not filtered the way you intended. After mapping, run the Test step and check the value landed on the sheet you meant. See Parameterize a report.
Manage a source file#
Each source file has a context (the ...) menu with these actions:
- Open, Download, Rename, Properties, Remove.
- Relink re-points the source to a different file, for example after the file has moved.
Notes and limits#
- Excluded worksheets still calculate. An unchecked worksheet is removed from the output before distribution, but it stays in the workbook during calculation. It can still feed the visible tabs through formulas, lookups, commentary, imagery, or Cell Value message and file-name variables. Use a hidden calc or lookup tab to drive visible content without shipping the tab itself. In short: compute here, do not ship.
- Encrypted Excel workbooks are not supported as sources. Remove workbook encryption before adding the file.
- File and folder names in the report provider cannot contain
< > : " / \ | ? *. Uploading, renaming, or creating a folder with one of those characters is refused with a message naming them, on every host operating system. Rename the file before you upload it. - Cross-workbook formulas resolve only when the workbooks are co-located. A formula in an Excel source can reference another workbook only if that other workbook sits in the same folder as the source file, within the same Network Share report provider. Co-locate referenced workbooks, or the references break at render time.
- Map the replicating parameter to every worksheet that must replicate. This is the rule behind copying worksheets as a group. When a parameter replicates a worksheet (East, Central, West) and a second worksheet references it, map that same parameter on both worksheets, even if the second one does not need to display the value. Reportworq then copies the related worksheets together and rewrites intra-workbook cross-sheet formula references, and pivot-table data sources, to point at each copy's own sibling rather than the original. Map it on only one worksheet and the other will not replicate with it, so every copy keeps reading the original. Copying as a group is on by default; an administrator can toggle it at Settings, Configuration, Reporting, Advanced Features, Enable copying worksheets as a group. Worked through in Parameterize a report.
Going deeper. To make one report serve many periods, entities, and recipients, add parameters. See Parameterize a report.
Feedback on this page
Comments, questions, requests, or something missing or unclear? Email us - the page you are on is filled in for you.
Email feedback on this pageOr write to support@reportworq.com directly.