
Fill in and submit a form#
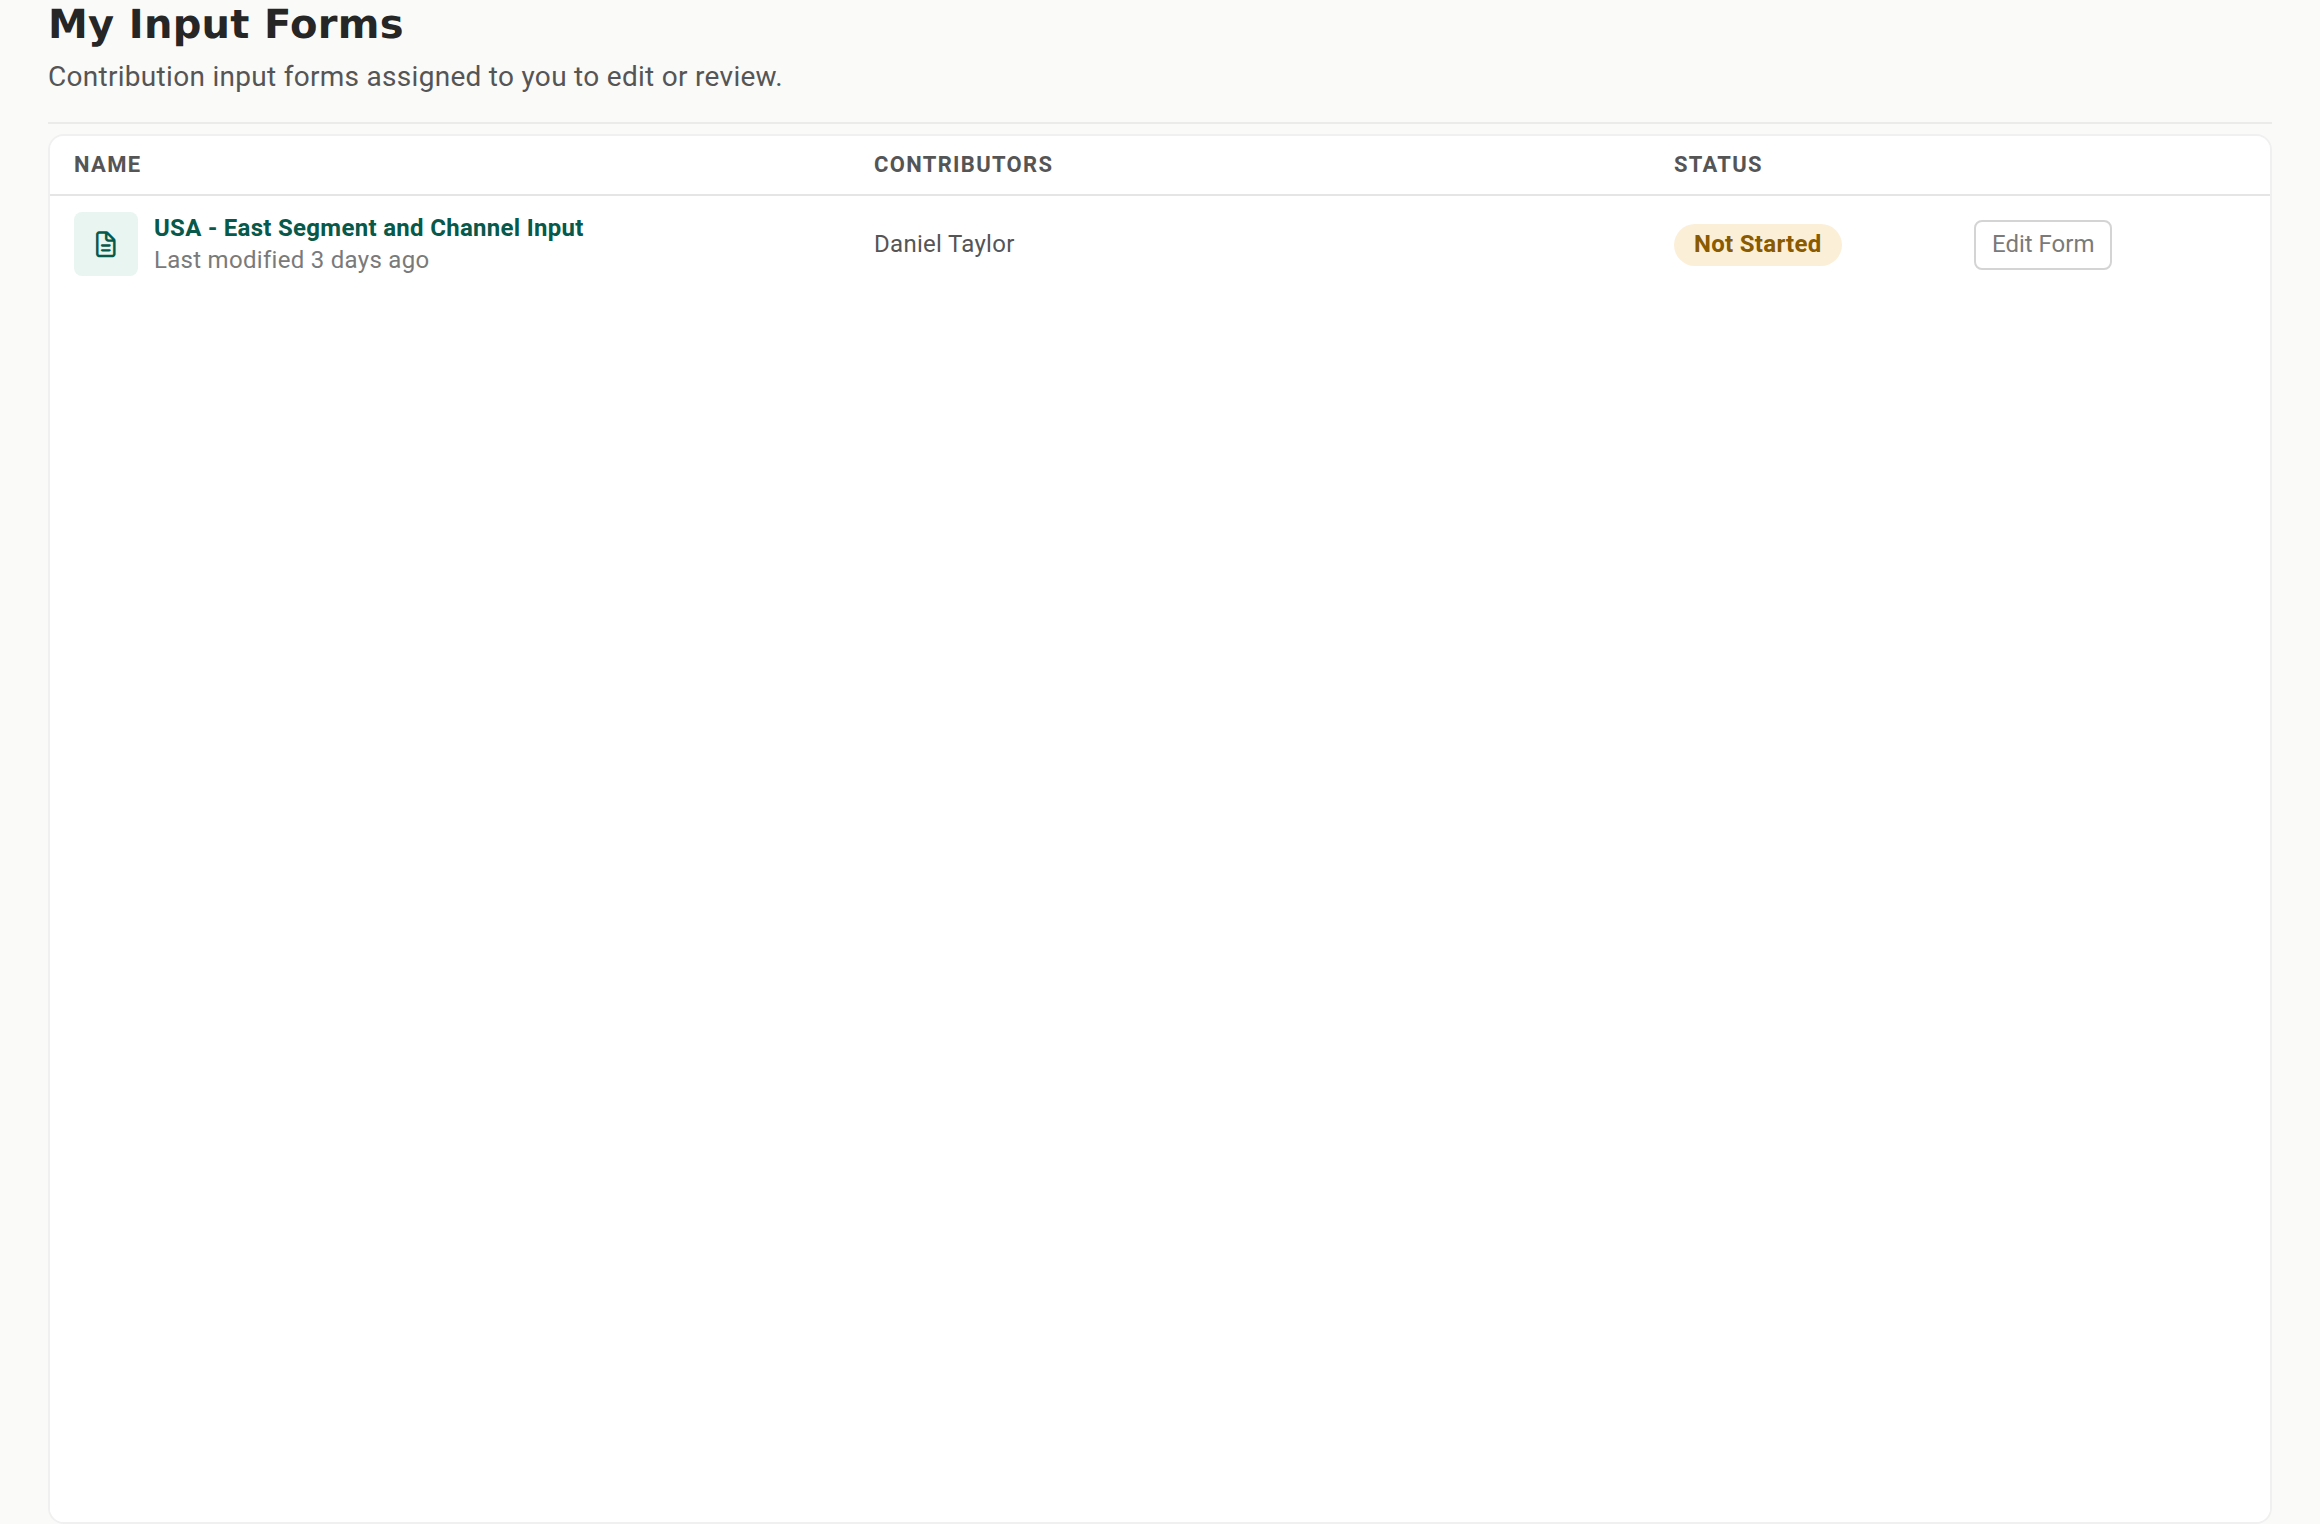
When someone adds you to a contribution campaign, your forms appear in My Input Forms. Each form is an Excel-based worksheet rendered in your browser: you type into input cells, use the tools on the toolbar above the grid, clear anything the form flags, and submit. This page is the contributor's task guide; if you are building the campaign, see Author a contribution campaign.
Before you start#
- You are assigned to a form as a contributor or an approver. Until then, My Input Forms shows an empty state.
- Open My Input Forms. A form you own opens as Edit Form; a form you only review opens as Review Form.
A quick tour of the form#
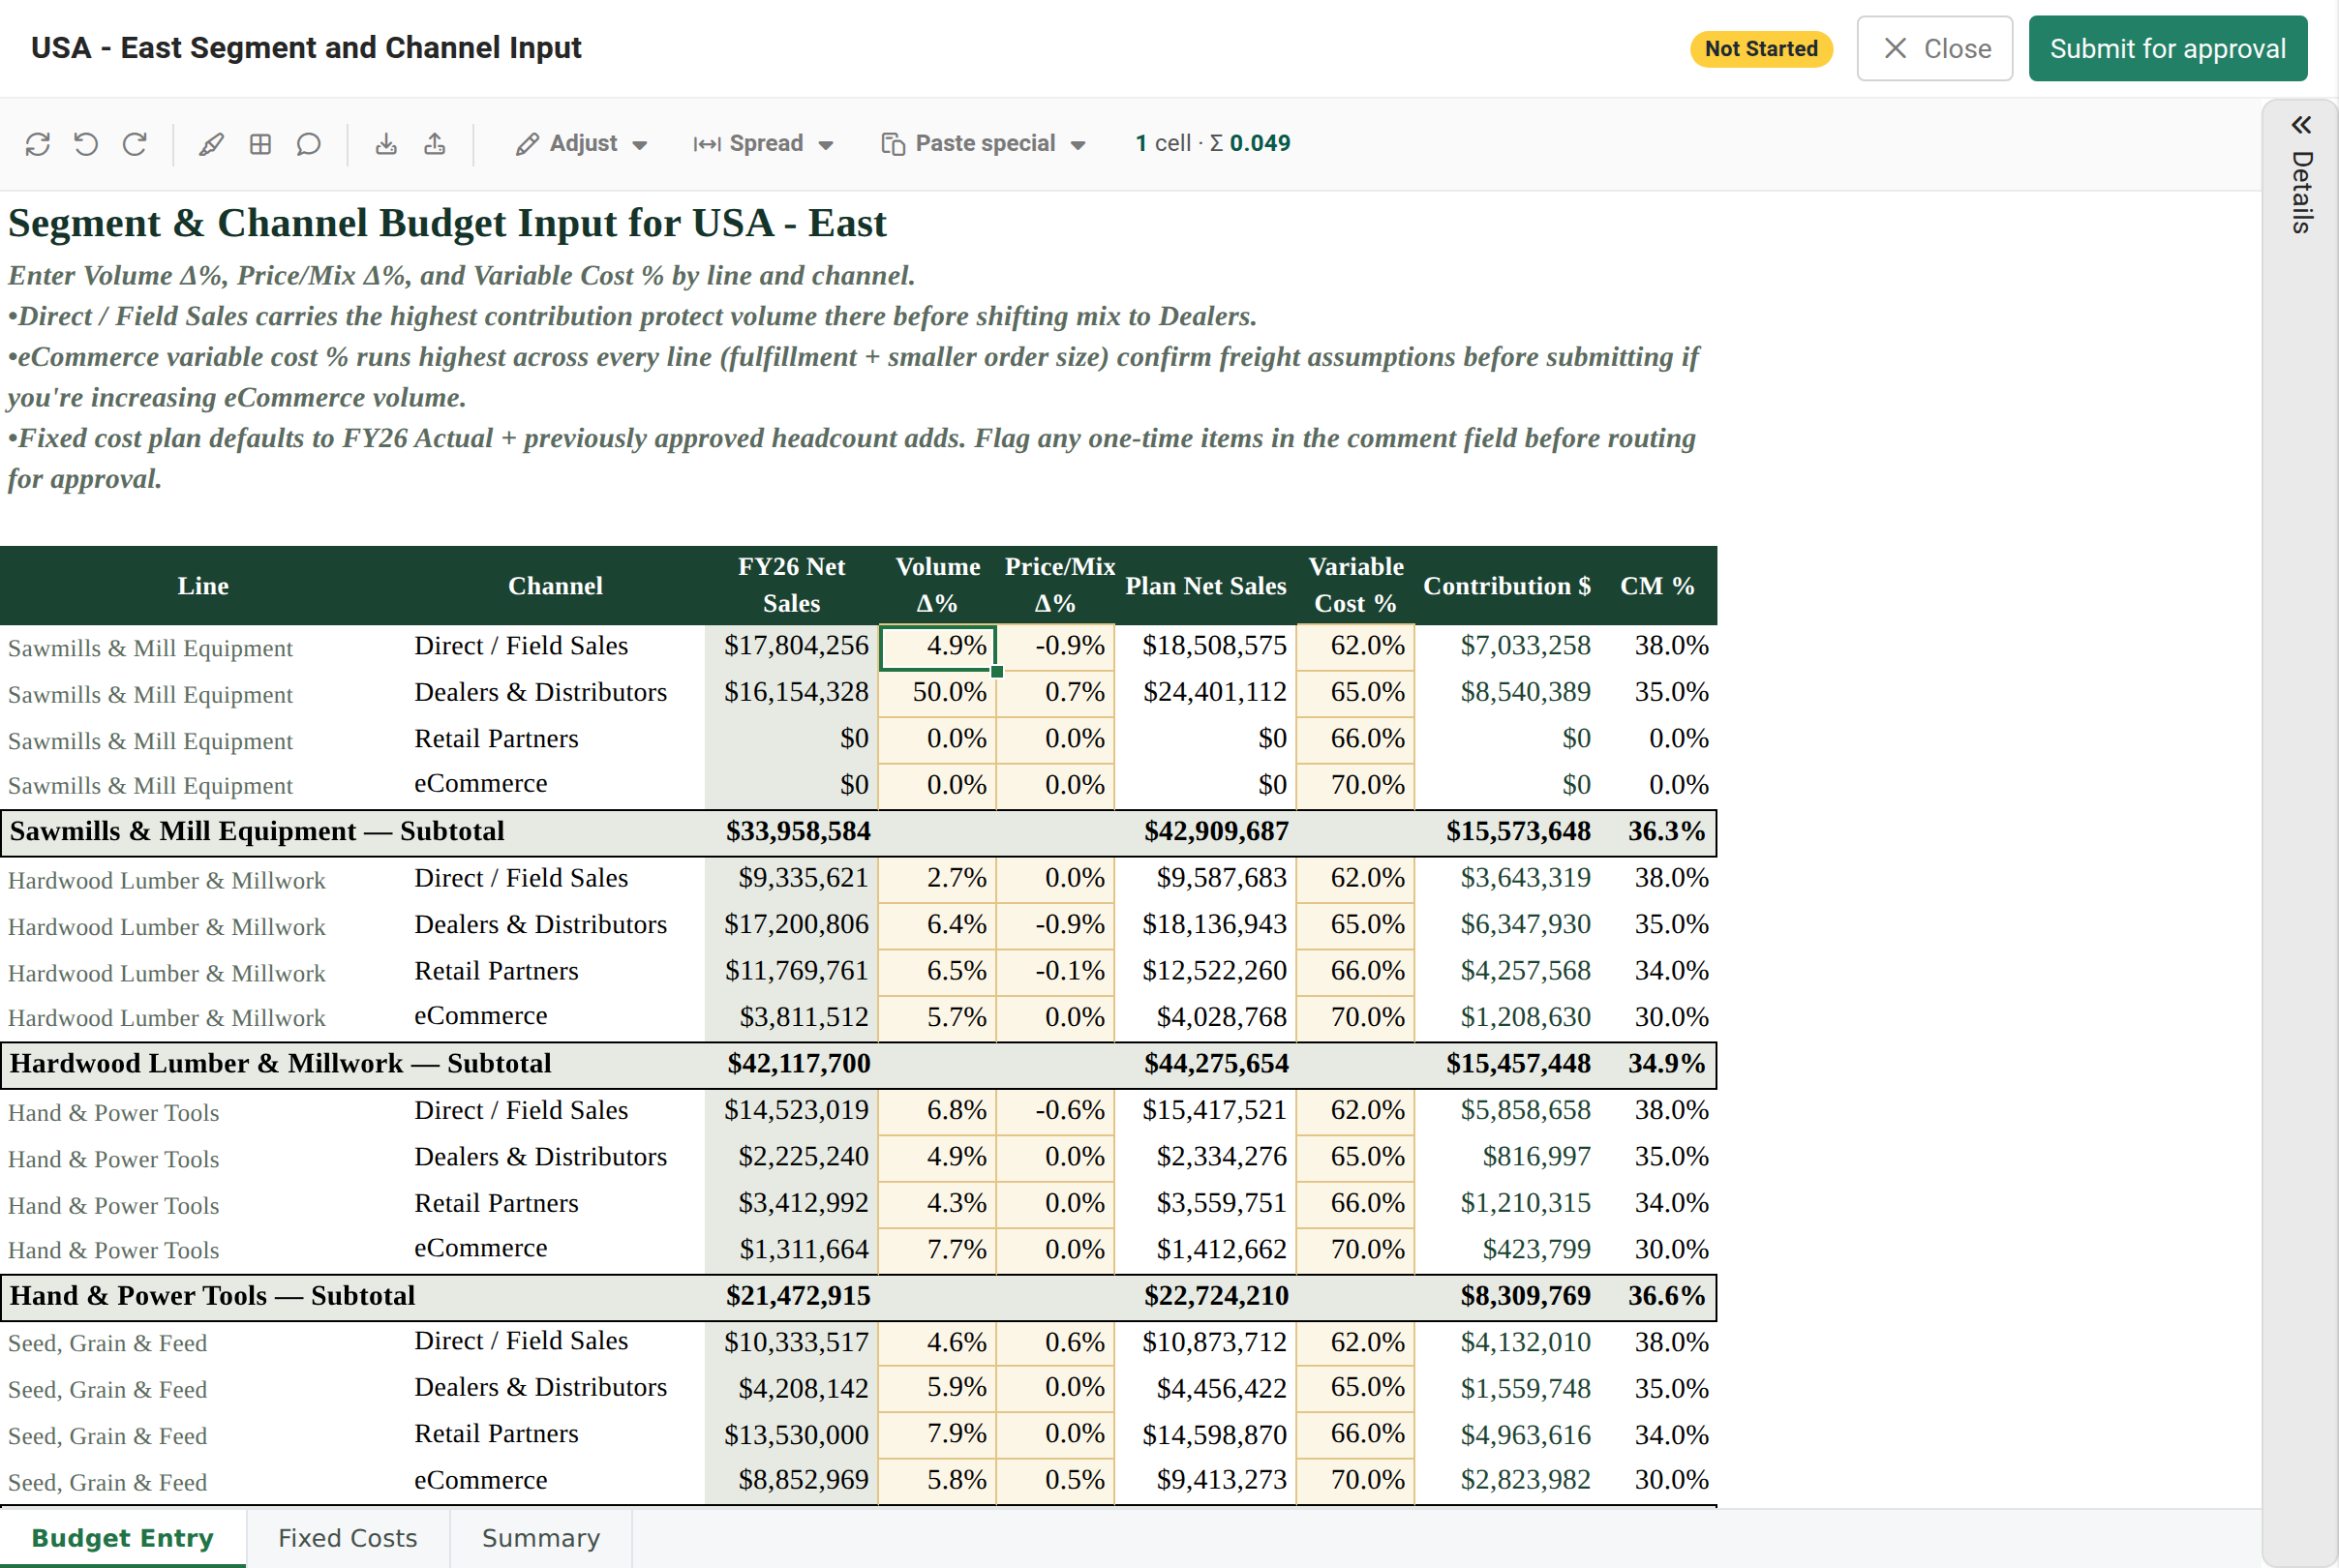
An open form has three regions:
- The planning toolbar runs across the top, above the grid. It holds the quick tools (Recalculate, Highlight, Gridlines, Undo, Redo, Comment), the Adjust, Spread, and Paste special operators, a live selection summary, and the workflow actions (Submit, or Approve and Reject).
- The grid fills the middle. Input cells you can edit are tinted; calculated rows are read-only. Sheet tabs sit along the bottom.
- The Details dock is a slim rail on the right. It is collapsed by default; open it to read the workflow status, the history thread, and a per-cell list of your changes and validation. See Track your work in the Details dock.
Fill in the form#
- Select a form from the list to open it.
- Select an input cell and type. Press Enter to commit the value, Escape to cancel the edit, or Delete to clear a cell. Edited cells show a modified marker.
- Use the form's built-in controls where they appear:
- A checkbox cell toggles a value on or off.
- A dropdown (list) cell offers a set of allowed values.
- A filter control scopes the visible rows. It has a search box; once you apply criteria, Select All relabels to Select All Selected, and you can pick several criteria together.
- Navigate large forms with the row and column groups (collapse and expand the gutters) and the frozen panes that keep headers in view. Select ranges with Shift+arrow and Ctrl+Shift+arrow, as in Excel. Shift-click or Ctrl-click cells to build a multi-cell selection for the operators below.
Use the planning toolbar#
The toolbar above the grid is where you do the planning math. It appears when the form allows editing.
Quick tools#
Left to right:
- Recalculate re-runs the form's calculations. In manual-calculation mode, this is how you apply buffered edits (see Notes and limits).
- Highlight input cells is a toggle that tints every cell you are allowed to edit, so you can see at a glance where input is expected.
- Toggle gridlines shows or hides the grid lines.
- Undo and Redo step back and forward through your edits.
- Comment adds or opens a note on the selected input cell. Select an input cell first; if none is selected, the form prompts "Select an input cell to comment." A cell that carries a comment shows a bookmark you can reopen from the Details dock.
Operators: Adjust, Spread, and Paste special#
Select one or more input cells, then open an operator dropdown to apply a bulk change. The selection summary next to the operators reads N cells · Σ total (and "no input cells" when nothing is selected), so you always know what a change will touch.
- Adjust changes each selected cell in place: Set to, Add / subtract, Multiply, Uplift % (grow or shrink by a percentage), Round to (round to the nearest multiple), and Clear.
- Spread distributes a figure across the selection: Equal, Proportional (in the same ratios as the current values), Straight line (interpolate from a start to an end value), and Growth % (a start value, then compound each next cell).
- Paste special reworks a copied range as you paste it: Paste + %, Paste + add, and Paste × factor. These need a range on the clipboard, so Copy first; otherwise they stay disabled.
Choosing an operator opens a short param form: a numeric field (or two) and a live preview that shows how many cells will change and the new total (→ N cells · new Σ …) as you type. Select Apply (or press Enter) to make the change, or Cancel (or press Escape) to close without changing anything. Clear applies immediately with no param form. Each applied operator shows a brief confirmation, for example "Uplift % applied to 4 cells." Operators that the current selection or clipboard cannot satisfy stay disabled.
Clear validation before you submit#
Some cells carry validation rules that surface as markers:
- A blocking marker (red) means a required rule has not passed, and Submit stays disabled until you fix it. The dock's Workflow banner reads "Validation errors are blocking the submission of this form," and the Details tab reads "Validation errors are preventing the submission of this form."
- A warning marker is advisory and does not block submission.
The Details rail badge turns orange and shows the blocker count whenever blockers exist, so you can see there is something to fix without opening the dock. Open the Details tab to see each flagged cell, then fix the value each blocker points at until the count clears. The toolbar's Submit button also shows the reason it is disabled, for example "3 blockers."
Copy and paste#
Paste works, with rules worth knowing:
- Copy and paste a single cell or one contiguous rectangle only. Non-adjacent (multi-block) selections cannot be pasted.
- A paste anchors at the top-left of the target and fills down and right.
- Non-editable cells are skipped. If your copied rectangle covers a mix of input and locked cells, values land only in the input cells and the rest are silently skipped. There is no error, so check that everything you intended actually landed.
- Cross-application paste is supported: you can copy from Excel or Notepad into the form, and out of it.
- To transform a copied range as you paste it (add a percentage, add an amount, or multiply), use the toolbar's Paste special operator instead of a plain paste.
Track your work in the Details dock#
The Details dock on the right is where you read status and drive the workflow. It is collapsed by default to a slim rail labeled Details with a count badge; the grid uses the width until you open it. Select the rail to open the dock, and select the collapse control (») in its header to close it again. Reportworq remembers your choice the next time you open a form.
The open dock has two tabs.
Workflow tab#
- A status banner at the top shows the current workflow message. If the form is locked by someone else it reads "Form Locked. This form is being edited by another user," with an Unlock Form action; if validation is blocking submission it says so; otherwise it shows the campaign's own message.
- The System msgs and Grouped chips filter and group the automatic (system) entries in the thread.
- The history thread lists the workflow so far, oldest to newest: who acted, the action (Assigned, Submitted, Approved, Rejected), their note, and when.
- A composer is pinned at the bottom. Type a note under "Enter a comment below," then use Submit (contributor) or Approve / Reject (approver). Recall Form appears here too when you can recall. These buttons are gated the same way as the toolbar's, and show the reason when disabled.
If you only review a form (no submit, approve, or recall permission), you see the history thread but no composer.
Details tab#
The Details tab lists your changes and validation, grouped per sheet as a collapsible "{Sheet} ({count})" header. Each row shows:
- A command on the left: undo this change, revert the cell to its submitted value, or (read-only) a formula marker.
- A validation status icon: a blocker, a warning, or a passing check.
- A clickable cell reference that jumps the grid to that cell, switching sheets if needed.
- A comment bookmark if the cell carries a note.
- A value line, "Value is 'X', was 'Y'," and "Last modified by" the person who changed it.
Settings menu#
Select the gear (⚙) in the dock header for form settings:
- Switch to HTML Grid / Switch to Server Grid changes the render engine (the label reflects the current one).
- Reset Form reverts every change back to the starting point (this is destructive and asks you to confirm).
- Show / Hide System Messages and Group / Ungroup System Messages control the automatic entries in the Workflow thread, matching the System msgs and Grouped chips.
Submit, and what approvers do#
You can act from either the toolbar or the dock composer.
- When the form is complete and no blockers remain, select Submit for approval on the toolbar (or Submit in the composer).
- From the toolbar, a small comment popup opens where you can add an optional note before you confirm. The composer sends the note you already typed there.
- If you need to withdraw a submission, select Recall Form.
When the campaign uses approvals, an assigned approver opens the submitted form and selects Approve or Reject; the Workflow banner names who submitted the form and prompts them to review it. Reject is styled as a destructive action and, like Submit, opens a comment popup to explain the decision; the form then returns to the contributor to revise and resubmit. Only one approval is needed to close a form, no matter how many approvers are assigned.
Comments save only when you submit#
This is the trap to remember. A workflow comment is saved only on a workflow event, that is, on Submit, Approve, Reject, or Recall. Closing a form saves your data work in progress but not an unsaved workflow note. If you type a note in the composer and close the form without submitting, the note is lost. Submit (or approve, reject, or recall) to keep it. (Cell comments added with the toolbar's Comment tool are attached to their cells and are separate from the workflow note.)
Your data is safer: undo and redo history persists across sessions, and a session that times out on inactivity saves your modifications first ("Your contribution session has automatically ended due to inactivity. All modifications have been saved safely.").
Notes and limits#
- A form can be locked while someone else edits it. The dock's Workflow banner shows the lock and an Unlock Form action, which overrides the lock, so coordinate before you take it.
- Reset Form (in the dock's Settings ⚙ menu) reverts every change to the starting point.
- Export and Import to Excel (Download and Upload in the header) are available when the campaign allows them. You can export the form, edit it offline, and import the edited workbook back.
- In manual calculation mode, your edits are buffered and only recalculated when you ask. The dock shows an amber callout, "{N} uncommitted edit(s) · Recalculate needed," and Submit stays disabled until you press Recalculate on the toolbar.
- A blocking validation marker always prevents submission; a warning never does.
Going deeper. The input cells, checkboxes, dropdowns, filters, and validation you see are defined by contribution formulas in the source workbook. See Contribution functions.
Feedback on this page
Comments, questions, requests, or something missing or unclear? Email us - the page you are on is filled in for you.
Email feedback on this pageOr write to support@reportworq.com directly.